Why oh why!

Why, some people ask, should I pay a photographer hundreds of dollars for some shots that Uncle Fred can do for free?

A fair question. It is clearly not that the photographer is getting rich. So what do you get for your money when you hire a photographer?

Here’s what.

  1. Knowledge. I have heard it say that it takes 10,000 hours to become an expert at anything, from brain surgery to plumbing. I can believe it – I spend every hour shooting or learning about it even today. A working photographer has the hours of learning needed to ensure success.
  2. Practical experience. It is unlikely that, when you hire a pro for, say, an important event, it is the first time he or she has shot that type of event.
  3. Artistic insight. Unlike Uncle Fred, the pro knows how to compose your photos. He or she will not put every subject in the centre: instead, you will get artistic photos.
  4. Equipment. A pro has the right gear for the job. My $15,000 worth of cameras, $10,000 worth of lenses and $10,000 of other equipment means something. It means that your shots will be tack sharp. It means that if we need a wide angle lens, we have it. It means backgrounds can be blurred out by large apertures. It means that if the shot involves low light, we will get it without motion blur. It means the cameras will work in the rain. It means that each shot can be written to two memory cards at once, so that if one breaks, the shot is safe. It means the colours will be right.
  5. Post-production work. The pro knows how to finish the shots in post-production. Cropping, exposure adjustments, skin blemish fixups: often, a one-hour shoot means two hours of finishing, exporting, and uploading. Do not underestimate that: half the work is in the post.
  6. Reliability. You can be assured that the pro will show up as promised, when promised…

And that is why a pro deliver substantially better photography service – and better photographs – than dear old Uncle Fred can. You are not buying prints: you are buying expertise – and in the end, results.

And that is what matters. Your event, your child, your product: a good photo makes it last forever,which presumably is worth the minor expense of doing it right.

KISS – Keep It Simple, S.

This picture shows that you do not need a studio with much equipment, necessarily.

I used a Canon 1D Mark IV camera with a 580 EX II speedlite.

And that’s it. Really.

I had the camera on 400 ISO, manual, 1/60th second, f/4. TTL did the rest with the flash.

The flash which was of course pointed behind me, giving “light from 45 degrees above”. Leading to pictures like the one above, and this:

Which when you zoom in enough shows you The Man In The Pupil:

..which of course is me.

Can you see how my flash aimed backward makes a pattern on the ceiling that looks like an umbrella? That’s the  entire point!

Sometimes very simple equipment is al you need for professional work.

Me in 1982

In Nineveh…

At the spiral minaret in Samara…

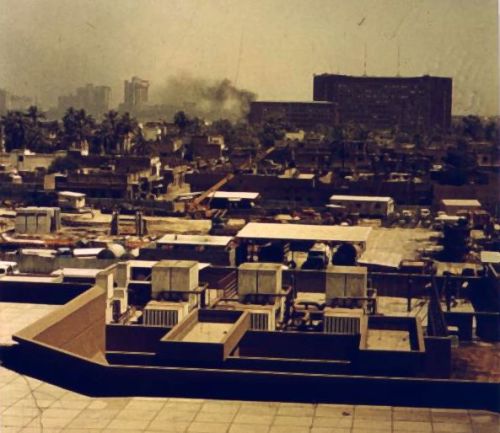
And after a ministry in Baghdad was bombed:

That picture, taken from my room at the al-Mansour Melia hotel, got me interrogated by security… but they were kind enough afterward to actually give me back my developed slide film. I must be the only person to have had their film developed by Saddam’s security men.

Lightroom Tips

Two Lightroom performance tips for you today:

  • Optimize your library regularly. On a Mac, go to “Lightroom”, “Catalog Settings..”, and select “Relaunch and Optimize”.
  • Increase your Camera RAW Cache size to at least 10 GB (if your hard disk has that much size available). On a Mac, go to “Lightroom”, “Preferences”, and set Camera Cache size to 10 GB or more.

This will keep your Lightroom installation working more quickly.

New toy

Just received the new Honl Photo bounce card/speed snoot.

It is like the previous ones in that it is small, sturdy, and conveniently attaches to the Speed Strap.

What’s different?

This one has not a white but a gold reflector (equivalent to 1/4 CTO).

That means I can use it to:

  • Shoot with flash in Tungsten ambient light without making the background warm or the subject too blue; or
  • Warm up portraits with a nice warm glow.

Yet another thing to make my light-life easier.

I am going to be once again sharing my Flash expertise in Phoenix next month – 22 and 23 March – for pro and emerging pro users. You can be sure I am going to show how these small modifiers enable a whole new world of flash.

Portrait lenses

Lenses for portraits, you ask? Which ones to use?

I usually suggest:

  • Prime 50mm on crop camera, or 85mm on a full frame camera, for head and shoulder shots. A prime lens is good for this while being fast, sharp, and light.
  • Prime 35mm on a crop camera, or 50mm on a full frame camera, for half body shots
  • 16-35 zoom on a crop camera, or 24-70 on a full-frame camera, for general purpose portraits from headshots two groups of two or more.
  • 70-200 for studio headshots and fashion.

The faster, the better. f/2.8 lenses are better than f/3.5-5.6 lenses. f/1.4 lenses are even better.

The affordable, great 50mm f/1.8 is a lens you should own (if you have a Nikon D40/60/3000/5000 you need to focus it manually). If you don;t have one yet, go get it.

This quick guide, which works for most photographers, should start you off well enough.

One light

You do not always need many lights. Sometimes, one light is enough:

f/8, 1/125th, 100 ISO

That is just one studio light, fired through a pocketwizard (but I could have used a cable) – and a reflector on the other side. This leads to this:

Yes, of course a background light, hairlight,and so on, would give me more control.

But we should all be aware that this amount of lighting is sometimes neither possible nor practical. And one light plus a reflector can give you nice light.

Travel Tip

When you travel with a suitcase, bring two camera bags. A small one and a large one.

The trick: one of these bags goes into your suitcase, filled with underwear, socks and other things you were going to bring anyway. That way it takes up no space.

So now when you get to your destination, you have a choice of camera bags every day: the large one, or the small one.

Camera Needs?

I shot a school Sunday: “Photo Day” portraits at a music school.

My colleague Anita and I used strobes, backdrops, and Canon cameras: 40D, a 7D and a 1D Mark IV. A few interesting observations:

  • The 7D produced the same crisp wonderful images as the 1D Mark IV. The 40D was not far behind. Sharp… amazing. Of course we were using all “L” lenses.
  • We both loved the 7D’s feel, ergonomics, even shutter sound.
  • I left the 1Ds MarkIII in the bag. With the 16/17 Megapixels of the 1D and 7D, who needs more?
  • The sharp display on the back of the 7D/1D4 really helps. And that is important: some images were slightly soft (ever so slightly – not that you would see even in a 8×10 print). Almost certainly due to me moving: I was using the cameras handheld.
  • The 1D4’s metering is a bit “enthusiastic”, as dpreview calls it. But on manual, with all  JPG adjustments turned off, this did not matter.
  • Excellent colour out of the box (shooting RAW, importing into Lightroom, WB set to “Flash” on camera to give LR a good starting point).

The 1D is the pro workhorse, of course, and it performed great (redundant memory card included!), but I must say, the 7D was a real pleasure to use. Especially at low ISO (100-400, say), I see no reason not to use it for pro studio work.