Shooting Rugby

I have never shot Rugby before, so I thought I would enjoy this morning’s newspaper shoot, a high school rugby game. And I did.

Here’s a shot. Of course it is one that I did not send to the newspaper, since I only just shot this and the paper is not out yet, and it is bad practice to trump your own customers. Click for larger:

For Rugby I used the 70-200 2.8IS L lens on the Canon 1D Mark IV.

I set the camera to continuous focus (“AI Servo”) and used a custom setting to give preference to tracking, not to refocusing on objects that appear in between. I used one focus point, with expansion to surrounding point.

The camera produced many sharp shots – most of them by far, so I was more than impressed with this first sports shoot with the Mark IV.

But my main learning was about the sport itself. Here’s what I learned:

  1. The sidelines are a great place to be.
  2. The sun needs to be behind the photographer on a bright day – and pay attention to where it falls onto the subjects (face is better than back of head!)
  3. 70-200 is a great lens for this sport
  4. Get action shots. There’s not much action in a school game – in that sense it is like football or cricket: periods of boredom with the odd burst of action.
  5. Get emotion.
  6. Get colours.
  7. Use fast shutter speeds (I used 200 ISO with the camera in aperture mode and set to f/2.8 mostly – leading to 1/3000th second shutter speeds).
  8. Get the action while you can – 15 minutes times two with only occasional action is no guarantee of a shot/

Oh, and the team in the red jerseys won by a 10-0 margin, so you can see why the others were very determined to stop that ball.

That was quick

I am impressed. Remember I mentioned Inkpress and how well they reacted to the warped paper?

Well, less than two days later, a box with lots of new paper just arrived via FedEx. Now that’s service!

And I am back to printing. And I note the new boxes have cardboard under and on top of the paper, and the paper is entirely flat, so I should have no more issues. Well done, Inkpress!

Three-Dee in flatland

Photographs are like flatland. There are just two dimensions. No depth.

That is why the pictures you take of the Grand Canyon or Cologne Cathedral look so boring when you see them at home. When you are on location, your brain gets clues from your stereoscopic vision, and from you moving, and even from sound. In a picture, all of those are missing.

The solution: use relative size. When a close object is really close, it looks large, and the background looks smaller. It is this that tells your brain that there is depth in the picture.

Like here, on the Golan Heights:

Every time something jumps out of the picture, it was taken like this:

  1. With a wide angle lens (say, 10-20mm on a crop camera; 16-35mm on a full-frame camera),
  2. With the photographer very close to the close object (in this case the barrel).

Another example:

As you see, this also distorts angles, which can give a pleasing dramatic effect.

And one more:

So if you want depth, zoom out and get close.

Let's start printing.

Printing is more important than ever. We can now make great photos and print them professionally at home, impressing everyone. And we should! Printing is the way to really enjoy your photography.

But it is, or can seem like, a kind of black magic – an art almost as much as a science. Perhaps because of that, I was asked recently to talk about my print workflow. And since I just spent the entire last two days printing 13×19 prints, this seems a good time to start.

“Start” is the word: this will be several posts – not one.

And what I want to start with is the distinction of pigment inkjet printers (such as the Canon 9500) versus the more common dye inkjet prints (like the Canon 9000).

Dye printers:

  • Are common and affordable.
  • Can print to any paper.
  • Have ink that bonds with the paper.
  • Produce very bright colours.

Pigment printers:

  • Are more costly.
  • Can only use certain papers.
  • Deposit their ink on the paper instead of bonding with it.
  • Produce prints that dry a bit more quickly.
  • Most importantly, tend to produce prints that last. 200-300 years is common, while dye prints often last just 20-30 years.

I use a Pigment printer (the Canon 9500). This means I am restricted with regard to the paper I can use. I use Canon papers and other Hahnemülle papers (the ones that say “Pigment” on the box). These are not as bright as other papers (off-white), but for a good reason: they last and stay the same way. I would rather have a slightly yellowish paper that will be the same for centuries than a bright white print whose ink and paper will both fade in more decades.

This is not a law. Some dyes wortk very well and are long-lasting. So do your research. But you will find that today, pigment printers are a great option if you want prints that last, while dye printers offer affordable impressiveness for today.

I know – I am simplifying. So do your research and decide what to do. Google is your friend.

Service Done Right

Yesterday’s post was about Canon’s new CPS (Canon Professional Services) program that apparently decreases service level, introduces a lot of red tape, and at the same time changes the cost from $0 to $250. I may be mistaken, but I do not think so, and Canon has not replied to my email about this.

So let me also share an example of a company that does service right.

I have a pigment printer, not dye (namely the Canon 9500). That means I need to select paper carefully (not all papers can be used with a dye printer – in fact few can. Read the box to make sure). I use Canon papers made by Hahnemülle, and I use Inkpress Pro papers from www.inkpresspaper.com – in particular Inkpress Pro Silky, which I really like. My standard paper!

But the last two boxes I bought contained only warped paper. Obviously a storage problem with the retailer, or perhaps old paper. In any case, this ruined half my prints: they touch printer rollers and smudge ink all over.

I went to the web site at www.inkpresspaper.com and filled in a simple form. Minutes later, a VP from Inkpress emailed me this:

How many sheets was it? Please provide us with your address- we will send you a replacement asap.

Now that is service done right. Not only does it help me with my immediate issue (I only print large, and 13×19″ paper costs a few dollars!) but it ensures that I will remain a customer, and that I say nice things about Inkpress and their paper.

I cannot understand why every vendor does not understand this, but I do, and Inkpress does as well.

A quick product shot

Today, I am sharing a quick product shot.

Here’s the shot, of my “nifty fifty”, a 50mm f/1.4 lens:

And here’s how I shot it:

  • I used a Canon 5D camera on manual at 100 ISO, f/4 and 1/125th second.
  • The lens was on a table with a white sheet of Bristol Board underneath.
  • The background was an improvised white background (I used a reflector).
  • I used a 430EX flash with a Honl grid, diagonally above the lens, as the main light. The grid causes the dropoff from the centre.
  • I used a 430EX flash with a Honl blue gel and a Speed Gobo to illuminate the background.
  • I used e-TTL to fire the flashes, from my 7D’s pop-up flash (the 7D will support this, like Nikon cameras. On other Canon cameras I need to use a 580 EX flash on the camera to drive the remote flashes).
  • I set a flash ratio of 8:1 a:b, where A was the main flash and B was the product flash.

All of which looked like this:

Simple. It only took a few minutes to set up, which is good since I was tired.

One tip: when shooting this type of product clean it well using a soft brush, or else you will spend hours in Photoshop or Lightroom aftereard, cleaning dust.

Using light today.

I shot Victoria Fenner today. But only, you will be glad to know, with a camera.

Let me talk you through that, shall I?

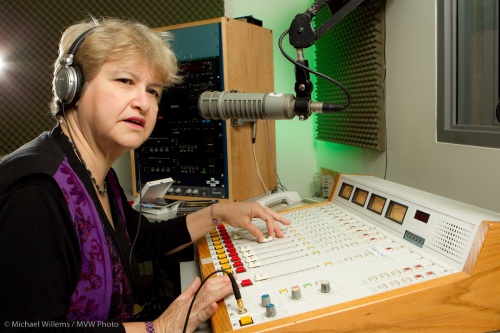
Victoria is an audio expert. She used to run the studio at McMaster University that we shot this in. We decided to shoot her doing her thing – and sound is her thing. So we shot in a studio first:

Camera: I shot her with a Canon 1D Mark IV. The camera was on manual at 100 ISO. I used a 24-70 lens set to around 24mm – meaning around 30 “real” mm.

Light: the camera was equipped with a 580 EXII flash to act as e-TTL “master” to drive three 430EX speedlites:

  1. The “A” flash through an umbrella on camera right, shining into Victoria’s face. An umbrella throws nice soft light, great for faces. (There is a certain irony in the fact that we use the word “umbrella” to name this thing that throws around this nice light. Umbra means shadow!)
  2. One “B” flash with a green Honl Photo gel in the background – I love adding a splash of colour, and green goes very well with purple.
  3. Another “B:” flash, fitted with a Honl Photo 1/4″ grid, as hair/accent light shining toward the camera. You can see it just outside the field of view.
  4. I set an A:B ratio of 4:1 to 8:1.

All this took about ten minutes to set up, and ten minutes to take down.

Then we shot some outdoors. For this, I used two flashes off camera: one into a Honl gold/silver bounce card; the other using a grid, as before. Yes, in bright sunlight you can fire these flashes using light-controlled TTL.

This was a bright day in April around noon. But it does not look like noon light, does it? I shot in Aperture mode, with -2 to -3stops exposure compensation. That darkened the background to give it colour saturation. The flashes took care of the foreground.

Pfffftttt…..

Canon Canada has just introduced a new CPS Program. CPS means “Canon Professional Services” – it is the program under which pros get faster service. Details of the new program are here: http://www.canon.ca/inetCA/categoryHome?msegid=5&catid=4345

From what I see, Canon has succeeded in changing the program as follows:

  1. Service level is lower than before. Yes, there are a few goodies, but mainly it’s less, from what I see.
  2. A previously free service is now -wait for it – $250 per year for the best service level.
  3. A form must be filled in (I just did); a page full of  legalise lays out the duties, punishments, etc. Geez, it’s like joining the army!
  4. This form-filling must be repeated annually, as must the paying.
  5. There is no email or contact address.

Perhaps I am misreading this. I mean – surely a company would not want to punish people fopr spending tens of thousands of dollars on their equipment by worsening service levels, introducing annual hassles (finding all the serial numbers took me an hour!)  and then charging for all that?

I have asked Canon what I am missing.. I shall tell you on the blog when I find out.

Focus where you want.

…where you want, I mean. Not where the camera wants. So as a tip for beginners and reminder for others, a few words about how to focus.

When you look through your viewfinder, you see focus areas, also known as focus points. Depending on your camera there are three, five, seven, nine, or even 11 of 45 of them.

When you press the shutter button half way, the camera indicates one or more of these by flashing them; then it beeps. As long as you hold your finger on the shutter button, these selected focus points stay active. Meaning that when you press down, that’s where the camera will focus.

How does it select which points to use?

It looks at all the focus points, and selects those that are on the closest subject. That’s how. So you’ll get this:

And therein lies the problem. What if you want not my hands in focus, but my face? Or what if you are shooting a relative in the forest and you keep getting that closest branch in focus rather than the relative?

That’s why you can disable this automatic selection of focus points.  And most people do most of the time. Ask a pro how many focus points he or she is using and the answer is almost always “one”.

Then you can:

  1. Select a suitable focus point
  2. Aim that one point at your subject
  3. Press half way down until your focus points locks and the camera beeps
  4. Hold your finger on the shutter, do not let go
  5. Recompose if necessary
  6. Press down and take the picture.

Q: In a portrait, what really needs to be sharp?

A: The subject’s closest eye. The rest is optional.

My student yesterday in a Henry’s Canon 7D class, taken with the 7D with 35mm f/1.4 lens using available light and, um, a TV:

Advanced users, did you know the following:

  • Focus selection is done in areas that are actually wider than the indicated focus spots.
  • The centre spot is the most sensitive.
  • The faster your lens (low F-number), the better it works.
  • Focus squares detect lines. The centre spot is sensitive to horizontal and vertical lines. Others can usually detect only horizontal or only vertical lines!

Well, now you do.

And if you are new to this, here is your assignment: reproduce this photo. Hand sharp in the very corner of your photo.

(Use aperture mode with a low “F-number”, or use program mode and get close).