Canonnews

I hear that Canon is announcing new camera and lenses etc for release by late 2010:

  • EOS 60D
  • 8-15 f/4 fisheye
  • EF 70–300mm f/4-5.6L IS USM
  • EF 300mm f/2.8L IS II USM
  • EF 400mm f/2.8L IS II USM.
  • Extenders EF 1.4X III and EF 2X III.

Canon has also issued an announcement that the EF 500mm f/4L IS II USM and EF 600mm f/4L IS II USM are currently being developed, with delivery planned in 2011.

OK… get your wallets ready!

Sensorama

I cleaned my sensors today. On the 1Ds Mark III and the 1D Mark IV. This took more than an hour.

So I thought this might be a good opportunity to talk about sensor dust.

Unlike a negative, which gets “replaced” for every shot, the sensor on your camera can gather dust over time. This then shows up under certain circumstances on your images.

When? When do you notice it?

To understand this, image a small piece of dust just above the sensor. If the lens has a wide open aperture, this piece of dust will not cast much of a shadow, because light from the left might cast a shadow on the right, but light from the right lightens that shadow. The wider the lens aperture, the less defined the shadow cast by the dust.

Now imagine a narrow aperture, a pinhole. Each piece if dust casts a nasty shadow. I.e. it is visible. That’s what dust spots are: shadows from dust specks.

Now think along with me. Say I want to shoot this, as I did during the Henry’s Creative Urban Photography session I taught in Oakville on Sunday.
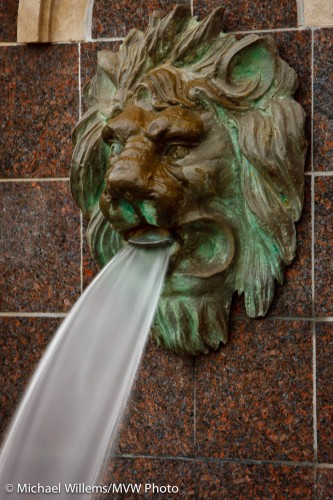
Lion and Water

Lion and Water

Evidently I need a long shutter speed to blur that water: in this case I selected a quarter of a second.

For which I need a small aperture. f/22 or f/32. A tiny opening in the lens.

So then, when you shoot at small apertures (large “F”-numbers), and especially in plain areas like the sky, dust shows up. Which got me here.

To clean dust, you need:

  1. A freshly charged battery.
  2. A spare camera in case you break the sensor (which I have never heard of, but I am sure it happens).
  3. A rubber air blower, your first port of call.
  4. A rotating brush from Visible Dust.
  5. Also from Visible Dust, pads in the size of your sensor (1.0, 1.3 or 1.6), and the appropriate liquid.
  6. A healthy dose of patience, and a calm demeanor.

First, measure. Switch the lens to a wide angle, and switch to manual focus. Focus close, then while gently moving the camera, shoot a distant white wall, using an 8 second exposure at f/32 at 100 ISO. Adjust as needed to get white, but not blown out. Now check by zooming in and you see dust and smears.

Now clean. Make sure you have a full battery. Now use the manual sensor cleaning function on your camera to open the shutter. Then remove the lens. Carefully blow first, using the bulb blower. Now close the camera, turn it off and on, and repeat the test.

Then if it’s not yet fixed, repeat using the brush, which you first rotate for a few seconds first. You may have better results. But you will equally probably make it worse instead of better.

In that case, repeat again using a pad, after you drop 3-4 drops of liquid onto it. Again, you will make things worse before you make them better.

This is where the patience comes in: after using up three or four pads you will despair. Smears, dust: it gets worse and worse. Every time you remove one dust speck, you add two. Will you ever get it done? Is your camera toast?

And yet… after an hour you get to a point when suddenly, there’s no significant dust. That is when you stop.

So after more than an hour, I now have two as-new cameras.

Two more things:

My camera does this by itself! Yes, but it does not clean off all the dust with its ultrasonic shaker.

Is this not risky? Yes it is. Do this at your own risk. (That said, I have been cleaning sensors for a decade without any mishaps.) My advice: do this when needed, but do not obsess. If you never shoot at f/16 or beyond, don’t worry. If you do not see the dust, do not worry. But if you do – get it done.

Think Tank Airport Security

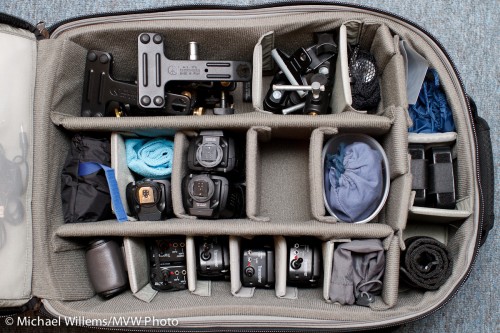
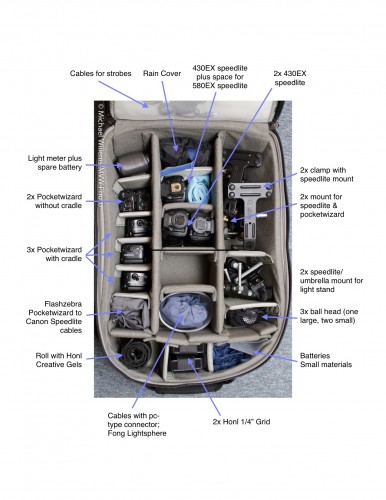
Always short of space to put things, and never one to shy away from adding to my number of bags, I recently bought myself a Think Tank Airport Security™ V 2.0 bag. This huge rolling bag (allowed onto aircraft in the USA, but too big for most of the world) now holds my lighting gear.

Not cameras or camera gear: just my lighting gear, like so:

Airport-security-v2-roller-camera-bag

Airport Security V2 Roller Camera Bag

That holds all my  clamps, ball heads, five Pocketwizards, three or four speedlites, cables, grids, gels, my light meter, and more. In addition, the side compartment holds the other Honl Photo modifiers, a gray card, and other small materials.

Michael's Big Lighting Bag

Michael's Big Lighting Bag

This bag is well built and has many cool gadgets. Such as three separate locks (two of which can be opened by the TSA). Emergency backpack straps. Many removable compartment sides. Two lockable cables to attach things to it, or it to things. A rain cover. Many things I will not need, like a tripod mount.

Small areas that could perhaps be improved:

  • The cutouts do not fit large Canon bodies (they are on the wrong side), so you need to remove your lenses if you are to use this as a camera bag. Quite an oversight.
  • Not quite enough internal compartment dividers for my liking: I had to add one or two dividers from another bag.
  • The lid hinges at the bottom, so things may spill out from pockets in the lid when it’s open.
  • The front external compartment is a little too small.
  • The external “laptop compartment” seems a bit of an afterthought and is rather insecure (yes, it has a cable to attach to the laptop – still not quite secure enough for me).
  • The uneven bottom made it a one-hour job to decide how to fit in all my gizmos. But that’s OK.
  • The handle that you use to roll the bag is flimsy and even has a warning, “do not lift by this handle” – that is a design flaw, if you have to warn people how not to use a product.

But those are small gripes. It’s a fantastic bag.

Michael’s Quick Judgment: recommended. This is one huge bag – where I carried two before. Anything that reduces my bag numbers is good. This bag does it in style and with intelligence. And all my lighting gear in one bag, in neatly arranged divisions: utterly fantastic.

Colour has to be real

Right?

Um, no, of course not: colour is a tool for you to use in your artistic endeavors.

And colour can be anything you like.

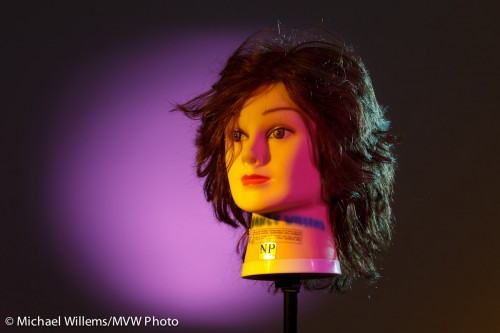
A few nights ago, I though I would see how long it would take me to recreate a lighting setup that my friend Dave Honl (yes, he of the excellent Honl Photo modifiers) did recently. So I looked at his shot and put it together the same way he shot it, in exactly 20 minutes:

Fun with gels, Photo Michael Willems

Fun with gels

That is including:

  • Setting up four light stands.
  • Connecting four flashes (3x 430EX, 1x 580EX) to Pocketwizards using Flashzebra cables.
  • Mounting these on the light stands using ball heads etc.
  • Equipping the key light with a 1/4″ grid and an Egg Yolk Yellow gel.
  • Equipping the fill light with a 1/4″ grid and a Follies Pink gel.
  • Equipping the hair light with a small snoot and a Steel Green gel.
  • Equipping the background light with a long snoot and a Rose Purple gel.
  • Setting the power levels correctly (by trial and error, combined with histogram: key light = 1/4 power, fill=1/8, hair=1/8, background=1/16).
  • Setting the camera up correctly (I used the 7D and set it to manual, 100ISO, 1/125th, f/6.3).

Huh? Egg Yolk Yellow, a crazy bright colour, to light the face? Are we crazy?

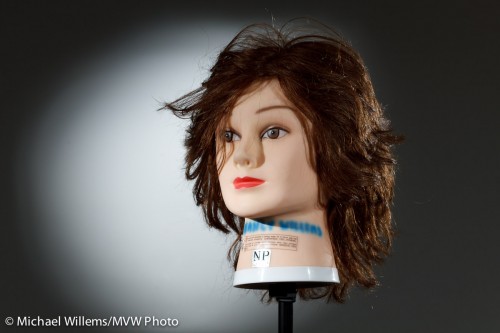
No, just having fun. Yes, of course Dave could have made his shot using no colour. Here’s what the same shot looks like without the gels. (Of course I switched the camera to an aperture one stop tighter, namely f/9, to compensate for the extra light once I removed the gels):

Grids and snoots, photo Michael Willems

Grids and snoots

Yeah, nice, and appropriate for a corporate head shot. But compared to the previous, it is kinda boring, no? So next time you shoot someone, unless they are a law firm executive, you might have fun and try some colour. You don’t need to go crazy and use four colours, but a splash here and there can really help your picture come alive.

By the way, what was the colour of the backdrop?

White.

Remember the following equation:

White – light = black

Similarly, in practice, black + enough light = white.

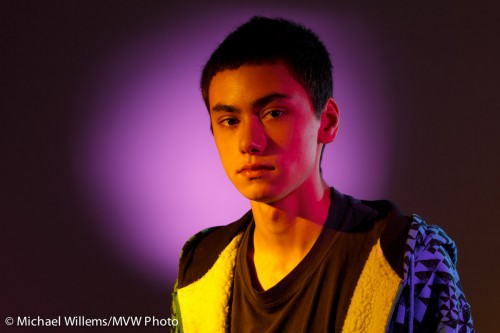
And finally, a real person: my son Daniel (“sigh, not again, Dad”):

Daniel, photo Michael Willems

Daniel in colour

But here’s the thing. After seeing it, he grinned and said “Rad.”. That‘s a first!


Size matters.

…the size of your umbrella, anyway.

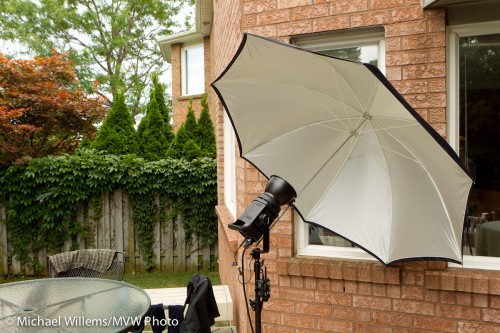
I am using a big Photoflex umbrella today. How big? Here’s how big:

Big Photoflex Umbrella

Big Photoflex Umbrella

This umbrella, which can be used to shoot into, as I am doing here, or to shoot through, is huge. Which makes the light softer.

It is also very reflective, more than most. And that helps: I was able to overpower daylight on an overcast day with the single Bowens 400 Ws light set to 3 (out of 5), somewhat close to the subject. With my regular, smaller and less reflective umbrellas, I would have used a setting of 4 to 5 for that shot.

So, all this amounts to:

  • Softer light (since the source is larger),
  • Greater distance I can bridge,
  • Less spillover behind the umbrella (which in a studio is important)
  • A lot more shots out of my battery pack,
  • Faster recharge time between shots.

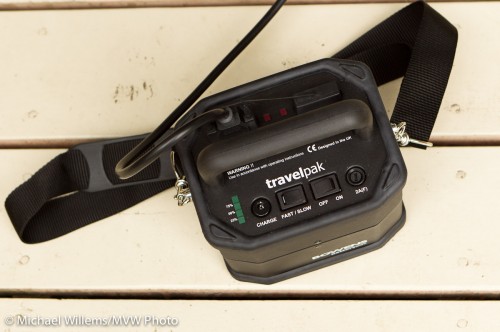
Here is that battery pack:

Bowens battery pack

Bowens battery pack

At full power, I get 150 shots out of a small battery (attached at the bottom); at power level 3, it is closer to 300 shots.

So by using a nice umbrella, metering to minus two stops ambient (minus three if metering off the dark garden), then setting the flash to the aperture thus achieved, which was f/5.6), I get this shot:

Nancy, photo by Michael Willems

In the back yard, lit by flash

As you can probably see, I am also using a speedlite on the camera left, to separate the hair from the background and to give some edge lighting interest. That speedlite is fitted with a Honl Photo 1/4″ grid to avoid the lens flare I would otherwise get.

Time for this snap: couple of minutes.

If all that is confusing, as it will be to beginners, then just take one of the flash courses and learn how to do this. It is fun, and well within reach of amateurs – not just for pros!

Michael’s Quick Judgment:

  • Photoflex large reflective umbrella: recommended.
  • Bowens Travelpak power pack: recommended.

Light is what you make it

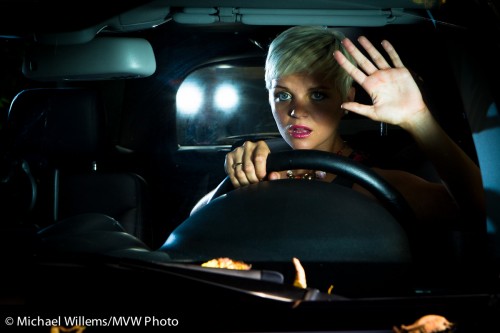
Night time? No.I took this shot in open daylight, last Saturday during the Advanced Flash course Joseph and I taught at Mono, Ontario:

Scary Drive (Photo Michael Willems)

Scary Drive (Photo Michael Willems)

The lesson here is not how that is done (it is involved, and needs speedlites, pocketwizards, reflectors, light stands, and my SUV), but it is that it can be done. Daylight can look like a scary stormy night.

On the advanced light course we teach you the details – but even before that, you can start playing with flash. Right now. Using one or more external flashes (not the pop-up).

And you should. Because flash can:

  • Make flat surfaces round;
  • Separate subjects from backgrounds;
  • Make dull subjects sharp;
  • Make wrinkled surfaces flat;
  • Make cold surfaces warm;
  • Make blurry motion sharp;
  • Make day into night;
  • Direct the eyes where they otherwise would not go;
  • Give you nice catchlights in the eyes;
  • …even create cars where there aren’t any.

That’s why this blog is called “Speedlighter” – speedlights and other flashes can be the most useful tool a photographer has, after the camera.

So my advice:

  • Get yourself one or more speedlites;
  • Find a way to fire them off-camera: TTL, flash cable, or pocketwizards;
  • Get some modifiers;
  • Stay tuned here, take a course: learn how they all work;
  • And above all, keep shooting.

And your photos will go up to the next level of professionalism and creativity.

Why is my picture blurry?

Why is my picture all blurry?

I hear this all the time from both experienced and new photographers.

Well, here’s why.

Focus:

  • You have not focused properly. Solution: select ONE focus point; focus; hold it; and only then shoot.
  • You are using a shallow depth of field. At f/1.4, it is hard to focus.

Subject:

  • Your subject is moving fast. Solution: pan with the subject or increase ISO, open aperture, or shoot the subject at the apex of its jump, say.

Shutter speed:

  • You are using a slow shutter speed (slower than twice the lens length, say, so on a 100mm lens you are using a shutter speed slower than 1/200th second). Solution: open the aperture or increase the ISO).
  • You are using a long lens (say a 300mm lens). On that lens, fast enough shutter speeds are hard to obtain). Solution: Zoom out, increase ISO, open the aperture, or use a tripod.
  • You are not using a tripod when you ought to. Solution? use a tripod!
  • You are using a slow lens. An f/3.5-5.6 consumer lens will never do as well as an f/2.8 pro lens. Solution: need I say?
  • You are using a small aperture, like f/8, when you should be using f/2.8. Solution: open your aperture.

Miscellaneous technique:

  • Your subject is in the dark – where it is muddy and blurry. Solution: Light your subject well.
  • You are not using flash when you should be. Solution: need I say?
  • You are  not using IS/VR. These are great features: stabilized lenses are superb and give you several stops. Solution: get an IS/VR lens.

Equipment:

  • Your camera is faulty – this is very unlikely, but have it checked out.
  • Your lens is faulty – this is also rather very unlikely, but have it checked out.

Clear? (Pun intended). Try all these and you will see your images improve amazingly.  Yes, I know, there are a lot of them. Yes, it’s complicated. But yes… you will take brilliant images once you get all of these right.

Remember these tips:

  • Bright pixels are sharp pixels (that is Willem’s Dictum);
  • Flashed pixels are sharp pixels;
  • VR/IS works;
  • Use one focus spot;
  • Hold the camera right;
  • A tripod is a good thing.

Have fun – a crisp, razor sharp picture really is a joy.

Those funny aperture values – why?

Your lens’s aperture comes in those funny numeric values. You all know them:

1.4,  2.0,  2.8,  4,  5,6,  8,  11,  16,  22,  32…

Okay, actually it is f1.4, f2.0, and so on. With an “f”.

Actually it isn’t. Not quite. In fact it is “f/1.4”, “f/2.0”, and so on. The aperture number is a fraction: F divided by that number. That is why a larger F-number means a smaller aperture: when you divide something by a bigger number the result gets smaller.

So why the funny numbers? When I was learning photography I wondered why they did not just choose f/1, f/2, f/3, f/4… and so on.

Here’s why. I know you want to know.

First of all, the f-number indicates:

The f-number, or aperture number, indicates the diameter of the lens opening, expressed as a fraction of the focal length of the lens.

A 100mm lens set to f/4 would have an opening of 25mm (100/4). An 80mm lens set to f/8 would have a diameter of 80/8, or 10 mm.  And so on.

So why the funny numbers? Because those numbers are chosen to halve the light entering the lens with every larger number (or to double it with every smaller number).

To halve the quantity of light entering a circle, you would not divide the diameter of that circle by 2. That would give you a quarter of the light (area = pi x r squared). Instead, you would divide the diameter by the square root of 2.

And that is therefore the ratio between the successive numbers. The square root of 2. (approximately 1.4). Check the numbers: take 1.4 and multiply it with 1.4 and you get 2, which happens to be the next whole aperture stop number. 1.4 times that gives you 2.8. And 1.4 times that gives you 4. And so on.

So now you know why larger f-numbers give you smaller lens opening and hence less light, and you know what’s with the funny numbers. Aren’t you glad you asked?

Battery tips

A tip for photographers: batteries. For speedlighters like me, these are very important – so here are a few tips.

  • Camera batteries are Lithium-Ion (LiIon). A battery technology that is used in most of your cameras. LiIon batteries do not need to be “fully discharged before charging”. You can charge them any time, even after just using 10% of the batteries. So go ahead and charge them daily. Never leave home without a full camera battery.
  • Also, if you have not used a spare battery (you do have one, yes?) for a month, charge it (top it up).
  • Flash batteries are NiMH, and these do have a slight memory effect. So use them up fully at least once a month. Better, get a conditioning charger like a Lacrosse (these can fully discharge the batteries before recharging). Also, these batteries “self discharge” in a month or two (some “low self discharge” batteries take longer, but they still discharge!). So recharge regularly.
  • Light meter batteries are specialized. And they last a long time. And they run out when you need the meter… so, carry a spare.
  • Pockwizard batteries: here you do not use rechargeables, which self discharge. but you use quality Alkaline batteries (low self discharge rate).
  • Strobe batteries: (i.e. those heavy optional batteries for outside use of large flashes): These are lead-acid, like your car battery, and should be kept charged. No memory effect here, either. They must not be discharged fully.

And did I mention “always carry a spare set”?

Finally: when shooting an event or a commercial shoot, or anything else, even a family picnic: make it a routine to replace your flash batteries before you start each section. That way you will not run out.