Yesterday’s recipe was the “Willems 400-40-4 rule” for indoors flash shots.
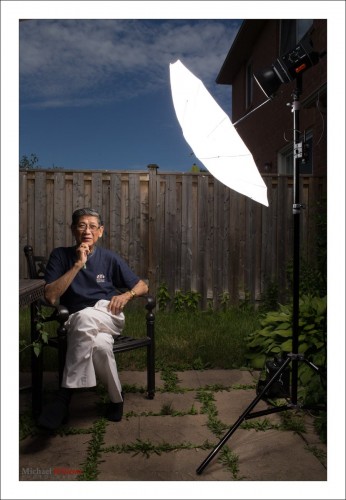
Today, another one. Say that you want to go outside for a saturated colour flash shot like this, on a fully sunny day at noon.
So for that you need a flash with a modifier. I used a strobe, but you can use speedlights if you are willing to fire them at high power and have them close to your subject.
Here’s my strobe:
Now follow my logic.
Step One: ISO and Shutter. The sun is bright and I am competing with it. So to cut the sun, I will be at low ISO (meaning at 100 ISO, the minimum) and high shutter speed (1/200th sec, the fastest sync speed for many cameras). This is a given, an “always” starting point: by default. sunny day means 100 ISO and 1/200th sec).
Step Two: Aperture. At that speed, a “normal” exposure would be f/11 (this is the Sunny Sixteen Rule in practice – look this up on this blog – yes, there is a reason I teach you all this stuff. At 200 ISO it would be f/16 “sunny sixteen”, so at 100 ISO, we’d need f/11.). So we arrive at 1/200th sec, 100 ISO, and f/11… this looks like this:
But wait – I want that background darker, to get saturated colour as in the first shot, not light as in the second shot. So we go to at least f/16, one stop darker than “sunny sixteen”. Now, indeed the background is darker.
Step three: Flash power. Now we adjust the flash to give us enough power to get to f/16. If we are using a small flash, that means no modifier (loses too much light); if using a strobe, we adjust it until the brightness matches f/16. Use a meter, or use trial and error.
So the method was:
- Set low ISO and fast shutter;
- Decide on aperture you want;
- Set flash to match that aperture.
And to this, we add:
- Use a modified flash if you can – like shooting through an umbrella, as I am doing here. But modifying loses power, so you may need a direct flash, or have the flash very close to the subject.
- Use off-centre composition (avoid the centre – use the Rule of Thirds).
- See if you can get diagonals included to lead into the image and give it depth.
- Avoid direct sunlight on the subject’s face: it shows wrinkles and it causes squinting. Sun from behind gives you “shampooey goodness” instead: much better.
- See if you can angle the flash w.r.t. the subject, off to the side, and turn the subject into that flash. Also raise the flash 45 degrees (looks natural and you see no glasses reflections).
- See if you can get lucky and include all three primaries, red (-ish); green and blue, in the image. If so, you have a good image!
Let’s see that image again. Click on it and click through to see the original image at full size:
That looks like a photoshopped image, and yet it is not – it is the way I shot it in the camera. yes… and I can teach you the same – it really is simple, once you get the idea.
___
The Pro Flash Manual e-book is designed to teach all this and much, much more, and it dovetails into this site and into my classes. Learn about both these e-books here on my web site. Want to learn? Check out www.cameratraining.ca as well.


