What’s in a name?

What IS in a name? Rather a lot, as it happens.

Take the company formerly known as Artisan State. They do great albums and other print-related items. I cannot recommend them highly enough.

Except, that is, for their current name. It is now “Zno“, which every world citizen except an American pronounces as the monosyllabic Russian-sounding “zno”, Vaguely sounding like “snow”.

But the company thinks it should be pronounced as “Zeeno”. Because while the entire world calls the letter Z “zed”, since it is derived from the Greek zeta, Americans, and only Americans, call it “zee”.

And so, apparently, should we.

Except some of us—meaning me—feel rather strongly about language, and while I’ll gladly let Americans pronounce Z as “zee”, or “zoo”, or “za”, or “zeeblebrox”, or anything else they like, I just cannot get myself to do it. Z is zed, not zee.

But of course there is a bigger thing behind this. Namely American exceptionalism and ignorance of the world, and even, if you like, cultural imperialism. Much as I love my American friends, I think they should perhaps educate themselves just a little bit, and realise that the entire world is not America. And something as crucially important as a brand name… why on earth would you choose something that either puzzles or antagonizes the rest of the world? Unless, of course, you only want to sell in America.

So we have problems. Until I live in the USA, I do not want to start pronouncing Z as “zee”, even by stealth, and I do not want to buy from a company that is at the very least either ignorant or culturally insensitive at its senior levels. When I have pointed this out to the company’s support email, all I got was a “we think of it differently”, or some such non sequitur.

So just like I would find it difficult to respect a president who is a racist and a mysogenist (and I am not pointing at Mr Trump here: I suspect he is a lot more intelligent than we think), I also find it difficult to buy from a company that is either ignorant or is trying to push American culture down my throat.

So yes, there is a lot in a name. A name is culture and language, and people care about culture and language.

Am I making a big deal of this? Nah. No big deal. I can buy albums, even good albums, elsewhere. I can recommend other print companies to my students. No skin off my nose.

But I do wonder why a company chooses not to care about antagonizing a great proportion of their market. Are they ignorant, or do they want to push American culture down the world’s throat? I’d say both are equally likely.

 

Print pricing

Following up from the “printing” post, I want to give you a little perspective on print pricing. Both for the buyers (companies and individuals) and for the sellers (the photographers and artists).

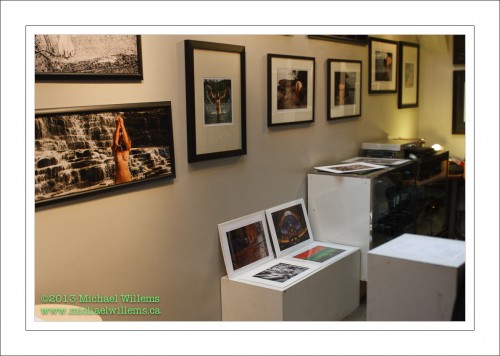
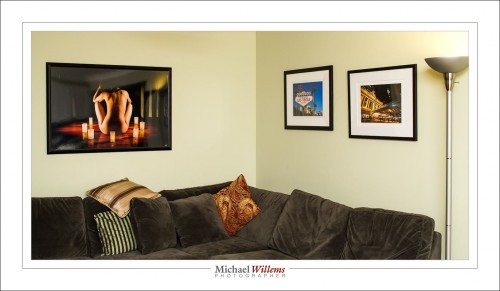
Professional art prints cost money. To give you an idea, a professionally made image printed on 13×19” paper, ready to frame, will cost $249. A 13×19” print framed ia $536 (you see two in the picture below). And a 40”x24” (approx.) metallic print, framed: $1435. (that’s the one on the left).

“Why? I can make a print for $20, surely?”, is an objection I have heard many times.

Well, no – that is not the way to look at this. And there are three ways to understand this. I thought it might be useful to go over those, today.

One way is by analogy. Sure, the print may not cost the sale price. But that is like saying “I went to the law office and I got my will done. I’ve got it here: it’s a piece of paper made by an HP printer, typed by a secretary. The paper and the typist time are no more than $15, so why should I pay more?”. Or perhaps it is like saying “Rembrandt’s brushes, canvas and paints cost him 2 florins, so that is what I’ll pay for that Rembrandt painting over there”. You see the silliness of those ways of looking at it, presumably. Printed photographs are the same. They are, in a term I have heard recently, “high-end wall furniture”. Any furniture designed for you and sold in limited numbers (“we’ll only make 20 of these couches”) will be worth money. And more than the cost of wood and cloth, of course, if we stay with the analogies.

The other way to understand is by looking what goes into a print. A framed art photograph for your wall contains, of course, a lot more than the paper and ink (just as the will contains more than just the paper and ink):

First, it contains, if you will, “intellectual property”:

  • Most importantly, the artistic taste, vision and ability that led to the image.
  • The photographic expertise. It takes 10,000 hours to become an expert at anything, and that is certainly true for artistic photography. You pay the lawyer for his experience and ability to deliver; same for the artist.
  • The printing expertise. Any idea how long it takes to become good at printing with the right colours, contracts, and so on, and to create prints on the right kind of paper, and prints that last?

A story, probably apocryphal, has it that Pablo Picasso was sketching in the park when a woman approached him. “It’s you — Picasso, the great artist! Oh, you must sketch my portrait! I insist.” So Picasso agreed to sketch her. After studying her for a moment, he used a single pencil stroke to create her portrait. He handed the woman his work of art. “It’s perfect!” she gushed. “You managed to capture my essence with one stroke, in one moment. Thank you! How much do I owe you?” “Five thousand dollars,” the artist replied. “But, what?” the woman sputtered. “How could you want so much money for this picture? It only took you a second to draw it!” To which Picasso responded, “Madame, it took me my entire life.”

Second, the photograph contains “real cost”. That is, of course, not your problem if you are buying, but it is nevertheless perhaps illuminating to see that there’s a lot that goes into a wall photo:

  1. Proper photographic equipment – at last $20,000 is needed to have a proper photographic setup. And that’s really just the cameras and lenses. Yes, proper equipment is important. When you blow up that image, imperfections due to cheap cameras and lenses will be noticed.
  2. Printer and computer equipment. Again, this is not cheap. You cannot expect permanent prints from a cheap inkjet printer or from a Costco machine. Proper printers have ten inks, not just one or two; and they are pigments, not dyes.  The computer equipment, software, disk space, etc also cost money, and proper high-end calibrated screens are essential.
  3. Supplies. Proper art paper and pigment inks are not cheap. My printer has 10 cartridges for the different colours, and it seems that every three minutes one of them is out. And they cost $22 each. And the paper: $50 will buy you a small box – and again, they’re constantly out.
  4. Time. The time to make the photo in the first place. But also, the time to finish that photo. And then the time to print. It takes two minutes to even feed a sheet of paper into a pro printer, and that’s without the printing having started yet!
  5. The frame. Handmade frames and custom-cut mats are a real cost. Go to an art supply store and ask to have something framed and you will see.
  6. Time to put it all together. By the time you see a work of wall art, the artist has made the photo, set up the equipment, finished the photo, made the print, driven back and forth to buy inks and paper, driven back and forth to have the photo framed or wrapped, and so on.

So buyer: while it may not be your problem that a lot of real cost goes into wall art, I think it may be enlightening to realize exactly how much. Your artist is not getting rich over your back. And seller:  when you do the math, on a simple spreadsheet, you see it is not viable to sell for less than “standard pricing”, unless you want to work for less than minimum wage, of course. Importantly, both buyer and seller should realize there is real, true, value in a piece of wall art.

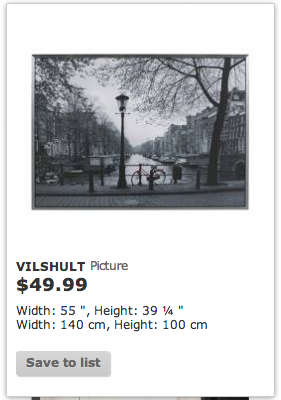
And finally, the third way to understand print pricing: a product’s value is defined by its scarcity. This is, presumably, interesting to any buyer! And this is why we tend to print in limited editions. You can go pick up a piece of wall art at Ikea, but apart from the cheap printing and eventual fading, more importantly, approximately 8 million other homes or offices will have the exact same print. And that’s just in your town.

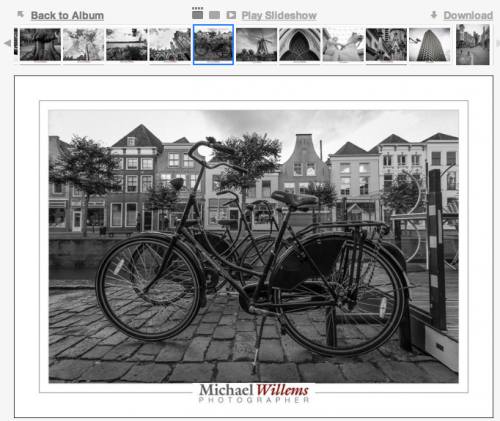
So yeah, you want the same Amsterdam canal pic that families from Toronto to Trondheim, from Stockholm to Singapore, from Israel to India have in their living room? Go ahead, here it is:

But if you want something unique, that not everyone else has, that is handmade, autographed, and produced in limited editions, then you may want to come to me and other wall art makers. That’s real value added to your environment.

What’s more: I can produce this image at any size you like, on any paper you like, with any frame you like. To fit you, instead of you having to fit the print.

So – head on over to www.michaelsmuse.com and similar sites, or go visit a gallery, and buy your own unique wall art.  Now you know it’s worth it!


Print thoughts

As I have said, printing your images is a great idea. Here’s a few on my living room wall:

It is also complicated – that’s one reason prints cost real money – and time-consuming. But – worth it. Here’s a few decision points for you, when you consider printing.

What tool? I print straight from Lightroom. No intermedia file with colour spaces to worry about, no loss of tines, and great functionality. More about that in future (and past) posts.

When you print, the first question is: “how large”. The two prints on the right in the image above were made on 13×19″ paper, and framed. If you use that kind of size, you will want to hang multiple prints. The image on the left is approximately 40 by 24″. That is suitable for a wall all by itself. Prints up to 13×19″ can be made on a printer like the Canon 9500 MkII.

The second question concerns the printer. Dye or pigment? Most inkjet printers are dye printers. A few, like my 9500 MkII, are pigment printers. The difference? Basically, dyes combine with the paper they are printed on; pigments form a suspension on top of it. The reason to go for pigments is that they last longer and will not fade or shift colour. Dyes, although they are getting much better, will usually fade within 25 years. When I sell, or hang, a work of art, I want it to last for centuries – which pigments will do. If you want your prints to last as long as photo lab photos, pigment is the way to go.

Then, the type of paper. Matte or glossy? That is often a judgment call. Glossy is “like a photo”, matte is “like a painting”. Some photos work best on glossy, some on matte. This is where taste and experience and preference all come together. I recommend that like me you settle on maybe four types of paper; learn what they do; and stick to those.

If you want resistance to fading, use natural fibre paper (such as the Hahnemülle papers). These are not coated, so they are not as white as brightened papers – but brightened papers will lose their brightness.

You can also, of course, go for metallic (like the print on the left in the image above). This is wonderful, sharp, glossy, with a great silvery shine. In addition, metallic prints do not need glass, so they can use a very simple frame. You can even wipe them.

Then, the aspect ratio. No, no, no: your prints do not have to be 3:2 like they come out of the camera, or 8×10 because that’s the only frames you can find.  make your prints any aspect ratio that please you. Even square, or long and thin like the print on the left here, from a gallery exhibit I did last year in The Distillery District on Toronto:

Finally, then the frame. A photo, like a painting, generally looks much better framed. Be warned that framing is not cheap – but it’s worth it. A custom frame, with a custom-cut mat, means your print can be any size. You frame according to the print’s needs. As a result, you will have a unique work that reflects your taste, environment and needs.

Do have a look at some of the pictures I am currently selling in limited editions, all handprinted and individually autographed: www.michaelsmuse.com. Interested? I ship worldwide.


Pro Print Precision!

In my continuing series of posts for everyone – today, a post for pros, or amateurs who take printing seriously. Which you should: a photo is not a photo until you have printed it. And hung it on your wall, preferably.

My advice today is this: print straight from Adobe Lightroom. This has many benefits over “just make a file and print that”:

  1. No intermediate file; no need to go down to the restrictive AdobeRGB or even more restrictive sRGB colour space file formats.
  2. No intermediate file also saves time, confusion, and disk space.
  3. Lightroom contains a very good print engine, with great print setting options.
  4. Set it up once, and it’s good forever.
  5. And most significantly in recent versions of Lightroom: soft proofing.

Everyone who has printed seriously knows that each paper type is good for certain prints only. After you figure that out, you will use one type of paper for prints with a lot of black. Another type for very colourful prints. Another type for prints with a lot of shiny areas. Or a lot of reds. And so on.

Lightroom to the rescue. This is not a full Lightroom course (for that, come to me privately and I will teach you). This note is for those of you who already know Lightroom and computers well.

And for those people, in a nutshell, here’s what you do:

1. SET UP PRINTING:

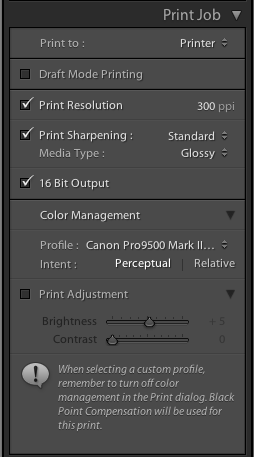
Select your photo, and go to the PRINT module. There, over time you will create a print preset of your own or each combination of printer and paper type (and other preferences, such as layout, margins, etc). Update that whenever you make a change to your preset. That way you invent the wheel once.

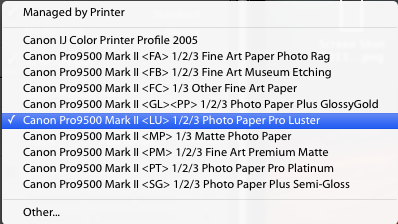
In that profile, make sure under COLOR MANAGEMENT, you do NOT select “managed by printer”, but instead you select the printer paper profile for the printer/paper combination you are using (profiles which you have installed separately; from the printer or paper manufacturer).

In my case, today, for a print that was Canon Pro Luster paper on my Canon 9500 Mark II pigment printer, so I selected that profile:

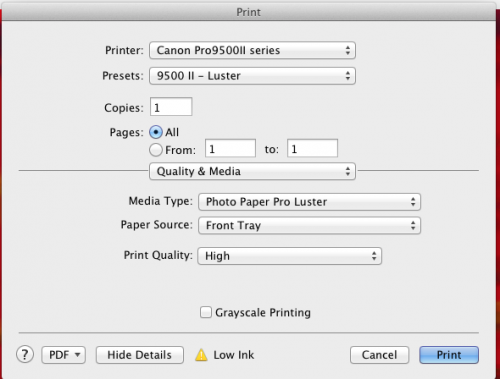
Before you actually issue the print command, the computer’s PRINTER dialog will pop up. In that, be sure to select the same paper (under “Quality and Media”):

OK, that is easy once you set it up, and prints will be reliable and predictable. And right.

2. SOFT PROOFING:

But here’s the fun part. In new Lightroom versions, there is an option called “soft proofing”. And that rocks.

Look under your image. And activate the “soft proofing” option.

You will be prompted to crate a soft proofing virtual copy; go ahead.

And now you can see where the print does, or does not, reproduce well for your selected paper and printer type (or for your selected colour space, if creating a file)!

See the top right, and select the correct profile for what you are printing to. In my case here, Pro Luster paper on the Canon 9500 MkII:

Now, provided I have clicked the little paper mark top right of the graph ON, I see where this photo will not reproduce well on the paper selected.

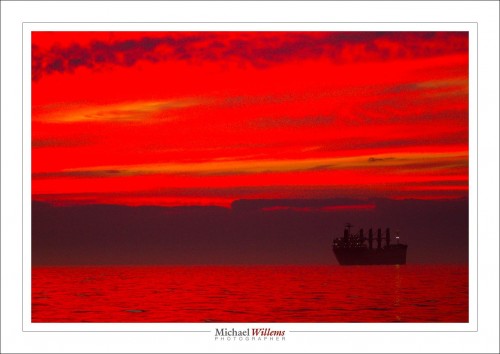
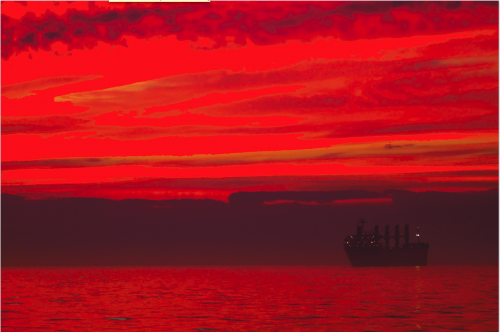
For instance, take the print I was just creating. A lake Ontario sunset:

Now, if instead of the printer profile I select “AdobeRGB”, I see the following in my soft proofing view:

Ouch! All those pure red areas are where the colour is outside of what the selected profile can handle. I.e. they will not look good. So I do not even attempt to print this print the way it is via an AdobeRGB file (yes, now you see how bad AdobeRGB is compared to using a good printer’s entire gamut).

if I select my paper type instead, I see:

There is still a little pure red stuff going on at the top, but much, much less. (If your print is red itself, like mine here, simply turn the “problem view” on and off repeatedly to see where the problems are.)

So now I can tweak my image in the DEVELOP module until this last bit of warning goes away. I can use HSL to reduce saturation or hue or luminance of the colour in question, or I can change overall saturation, or I can decrease exposure: I have all the options open. And my print will be good. And I do not have to make four test prints to finally find the paper that works well!

The Soft Proofing function is amazing. One more reason to live in Adobe Lightroom, if you are not yet!


____

Want to learn? I have scheduled a special all-evening Flash course in Oakville, Ontario on 3 Oct; as well as a five-evening basic photography course, starting Oct 2, aimed at novice to intermediate users who want to learn to use their DSLR properly once and for all.

These courses are very special in that they are like private coaching: I will only take up to 6 students for each course. The Flash course includes the Pro Flash Manual, and the five-evening course includes course materials and homework. Both are now available for signing up on www.cameratraining.ca/ – see the flash course details on this page.


Of Pigments and Dyes

A quick word about inkjet printers today.

My Canon Pixma Pro 9500 13×19″ art printer broke recently as you will have read – so I bought a Pixma Pro 9500 Mark II printer. These are pigment printers, as opposed to the more usual dye printers.

What is the difference?

Dyes, which are absorbed by the paper they are printed on, are easier to keep predictable in terms of colour, and hence are cheaper; pigments, on the other hand, which sit “on top of the paper”, whilst more expensive ($200+ for all ten cartridges on my printer) are permanent. Pigment inks can last more than 200 years on some paper types under ideal (museum-quality lighting and framing) conditions; dye inks fade quickly (sometimes in as little as days; usually in 20-30 years). Which is why art prints are made on pigment printers: you presumably want a piece of art to last forever.

When you use a pigment printer, you need to make sure that you use paper suitable for pigment printers. Good papers (like the Inkpress pro Silky I like to use for photos, or the Hahnemülle Fine Art papers) will say on the box when they are suitable for both dye- and pigment-printers. Pigments combined with long-lasting natural-fibre Fine Art papers, once you get all the settings and drivers right, give you extremely consistent, predictable, and lasting museum-quality prints.

Also, my Pixma printer accommodates Fine Art papers by having a straight (flat) paper path – this requires a complicated feeding procedure that takes time, and only individual art sheets can be loaded, but it is worth is since it does not bend the paper.

So when anyone asks “why does a print cost like $80?”, the answer is above. The cost of supplies, paper and printer, combined with the time needed to make a pro print, combine to make the finished product not cheap. But it is “museum quality” and lasts forever.

So before you go to Wal-Mart for a quick print – do some research, and consider having it done by a pro using pro pigment inks and art papers – or buy your own, and do the work to set it all up. There’s nothing like a quality, lasting print to show off your work!


Printing more prints

Adobe Lightroom offers great print functions. One of them is the ability to print multiple images on one sheet.

You can print the same image multiple times (a “Picture Package”), or many different pictures on a page (a “Custom Package”).

The latter is easy:

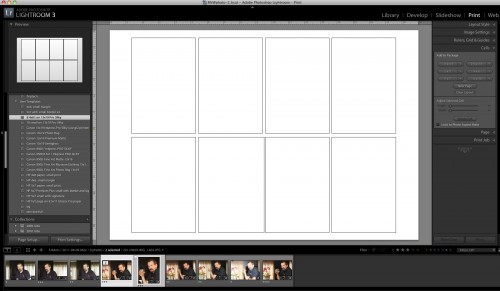
  1. To keep it easy, in the PRINT module, select a “normal” print size that you have previously defined (eg a 13×19 page, or an 8×10 page).
  2. Now go to “Layout Style” on the right, and select “Custom Package”.
  3. Go to “Cells”, and add cells of the right size( eg 4×6, 5×7, etc). These will show up as empty blanks.
  4. You can rotate and reposition each cell after you add it. You can also create multi-page layouts.

You see this:

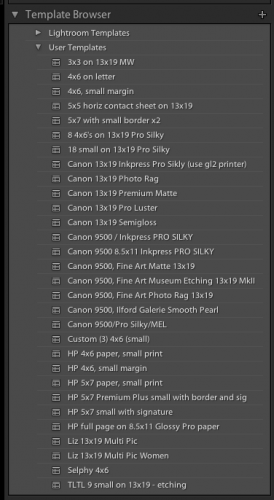
Once you are happy, save the layout by using the PRINT – New Template function from the top menu.

Now you can make your actual print. To do this, drag the images you want into the layout from the negative bar at the bottom. Then print, and you are done!

My printer did overtime today printing a recent shoot – I find that a large page with small images is good for two purposes:

  • For me – It allows me to see an overview conveniently – a “contact sheet”, if you like.
  • For the client – I get many prints done at once. (Note that if this is for printing and cutting, I also enable “Cut Guides” in the Page section!)

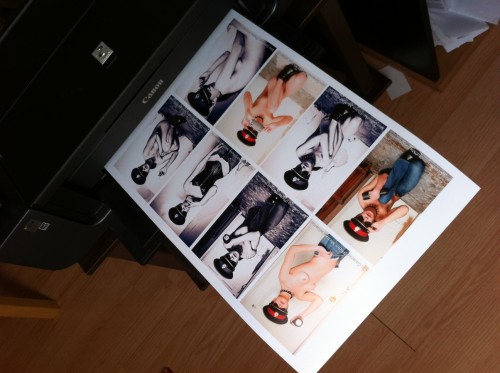
Here’s my Canon Pro 9500 printer producing a selection from a recent shoot:

Model shoot overview (Photo: Michael Willems)

Saves me a trip to the print shop, and the print is under my control – and one page is easier than 8 small pages. Once again Lightroom delivers the convenience that really makes it work well for photographers, by making life easy and saving time.

Personal note: today I honour the memory of my father, GTC “Eddy” Willems, who died of a stroke in 2002 at age 72. Today would have been his birthday.


Questions

Reader questions today:

I was searching your blog to see if you had anything with output sharpening for printing from LR2 and did not come up with anything. I have read or been told at one point that you want to do some over sharpening of your images when you go to print them to compensate for the process of putting ink to paper and having that ink spread?

Is this something to worry about, and if so any suggestions for settings?  I have the basic LR2 sharpening output features and the mogrify add on has some output sharpening options as well.

There are two reasons you may need to sharpen images.

  1. “In-image sharpening”: a DSLR has an anti-moiré filter in front of the sensor which unfortunately blurs the image a little. A little sharpening (edge detecting) afterward helps bring back the optimum sharpness. Usually not a big worry.
  2. Output sharpening: Plus, when you decrease an image in size – e.g. to bring back a full-size images to 1024×768 size for your iPad, or to 800 wide for an email – you lose sharpness. Sharpening brings back the original sharpness.

Good news: if you use Lightroom, this is taken care of.

If you want additional in-photo sharpening (type 1), select this in DETAIL in the Develop module.

And if you want output sharpening (which as you correctly surmise, you do!), just select “standard” when producing your output or print (and select what the image is for). It is in the export and print dialogs. Lightroom automatically takes care of the right amount of sharpening, given the output parameters. This is really very clever. In the Photoshop world this was a lot more work.

Another thing I have heard was that for guys like me who don’t have an expensive printer at home, you can download or get printer profiles form local printers and adjust your images accordingly so you can see how they will turn out from their printer.  Any experience on this subject.

Yes, and it is true. For anyone. Download, install, and use the right printer profiles for whatever printer and paper combinations you use. Check with your printer and your paper manufacturers!

Printing is black magic – but once you have a certain print type –  printer – paper combination sorted out it will always work.

Let's start printing.

Printing is more important than ever. We can now make great photos and print them professionally at home, impressing everyone. And we should! Printing is the way to really enjoy your photography.

But it is, or can seem like, a kind of black magic – an art almost as much as a science. Perhaps because of that, I was asked recently to talk about my print workflow. And since I just spent the entire last two days printing 13×19 prints, this seems a good time to start.

“Start” is the word: this will be several posts – not one.

And what I want to start with is the distinction of pigment inkjet printers (such as the Canon 9500) versus the more common dye inkjet prints (like the Canon 9000).

Dye printers:

  • Are common and affordable.
  • Can print to any paper.
  • Have ink that bonds with the paper.
  • Produce very bright colours.

Pigment printers:

  • Are more costly.
  • Can only use certain papers.
  • Deposit their ink on the paper instead of bonding with it.
  • Produce prints that dry a bit more quickly.
  • Most importantly, tend to produce prints that last. 200-300 years is common, while dye prints often last just 20-30 years.

I use a Pigment printer (the Canon 9500). This means I am restricted with regard to the paper I can use. I use Canon papers and other Hahnemülle papers (the ones that say “Pigment” on the box). These are not as bright as other papers (off-white), but for a good reason: they last and stay the same way. I would rather have a slightly yellowish paper that will be the same for centuries than a bright white print whose ink and paper will both fade in more decades.

This is not a law. Some dyes wortk very well and are long-lasting. So do your research. But you will find that today, pigment printers are a great option if you want prints that last, while dye printers offer affordable impressiveness for today.

I know – I am simplifying. So do your research and decide what to do. Google is your friend.