Joel, a reader who came on a recent Creative Urban Photography walk with me, says the following – and I thought it worth it posting this today, to emphasise what I have said before:
Just circling back after the Urban Photography walk in Oakville that I did with you and the group on Oct. 23rd.
Despite the rain, it was a nice blend of technique and discussion. I putzed around after we wrapped up down by the waterfront.I had been on the fence about purchasing a flash after the Henrys show, but spending an afternoon with the Speedlighter had me sold. Your quick demo about flash compensation and CTO was enough to push me over the edge.
[…for Canon users: Joel then points out there are cheap deals on for the 430EX: price match the Adens Camera offer at $274.99. I believe Henry’s also has a great offer on this flash…MW]
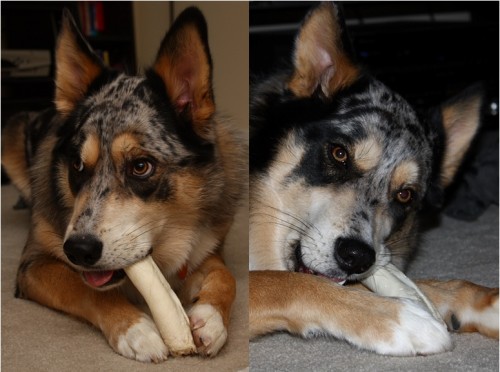
Not that you need any proof yourself, but I took a quick comparison shot (attached) to bring back to the camera guys here at work. Images are unedited (but very compressed). Left side is bounced behind me with the 430, right side is standard pop up flash. Both shot at ISO 100 in my poorly lit living room at night. Very happy with it and excited to learn more. Keep posting on your speedlighter site – lots of good advice…
Thanks, Joel. Here’s your two shots:
(Click to see them larger).
As you can see,
- The bounced shot is much warmer (note, if due to wall colour it is too warm, this is easily adjusted with one little tweak in Lightroom).
- Its shadows are softer. Look at the dog on the right and at the annoying shadow on our right.
- Its background is not inky black, unlike the direct image’s background.
- The catch lights are more natural (the straight image has an unnatural looking tiny catch light right in the centre of the pupil; the bounced image has a much more natural looking and much more naturally positioned catch light).
- The dog looks more natural in the left image. On people, this would be even more dramatic: the right image would have oily, overexposed skin highlights. The dog’s hair helps shield us from this.
Images like this are taken as follows:
- Attach the flash to the camera.
- Turn it on, and ensuring it is set to TTL mode (its default).
- Use program mode on the camera; or manual (preferred for more advanced users) or even “night portrait” mode.
- Turn the head so it points 45 degrees upward behind you.
- Shoot!
Joel adds, in a follow-up email:
Camera is Canon XSi. Standard Kit Lens 18-55 EF-S. I’ve never seen this level of detail out of my equipment before. It was so sharp that when zoomed in, you can see my kitchen in his eye. Like you said – ‘A bright pixel is a sharp pixel’ J
Exactly. That is Willems’s Dictum: “Bright Pixels are sharp pixels”. Noise, grain, cockroaches and bedbugs all hide in the dark areas.
All this is subject of my next November 20 all-day course (see www.cameratraining.ca) – you will learn these techniques and many more, and go home with some great portfolio shots using a professional model.

