Accountants of the wild frontier

Today was a good example of n event shoot.

Colleague Joseph and I got to the Metro Toronto Convention centre to shoot a few hundred accountants pointing laser pointers at the ceiling. A very un-accountant-like event!

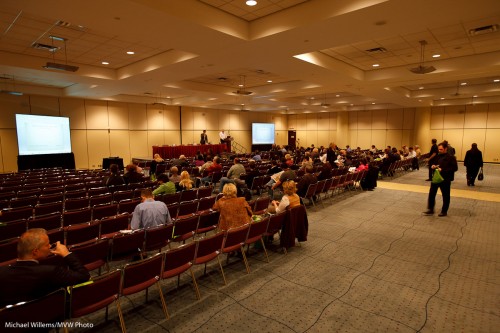
So we set up ladders and camera with the light just right. We use a combination of ambient and gobo’d flash. Test shots of the room looked like this:

Convention hall

Convention hall

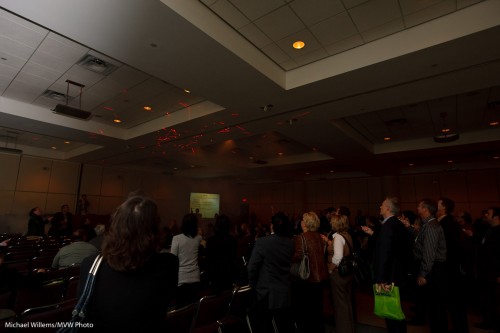
The event starts. And as the fog machine we had arranged starts and on command, the accountants’ laser pointers aim… unexpectedly, someone dims the lights to just about zero.

So we get this:

Convention hall

Convention hall, lights dimmed

No time to say anything: we only have moments to shoot.

So I quickly had to:

  • open up the lens to f/2.8,
  • shoot at 1/15th second,
  • at 800 ISO,
  • I quickly set the flash to 1/16th power manual and bounced behind me (if I had had more time I would have gone up to 1/8th power),
  • ….and then at home, push the exposure another stop!

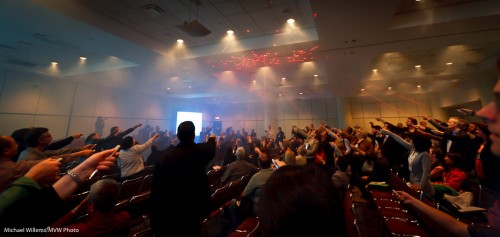
In the end, this gives this:

Convention hall with lasering accountants

Convention hall with lasering accountants

Not too shabby eh? Ever seen such a fun group of accountants?

The moral of this post: you have to be quick on your feet and problem-solved instantly when someone is hiring you for a shoot. You cannot come home with excuses: need photos instead.

And it never hurts to shoot RAW.

Data mining

Photography is not about gear. It is about art, expressions, emotion, colour. About the end product, not about what you use to get there.

Right. But it does start with gear. I thought, therefore, that you might be interested in what lenses I used for what shoots. I get asked this rather a lot. So I did some data mining of my shoots of the last few years.
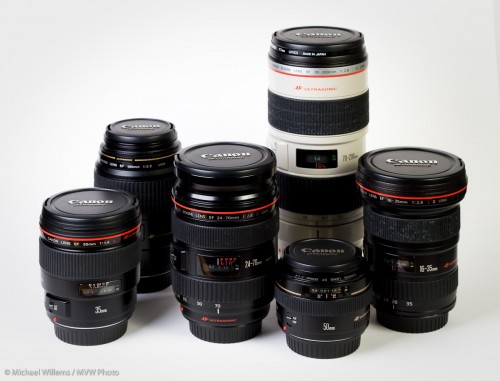
Michael Willems's Lenses

Michael's Lenses

EVENTS:

First I picked some recent event shoots: “grip and grins”. The lenses I uses were, out of a total of thousands of images:

Canon 1D Mark IV (1.3 crop factor):

  1. 42% – 24-70 f/2.8 (equiv. 30-90) (by shoots, this is number 2)
  2. 39% – 70-200 f/2.8 (equiv. 90-260) (by shoots, this is number 1)
  3. 17% – 16-35 f/2.8 (equiv. 20-45)
  4. 1% – 35mm f/1.4 (equiv. 45)
  5. 1% –  50mm f/1.4 (equiv. 65)

Canon 1Ds Mark III (full frame)

  1. 51% – 16-35 f/2.8
  2. 33% – 24-70 f/2.8
  3. 12% – 35mm f/1.4
  4. 2% – 70-200 f/2.8
  5. 1% –  50mm f/1.4

That is interesting. On the 1Ds, I use the 35mm f/1.4 lens in too few shoots (a lovely lens!).

GENERAL:

Now the total, all types of shoots, out of a total of tens of thousands of images::

Canon 1D Mark IV (1.3 crop factor):

  1. 49% – 24-70 f/2.8 (equiv. 30-90)
  2. 25% – 16-35 f/2.8 (equiv. 20-45)
  3. 19% – 70-200 f/2.8 (equiv. 90-260)
  4. 3% – 35mm f/1.4 (equiv. 45)
  5. 2% –  50mm f/1.4 (equiv. 65)
  6. 2% – 100mm macro

Canon 1Ds Mark III (full frame)

  1. 33% – 24-70 f/2.8
  2. 27% – 16-35 f/2.8
  3. 19% – 70-200 f/2.8
  4. 13% – 35mm f/1.4
  5. 5% –  50mm f/1.4
  6. 3% – 100mm macro

One surprise here is how often I use a specialty lens like the macro. The real surprising thing is how often I use the 24-70, on both cameras.

Here is another breakdown: What focal length do I use in event shoots. More data mining from Lightroom gives me this (out of aroud 2,000 shots in a number of event shoots):
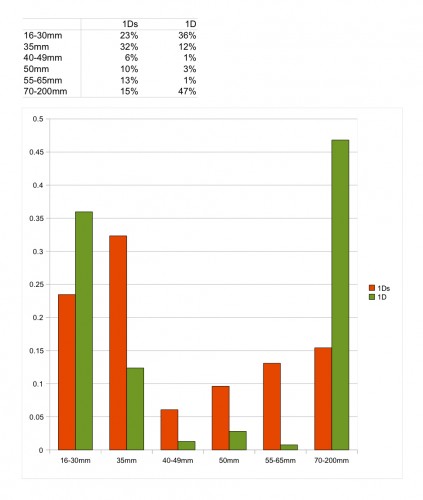
Michael's event shoot focal lengths

Michael's event focal lengths

As you see, peaks at 35mm for the full frame and at 70-200mm for the 1.3 crop camera.

So for an event, here are a few suggested combos.

Large room: A good safe “vanilla” combo, for larger rooms:

  • 1Ds with 24-70
  • 1D with 70-200

Smaller Room: Another safe combo, good for wider shots, e.g. in smaller rooms:

  • 1Ds with 16-35
  • 1D with 24-70

Creative: A slightly riskier combo, great for both wide effects and long shots (and covering a super-wide range, but maybe a bit riskier because the range between “real” 35-90 is missing):

  • 1Ds with 16-35
  • 1D with 70-200

Dark: Finally, a combo for darker rooms:

  • 1Ds with 35 f/1.4 prime
  • 1D with 70-200 – or with 50mm f/1.4!

Of course you can also just pick what you have. I mentioned a friend and student who recently showed me a wedding he had shot entirely with a 35mm (equivalent) lens. You do not need to obsess too much.

That said, it is fun to use the tools in the best possible way. And I strongly recommend that you also make checklists.

Quality

I was amused to see Leica announce recently that they would not be issuing any micro four-thirds lenses. In a recent Popsci blog, Leica’s VP marketing is quoted as saying:

“One reason why we’ve decided not to move into Micro Four Thirds is that we have looked at the sensor size and realized that it cannot produce the image quality that we need. Therefore we decided to stick with the full format in addition to APS-C. It’s all about the ratios”

Interesting. Really? So why is Leica selling rebranded Panasonic cameras at the bottom end?

So let’s see what a real micro four thirds Panasonic, my new GF-1 with fixed 20mm lens, can do against the top of the line Canon, the 1Ds Mark III with a prime 50mm lens. Crazy comparison, eh? Who’d be crazy enough to shoot the same object with a highest-end SLR versus a point and shoot?

Me.

I just shot my most patient model in the studio, lit by a couple of Bowens strobes.

  • Both cameras set to manual, 100 ISO, f/9, 1/125th second (as measured with the light meter). One shot focus, focus point on the eye.
  • 1Ds Mark III: 50mm f/1.4 lens on this full-frame 23 Mpixel camera
  • The 12 Mpixel GF1 was fitted with a 20mm f/1.7 lens. Because the sensor is four times smaller than a negative, this is equivalent to 40mm “real” length.

So the shots:

Full shot, Canon:

Canon 1Ds Mark III, 50mm f/1.4 lens

Canon 1Ds Mark III, 50mm f/1.4 lens

Full shot: Panasonic:

Panasonic GF1, 20mm f/1.7 lens

Detail, Canon:

Canon 1Ds Mark III, 50mm f/1.4 lens (detail)

Canon 1Ds Mark III, 50mm f/1.4 lens (detail)

Detail, Panasonic:

Panasonic GF1, 20mm f/1.7 lens (detail)

Panasonic GF1, 20mm f/1.7 lens (detail)

In all cases, click to see a larger picture.

These were RAW images that have been read into Lightroom and edited slightly for white balance and exposure. No sharpening or noise reduction was done.

What does this show me? Yes, I suppose at higher ISOs I’ll see more of a difference, but at these low ISO settings, any megapixel count over ten is “enough”, and the difference in the case of such a controlled shot is minimal.

Certainly, this does not in my opinion warrant the comments by Leica.

While I am not about to hang up my DSLRs, I am impressed by the small camera’s ability to produce professional work.

So to Uncle Fred (and you are not Uncle Fred, or you would not be reading this):

  • It’s not about the equipment;
  • It’s about the picture.

There! Let’s start thinking more about the image than about how we make it.

Site of the day

I see that this site is today’s Site of the Day at http://www.1001noisycameras.com/ – that’s great! Welcome, 1001 Noisy Camera fans.

As you will see, on this blog I teach daily – a teaching post every single day. Enjoy, and search back through the past year – many useful tips here from a working photographer and teacher to everyone who is interested!

Few posts of mine come without a snap or two, so here are a couple from yesterday’s shoot – the Hon. Minister Harinder Takhar MPP, a truly charming man:

The Honourable Minister Harinder Takhar, MPP, photographed in June 2010 by Michael Willems

The Honourable Minister Harinder Takhar, MPP

I used three lenses: one long (70-200 on the 1D Mark IV) and two wide (24-70 and later 16-35 on the 1Ds Mark III).

Wine being poured at a reception, photograph by Michael Willems

Wine being poured, photograph by Michael Willems

Manual and with a flash for fill.

Reception Buffet, photograph by Michael Willems

Reception Buffet

Cheers,

Michael

Why I use 1-series cameras

They don’t do anything more than a Digital Rebel. But they do do it better sometimes, and that is important when you shoot for a living. They are more waterproof and more shockproof and shoot faster. And they have several other neat functions that can really matter.

Look at this shot here, from a commercial shoot I just did:

Entertainment Central, Oakville

Entertainment Central, Oakville

No idea what happened to the bottom right corner: bad sector on the disk, perhaps?

That is why the 1-series cameras, like my 1D Mark IV and my 1Ds Mark III, can write to two memory cards at once. I always do this. Sometimes the same format to both, sometimes large RAW to one and small RAW or even JPG to the other. That way I still have one when the other one has a problem.

If you do not have a 1-series or similar camera that can write to two cards, what do you do?

  • Change memory cards regularly
  • Format them every time you re-insert into the camera
  • of course, backup, backup, backup.

But you knew that.

Fast Flash!

To exceed your camera’s maximum flash sync speed (which is something around 1/200th – 1/250th second), you need high speed flash (Auto FP flash, in Nikon terminology) where the flash pulses at ca. 40kHz instead of firing all at once.

You need an external flash for this, like an SB900 or a 580 EX.

  • When you need it: when you need to exceed your flash sync speed, e.g. when taking an outdoors picture of close object with blurry background. That means low F-number, which means even at 100 ISO you’ll need fast shutter speeds.
  • Advantage: in theory, you can you can go to any fast shutter speed and still use flash.
  • Drawback: you lose much power, so that Fast Flash is usually only suitable for close-by subjects.

The Shot: Shoot a close object or person with blurry background. To achieve this, set your camera to A/Av mode, and select a wide open aperture (f/2.8,say). (If your lens cannot go down to f/2.8 or it is a very dull day, you may need to go to 400 ISO).

You should now be exceeding your flash synch speed-if you set your flash to Fast Flash. Else you get an overexposed picture (your camera will refuse to go faster).

Note, your object has to be close, especially if you get to speeds of 1/1000th o rfaster. Else, your flash will not have enough power.

And now you can get this – the following image was lit by flash at 1/1600th second, at f.2.8!

Nick

OK, so I spent the day photographing St Nicholas, i.e. Santa Claus, in the mall. The real one (pull his beard, it’s the genuine thing).

So how do you do this? See yesterday for the tethering article, but I thought it might be useful for you to see how this is done in other equipment terms.

I used, and with the help of my assistant Daniel set up, the following in this order:

  • Lights:
  1. Two 400 Ws strobes (Bowen) on light stands, firing into umbrellas.
  2. A pocket wizard on each light to fire it.
  3. Power set to 4/5 as a starting point
  • Camera:
  1. Canon 1Ds MkIII, with power supplied by mains adapter.
  2. A tripod
  3. Wire release for the camera.
  4. 50mm f/1.4 lens (any lens would have done)
  5. Pocket wizard (to fire the other two)
  • USB cable to the computer.
  • Computer, tethered as per yesterday’s article

First, I set my camera to manual exposure, 100 ISO, 1/125th second, f/8. Then I set the lights to that, using a light meter.

Then I tried a test shot without  flash:

This is very important. I wanted the ambient light in the mall, which varied due to a large skylight, to not affect exposure. So that picture above should look dark. Else variance in the sunlight will affect my pictures. One lovely thing about studio lighting is that it is consistent.

Then I did a custom white balance (I had to shoot JPG for the printing company, so this was very important). So I shot a grey card on Santa’s seat, and set my custom WB to that exposure.

Then I set the camera “style” settings to extra saturation by one click. (I am shooting JPG and we have bright Santa- and kid-colours).

And then I was ready. Here’s me:

Having tuned a bit (set my aperture to f/9 instead of f/8 to reduce exposure a bit), I am now ready for shots. And for Santa!

And the great thing is that I was able to stay at these settings all day. And every picture was sharp as a tack, exposed perfectly, and the right neutral colour. This is what I love about studio light. Even in a mall, with a portable studio. Of course it is important to check every now and then that you are still set right – JPG, 1/125th sec, 100 ISO, f/9. But if you make no mistakes, you get the same great light all day.

And Jolly Old Nick will be happy, as will the kids – and more importantly, their parents.

Since you asked:

Here are some shots at 100-800 ISO from both the 1Ds Mark III and the 7D. Studio, and to get to the next step, I just changed both ISO and Aperture up in both cases each time.

The shots below are a crop detail from this setup, lit with one umbrella and one softbox fired with pocketwizards. I used a 35mm prime lens on the 7D, and a 50mm prime on the 1Ds MkIII, in order to get the same field of view.

Important – click on each image to see a pixel-for-pixel real-size preview.

IMG_1802

So here we start at 100 ISO:

7D-100

7D- 100 ISO

1Ds MkIII - 100 ISO

1Ds MkIII - 100 ISO

Now take a look at 200 ISO:

7D - 200 ISO

7D - 200 ISO

1Ds MkIII - 200 ISO

1Ds MkIII - 200 ISO

Now up to 400 ISO:

7D - 400 ISO

7D - 400 ISO

1Ds MkIII - 400 ISO

1Ds MkIII - 400 ISO

And finally, 800 ISO. Now we start to see noise, but keep in mind, these are real-sized crops. In reality, even at 8″x10″ you would see little.

7D - 800 ISO

7D - 800 ISO

1Ds MkIII - 800 ISO

1Ds MkIII - 800 ISO

Indoor Flash

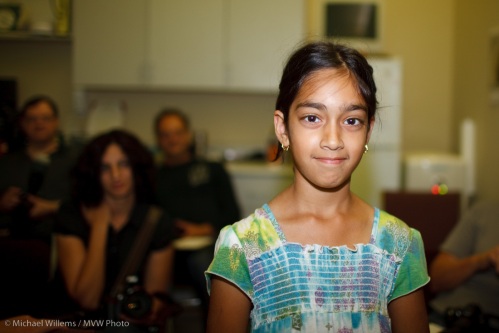
Here’s a few demo shots from a kind volunteer (a student’s daughter) at a recent camera course I taught. This bit was about “flash”.

First, pop up the flash and use “P” or “Auto” mode and you get the picture that makes people hate flash:

MVWS0106

Then enable “Slow flash” or “Night portrait mode” and you get a better picture.. yeah, it’s better. But not all that much:

MVWS0105

Then put your big flash on top of the camera (e.g. an SB-900 or 580EX II, or their slightly smaller equivalents SB-600 or 430EX II). And aim that flash behind you.

Yeah. Behind. So it bounces off ceilings and walls behind you.

Much better. Much. See:

MVWS0107

And then if you want extra “character” and “depth”, bounce off a side wall, if you can find one.

Now you get three-dimensionality, depth, character as well:

MVWS0108

I mean – how cool is that? And all this was done in “P” mode, with no special stuff, with no settings on the camera, no required knowledge of aperture, no complicated techniques.

Flash is wonderful once you learn how to play with it. And it is easier than ever.