Passports and more…

I am having a lot of fun with passport/ID/Visa/Residence photos. As I mentioned before, every country is different…:

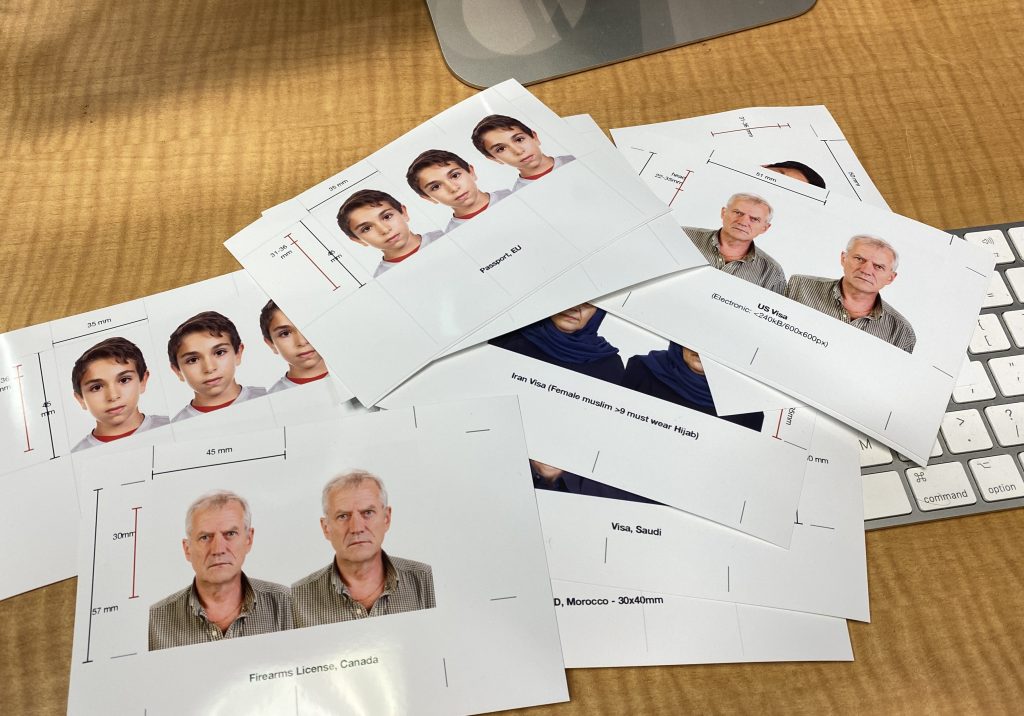
And the fun is to see a lot about a country by the requirements. As in…:

  • The Chinese are control freaks, with the most complex size requirements in the world – but the Dutch are not far behind…
  • For Iran, any muslim female over 9 years old must wear a hijab.
  • French photos have a “white background forbidden” rule, while the rest of the world requires white – just to be different?
  • Europeans are, to an extent, standardized – but only to an extent.
  • Bureaucracies are bureaucracies… invariably a country will have different requirements depending on which bureaucracy needs the photo (visa vs passport vs license: all different)… just imagine the efficiency gains that could be made by having one standard!
  • The Brits have strange requirements that involve being an approved photographer using some approved British system…
  • The Canadians are the only ones to do it right: great sizing requirements, bigger photo than anyone else, meaning lots of space for people, with an afro, or with a very long beard, our with a wide face, and so on.

Fun stuff! And we love doing them… and the one thing they al have in common is: no smiling, “neutral expression”… don’t blame us for that one!

Shoot!

Yesterday, we shot Orleans’s X-uvia Soccer Academy. And we put both kids and adults in front of a green screen, like so:

Because that way, we can put the kids where they belong – on a soccer field.

To shoot “green screen” like this, you use a chroma green background, and then you use software like Photoshop (with a technique explained previously on this blog), or, like in my case, dedicated Green Screen software to put the background behind the subject.

To do this, keep in mind that the subject must not wear green – or they’ll be transparent. But often forgotten: also avoid things that reflect green. You can see some of that effect in the soccer ball above.

As a finishing touch, let’s add logos (which is easily done in Lightroom):

Of course you can also take a way the background completely…:

That way, if you save it as a .PSD file, the image can be put on a web site or in a publication with text all around the subject.

And that’s hoop it’s done! Now, back to finishing the images…

Why you do not make your own passport photos…

We love doing passport photos – precisely because they are a challenge.

And I do not mean the taking of the photo. Yes, that too needs to be done well: pure white background, neutral expression, looking straight at the camera, no shiny skin refections, no shadows, well lit, good colour, veils must not cover eyebrows, glasses discouraged but if used no refections – and so on.

But the really fun challenge is to get the format right. Here, for example is China’s required format:

Take a good look at that – the specificity of all the different dimensions. And if you get them wrong, your photos are rejected.

What if the person has an afro? Or if the hair is wild? The top means “where the skull is”. It can be hard to tell…

And what if a person has a very wide face – like a small child? Then it may be almost impossible to get the picture to meet those requirements. So this needs care and attention and, dare I say kit, some artistic feeling as well as mathematical insight.

And then there’s digital. “354 x 472 pixels” – specific much?

And of course most countries’ specifications differ from most other countries’… and they can change over time – as well as per embassy!

And this is why we love doing passport photos: because others do NOT do them well. We virtually never get them rejected. And it’s always fun too do a good job.

Mars Ethics

So NASA released this amazing picture of a spacecraft actually landing on Mars:

Fantastic.

But the first thing I, as a photographer, think is “Damn. That’s not sharp”. Click to see the image full sized to see that it is indeed not sharp. Hey, it’s from a dangling spaceship on Mars, so this is not criticism!

But still… I can make that better.

Using the AI sharpening software I use, with only very little effort we get this sharpened image:

Again, click and view full screen to see the sharpness. Amazing, no?

Now. Is this unethical? Am I altering, doctoring even, a NASA image?

There’s two ways you can materially change a photo:

  • Manipulating images to make them art is OK if you say it’s art.
  • Distorting for nefarious purposes (like to “prove” that the earth is flat) is not OK.

But this is neither art nor distorting the image. This is simply bringing back a clearer picture of the reality that there actually is. Just like correcting the white balance would be.

So I think we’re good here. Enjoy the sharpened image.

Leading lines

A short note today about leading lines. We use those to lead the viewer into a photo and call attention to the subject. You can use a wide-angle lens, and you can look for lines naturally occurring in the environment. Like the perspective lines here, in the parking lot at Place d’Orléans mall, that seem to point to Rose:

Rose at the mall

As soon as I saw r=those “Alhambra-like” columns, I knew we had a photo. It’s all about opening your eyes.

This, incidentally, is one of those images that can also work very well in Black and White – here, with the super-cool grainy Tri-X film look – and you really need to see it full size to judge:

In this particular case I am not sure which one I prefer – I love both. What do you think? Let me know!

New Tools

When we fix images, as we do daily in the store (www.michaelwillemsphoto.com) sometimes it is easy – and sometimes we need a lot more effort. Like in this before/after example:

White balance isn’t enough – not even close. For these colours I needed to use Lightroom’s white balance, extensive HSL, and especially the new excellent “Color Grading” tool. If you haven’t needed it yet – you will. And then a coloured local adjustment brush to add some skin colour, quite often – this is an art as much as it is a craft and a science.

But then there’s also Photoshop to remove the small imperfections, and an AI-based de-noise tool to lower noise. (“AI” stands for “Artificial Intelligence” – it’s not the name “AL”…)

In the end, it is always worth it. Memories preserved. Because when the photos fade, the memory itself fades.

Travel Photo Trick!

Today, a repeat of a 2015 post that is particularly useful for travel photographers.

With the camera on a tripod and exposure set to manual, I can take pictures like these, one by one:

…and on on. As said, I am using a tripod, so the only thing that varies is me (I used a self timer).

And then I can use Photoshop or the GIMP (the latter is a free equivalent) to do things like this very easily:

Or even this:

OK.. so a cool trick. You do this with layers and masks. Hellishly complicated user interface, but once you know the silly UI, the process itself is very simple. It’s the only thing I have the GIMP for.

So. Why would I think this is useful, other than for fun?

Well…. think. You can also use it the other way. Instead of replacing the wall by me, replace me by the wall. And now you can perhaps see a benefit looming.

No? Think on. You are at the Eiffel Tower. Or the Grand Canyon lookout point. Or whatever tourist attraction you can think of. What do you see? Tourists. Right. It attracts them: that’s why it is a tourist attraction.

But not in the same spot all the time. So all you need to do is the same I did here: take a bunch of pictures. Say 10-20 of them. So that you have each spot of attraction at least once without a covering tourist. Then you put them into layers—one each—in PS. And then you manually remove tourists. One by one, poof.. they disappear.

Or you go one further: depending on your version, you can use function File > Scripts > Statistics.  Now choose “median” and select the photos. And you end up automatically with an Eiffel tower without tourists, a Grand Canyone without other onlookers, and so on.

Cool? Yes, very.

So there.

Magic.

That’s the only word I can use. Magic.

I am talking about Topaz Sharpen AI. Software that uses AI to sharpen blurry or out of focus images.

Dreadfully slow, but that’s fine. Look what it does. View these images full size and look at the cat in the background “before” and “after”.

Need I say any more? This kind of AI sharpening was, until recently, impossible.

This is one reason, by the way, why I have always said “don’t delete your bad images”. Who knows what the future brings.

Recommended.

Apollo 13

Sometimes I feel like an Apollo 13 engineer. Everything is going wrong – but you use ingenuity (and duct tape) to make it work again.

Yesterday afternoon, suddenly:

  • My Mac has unrecoverable disk errors
  • My external drive, where my photos live, spontaneously lost all of 2020!

Fortunately:

I make backups.

…and as it happens I had made a backup that very morning. So after a quick restore, all is well again.

And now I need to find a day where I do not need the Mac, so that I can reformat the drive and start over…

More restore in the store

Since the store re-opened, I have been doing a lot of photo restoration. Like these two, today:

And these examples illustrate two things. One, I do it all in Adobe Lightroom. With a bit of inventiveness and experience, it can handle this. And that brings me to the second point: there is a big difference between “good” and “good enough”.

Of course in the ideal world, you only do “good”. But that can easily mean several hours on one image. Which means a couple of hundred dollars – which puts the restoration beyond most people. So instead, you do what is warranted. It does have to be good enough, as these are, but it doesn’t have to be perfect.

Whatever you do – do restore your old pictures. Or have an expert do it for you. When I fix old photos, I also print them as giclée prints, using pigments on permanent media. So that they will last an awful lot longer than the orginals.