Lighting Ratios

When you use more than one flash, you can adjust each light individually. If you use speedlights and your camera maker’s wireless TTL functionality, you can do that in two ways:

  • Canon: relative, using ratios. As in “A:B = 4:1” meaning A is 4x (two stops) lighter than B
  • Nikon: absolute, by adjusting individually. E.g. “A = No adjustment; B = -2 stops adjustment”.

An example of this using two Canon flashes.

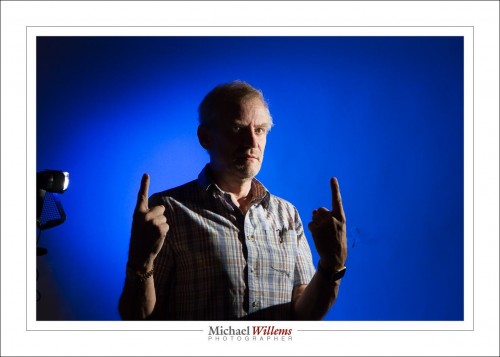
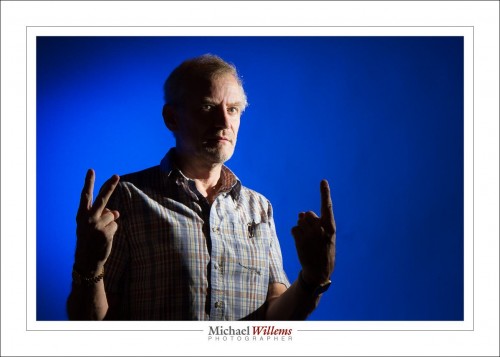
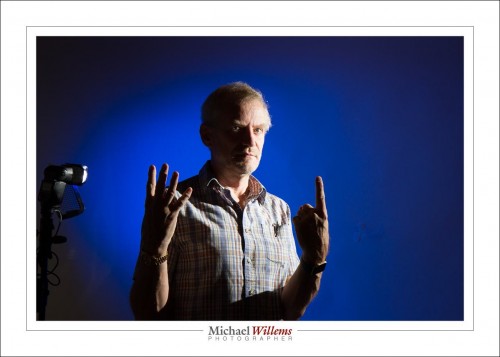
Ratio between key light (face) and background light: 1:2

1:1:

2:1 (you are getting the hand signals by now I presume):

4:1:

The preference is yours: mine is 2:1. But that is largely a matter of taste.

If you use manual flash and radio triggers, it is conceptually easier, since you set up each flash by itself, independent of other flashes. Ratios are a little bit trickier to get your head around, because it is not immediately clear which flash will get darker and which flash lighter, and to what extent. So trial and error will be required. Either way, key point is that you should think carefully about how bright each flash is, in a multi-flash setup.


Flash tip

Today, a quick but important (and as far as I can tell, pretty unique) TTL flash tip.

So you want to know if you can do a certain shot? TTL outdoors is fighting against the sun. Do you have enough power to do the shot? It’s always a battle.

You can of course fire a test shot. If the flashed area is dark, try exposure compensation, maybe. Or spot metering, or using FEL (flash lock). Or rely on the LCD display on your flash to tell you the expected distance. All very time consuming and uncertain. What if I just want to know “do I have enough power in my flash to do this shot” and then if yes, figure it out from there?

I am glad you asked.

  1. Set your camera to highlight review mode (“blinkies” on)
  2. Set your flash to MANUAL
  3. Set power on the flash to FULL (100%, a.k.a. 1/1)
  4. Take the shot!

Now you know:

  • Blinkies means yes, you have enough power. Turn the flash back to TTL and go from there.
  • No blinkies means that however you compensate or meter, nothing you can do. Get closer, or increase your ISO, and try again.

Simple, innit? This trick has saved me countless times.

Tricks like this one, and many more, is what you will learn in Las Vegas next week, and in Mono, Ontario the week after. Come join me and David Honl in Vegas and me and Jospeh Marranca in Mono to learn more!

Manual flash or TTL flash?

You know (if only because I have discussed it before) that you can set your flash to manual or TTL. I thought I would revisit this, and show you some shots I took Wednesday.

Manual means you set the power level; TTL means the camera fires a preflash and measures the return, and then sets the power level based on that. TTL (Nikon calls its version i-TTL, Canon calls its version e-TTL) is the default setting (the panel on the back of your flash says something like “TTL”).

An on-camera flash

An on-camera flash

Unlike David Hobby, I tend to use TTL most of the time, not  manual.

TTL is a major revolution in camera technology, because it allows you to shoot varying scenes without having to worry about distance. In particular, you can bounce anywhere you like, off a different wall for every shot, and you can use whatever modifiers you like, and not worry about measuring. And you can use “fast flash” to exceed the camera’s flash sync speed – useful on sunny days.

A sample, shot with TTL on Wednesday:

Pretty bartender at a reception

Bartender at a reception, shot using TTL

Indeed as David points out, TTL has drawbacks: the major one being that it’s not perfect. Its measuring is finicky. If you always aimed your viewfinder at an 18% grey surface you would be fine, but the meter is in evaluative mode, and on top of that it has an undocumented bias toward the focus point. All that means that if I focus on a black area I get grey (too bright), and if I focus on a white area I also get grey (too dark). So I need to use flash exposure compensation. And check the back of the display frequently.

TTL’s pluses, then, are:

  • You can use it anywhere, any time.
  • You do not need to meter or set anything.
  • You can do it when the subject varies.
  • You can bounce off varying surfaces, like when you shoot an event and both you and the subjects are constantly moving around.
  • You can exceed your camera’s flash sync speed by using “fast flash” (“auto FP flash”in Nikon terms)
  • You can use any modifiers you like

And its minuses:

  • It can be infuriatingly inconsistent.
  • Your subject’s brightness makes a difference.
  • Reflections can spoil a picture by underexposing it.
  • You’ll need to do more post-production work, as in a fast-moving event, where the setup changes with each shot, quite a few images will be half a stop under or over.
  • You’ll even miss a few images.

So TTL is great when things are predictable, but it is also very useful when things are not predictable (like when you, and they, move).

Now let’s move to manual flash. Manual is the opposite to TTL: it is utterly predictable and consistent but you need to do all the work, and it is totally useless when you and the subject move.

So I use manual when:

  • I want consistency, and I can ensure that nothing moves (like in studio portraits).
  • I have time to meter.
  • The flash is just adding light, like an accent, or like fill on a sunny day, when the exact power level is not that important (if the flash were a bit under or over it would not make a material difference to the image)
  • I am using Pocketwizards, e.g. for outdoors shots – which will therefore need to be predictable.

Don’t get me wrong, I love the predictability of manual flash firing, not to mention the predictability of the use of Pocketwizards.

So in fact I shoot manual flash if possible, and if not, then TTL.

Do I sound like I am contradicting myself? No. Because I shoot events. And events mean I need to be on my feet in a constantly changing environment. And that is when TTL shines (pun intended). Every shot I am in a different room, and I bounce off different surfaces. So that is why I usually use TTL.

And when using TTL, it is all about knowing how it is going to react, and being able to solve the problems. That is what I teach in my courses (e.g. at Henrys School of Imaging, and in the all-day course coming up on 30 May, and in Las Vegas on July 12+13, and many more times in between). There’s a lot of problem solving, involving tools like:

  • Flash lock (FEL/FVL)
  • Fast flash
  • Flash compensation
  • Knowing exactly what it will do

Remember, while a setup shot has to be right, in a fast-moving event, the objective is to get within half a stop to a stop, as long as you shoot RAW.  And believe me, this is eminently doable.

Another sample from Wednesday, where bright ambient light necessitated 1/400th second, which meant using Fast Flash:

Oakville's mayor Rob Burton and family

Oakville's mayor Rob Burton and family

Snacks, also from Wednesday:

Snacks at a high-end reception

Snacks at a high-end reception

Do try to bounce, and use you camera on manual settings (flash is still measured). The following may work, but only if you are lucky:

A photographer using popup flash

Photographer using popup flash

I would like to see her shots, but I know they would be better if she used an external flash and bounced it off the ceiling behind her!

Flash: TTL or manual?

Do I set my flash to TTL or manual?

Both.

TTL (fully automatic flash measuring) is a revolution, and you should use it whenever:

  • The subject moves
  • You move
  • You have little time
  • You use one flash on camera
  • You use multiple flashes but they are within eyesight of each other

Use it as is (your flash shows “TTL” on the back display), and do not forget to use Flash compensation to adjust to taste (or when shooting dark or light subjects).

I used TTL here, Sunday night (with -2 stops flash compensation, or it would have been too bright):

Berlin Nightclub in Oakville

Berlin Nightclub in Oakville

Manual (your flash displays “M” at the back and you set the power level to 1/1, or 1/2, 1/4, etc) is useful in cases almost opposite to the previous, namely:

  • You and your subject are stationary
  • Things are predictable and you want full control
  • You have time to meter, try, and iterate
  • You use multiple flashes and they cannot see each other
  • You use Pocketwizards

You can even mix: use TTL for most flashes but fire small accent lights using Pocketwizards and manually set flashes.

Earlier that same Sunday night, when I had time, I used three speedlites set to manual and fired by Pocketwizards, here:

Berlin Nightclub in Oakville

Berlin Nightclub in Oakville

You can probably see I also used some Honl gels: one red and one purple. And one flash was zoomed in to light the picture.

A good photographer knows both TTL and manual. Practice with both, and make them “your own”.

Why would you use flash outdoors?

So why would you use flash outdoors during the day?

Sometimes it is obvious: to fill in shadows on backlit subjects. Or to soften hard shadows. But sometimes you do it for more artistic reasons.

Let me illustrate this with a shot taken during the Get Out and Shoot run we did in Toronto early this week – the workshop I wrote recently.

Imagine you are shooting someone – me, say – on a bright day, but in a spot where I am in the shade against the shady side of a grey building. Before you know it you get a dull picture: grey and low-contrast on all counts: blaah.

So that’s when you bring out the flashes. Say, two remote “slave” flashes, fired by a “master” flash on the camera. One slave to the camera’s left, shining into a Honl reflector, and aimed at the subject’s face, to add bright light to the subject. The second flash is equipped with a Honl Speedstrap and on it, a green gel, and this flash is aimed at the grey wall behind the subject to make it less grey.

Now you get this:

Outdoors Flash

Outdoors Flash Used During the Day

You will agree, I hope, that this is a lot better than it would have been without the help of flash. Even, no, especially, on this bright day.

Want to learn about all this stuff: read here of course, but also: join me for training.

(Thanks to colleague photographer Rob Corrado for the picture)

A quick product shot

Today, I am sharing a quick product shot.

Here’s the shot, of my “nifty fifty”, a 50mm f/1.4 lens:

And here’s how I shot it:

  • I used a Canon 5D camera on manual at 100 ISO, f/4 and 1/125th second.
  • The lens was on a table with a white sheet of Bristol Board underneath.
  • The background was an improvised white background (I used a reflector).
  • I used a 430EX flash with a Honl grid, diagonally above the lens, as the main light. The grid causes the dropoff from the centre.
  • I used a 430EX flash with a Honl blue gel and a Speed Gobo to illuminate the background.
  • I used e-TTL to fire the flashes, from my 7D’s pop-up flash (the 7D will support this, like Nikon cameras. On other Canon cameras I need to use a 580 EX flash on the camera to drive the remote flashes).
  • I set a flash ratio of 8:1 a:b, where A was the main flash and B was the product flash.

All of which looked like this:

Simple. It only took a few minutes to set up, which is good since I was tired.

One tip: when shooting this type of product clean it well using a soft brush, or else you will spend hours in Photoshop or Lightroom aftereard, cleaning dust.

Using light today.

I shot Victoria Fenner today. But only, you will be glad to know, with a camera.

Let me talk you through that, shall I?

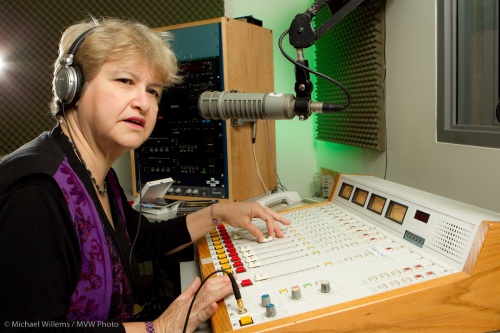
Victoria is an audio expert. She used to run the studio at McMaster University that we shot this in. We decided to shoot her doing her thing – and sound is her thing. So we shot in a studio first:

Camera: I shot her with a Canon 1D Mark IV. The camera was on manual at 100 ISO. I used a 24-70 lens set to around 24mm – meaning around 30 “real” mm.

Light: the camera was equipped with a 580 EXII flash to act as e-TTL “master” to drive three 430EX speedlites:

  1. The “A” flash through an umbrella on camera right, shining into Victoria’s face. An umbrella throws nice soft light, great for faces. (There is a certain irony in the fact that we use the word “umbrella” to name this thing that throws around this nice light. Umbra means shadow!)
  2. One “B” flash with a green Honl Photo gel in the background – I love adding a splash of colour, and green goes very well with purple.
  3. Another “B:” flash, fitted with a Honl Photo 1/4″ grid, as hair/accent light shining toward the camera. You can see it just outside the field of view.
  4. I set an A:B ratio of 4:1 to 8:1.

All this took about ten minutes to set up, and ten minutes to take down.

Then we shot some outdoors. For this, I used two flashes off camera: one into a Honl gold/silver bounce card; the other using a grid, as before. Yes, in bright sunlight you can fire these flashes using light-controlled TTL.

This was a bright day in April around noon. But it does not look like noon light, does it? I shot in Aperture mode, with -2 to -3stops exposure compensation. That darkened the background to give it colour saturation. The flashes took care of the foreground.

My day

First, more episodes of season 7 of “24”… the inimitable Chloe… one episode to go 🙁

Then, teaching, and then to the gallery in Toronto’s historic Distillery District:

That was a wide angle lens: 16mm on a full frame camera. Aperture mode, exposure compensation minus two stops, and flash on. (Aren’t wide angles great?)

Then, in the gallery, a snapshot of a gallery visitor and potential student of flash:

That was done with:

  • The camera on “Manual”…
  • …with exposure set to around minus two stops.
  • A CTO-gelled 580 EXII flash aimed to my right.
  • …and white balance on “Tungsten”

Isn’t TTL wonderful?

Flash from behind

Look at this picture, which a student took of me in a class the other day:

Michael Teaching

Can you see how she turned her flash behind her, so it aimed at the wall above her, which in turn lit me with soft, gentle light? Otherwise, if she had aimed it at me directly, we would have seen all the things that people hate in flash:

  • oily skin
  • flat face
  • dark background
  • overexposed subject
  • shadows under the chin

Instead, we get soft, natural looking light.  And it’s easy: turn the flash so that the light bounces behind you. With TTL, it’s easy: the camera does the math. You just push the button.

That wired effect

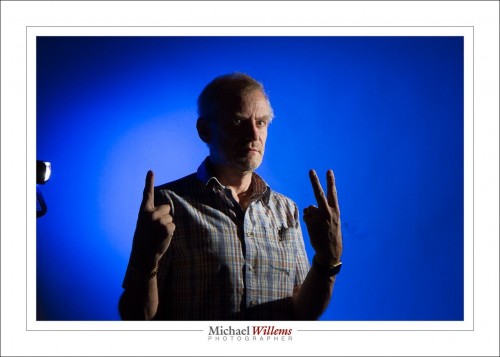
Here’s a picture I just took of my favourite patient model. I used some technique to get that dramatic “Wired” effect:

The way I made this picture:

Camera:

  • Camera: Canon 7D with 50mm f/1.4 lens
  • Set to Manual, 1/125th sec, f/8, 100 ISO

Flash:

  • Multi-flash TTL with one on-camera and two off-camera flashes.
  • One “A” Flash on the camera (580 EX) as fill flash and “commander”;
  • The main lighting was rim lighting: two 430 EX flashes either side of the model, slightly behind, set up as “B” flashes.
  • I was using a 1:8 A:B ratio.
  • The 430 flashes were each equipped with a Honl 1/4″ grid, to stop their light from hitting the entire room.
  • Flash compensation -1 stop to avoid overexposing the rims (this is common when your main flash lights only a small part of the picture).

Post:

  • And finally, I desaturated the colours in Lightroom: Presence +15, Vibrance -20 and Saturation -40. I also did a version where I desaturated only red and orange, and increased sharpness, which is the usual technique.

Try it yourself, or come to our two-day Light workshop 10+11 April to learn exactly how to do this.