In Real Life

..In real life, you only have so much time when shooting an event. So you need to be quick, and you need to really master a bunch of little things.

Take this picture, taken with a wide angle 16-35mm lens at 800 ISO, 1/40 sec, f/4, with bounce flash aimed behind me. . Attentive readers may recognize the Willems 400/40/4 formula in that, modified slightly (800 ISO instead of 400) because it was so non-reflective.

20160916-1dx_0486-1024-2

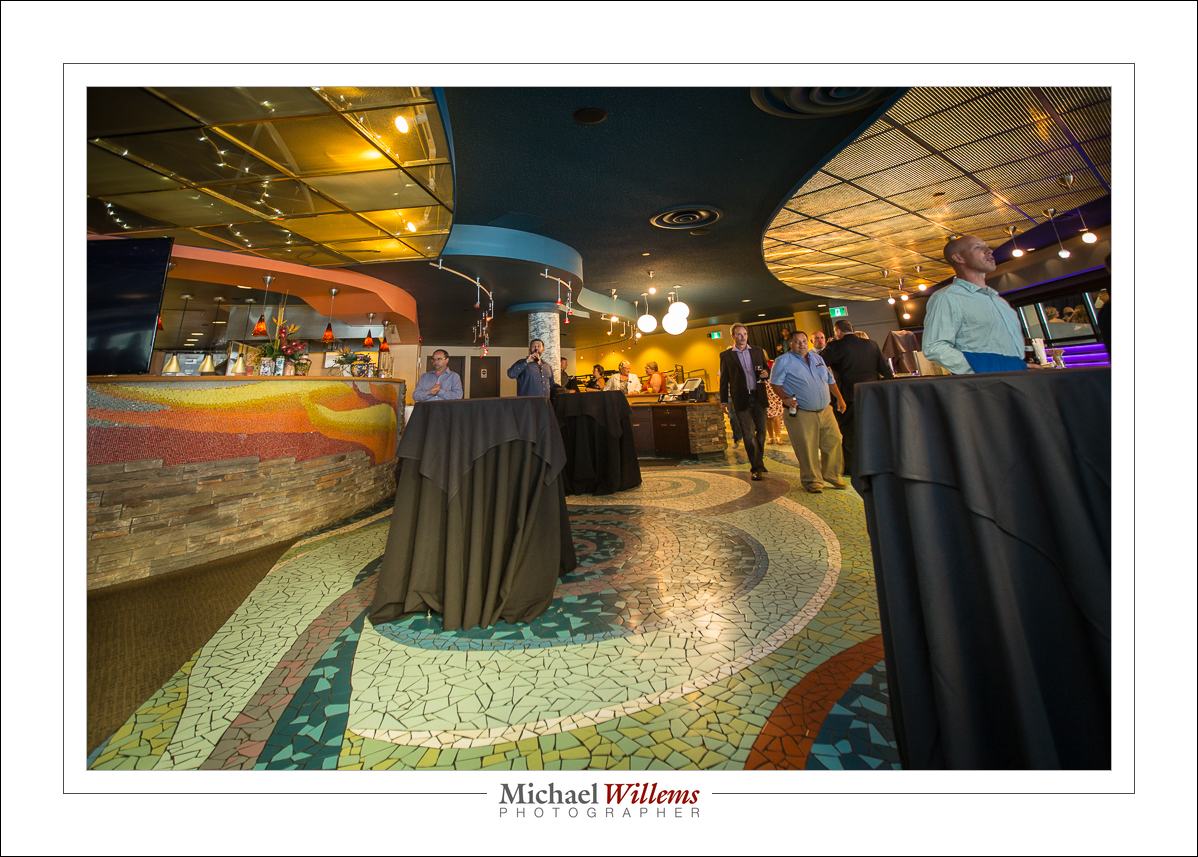
Nice, but why are the verticals tilted inwards toward each other at the top?

Because the photographer was aiming the camera upward! That results in this tilt.

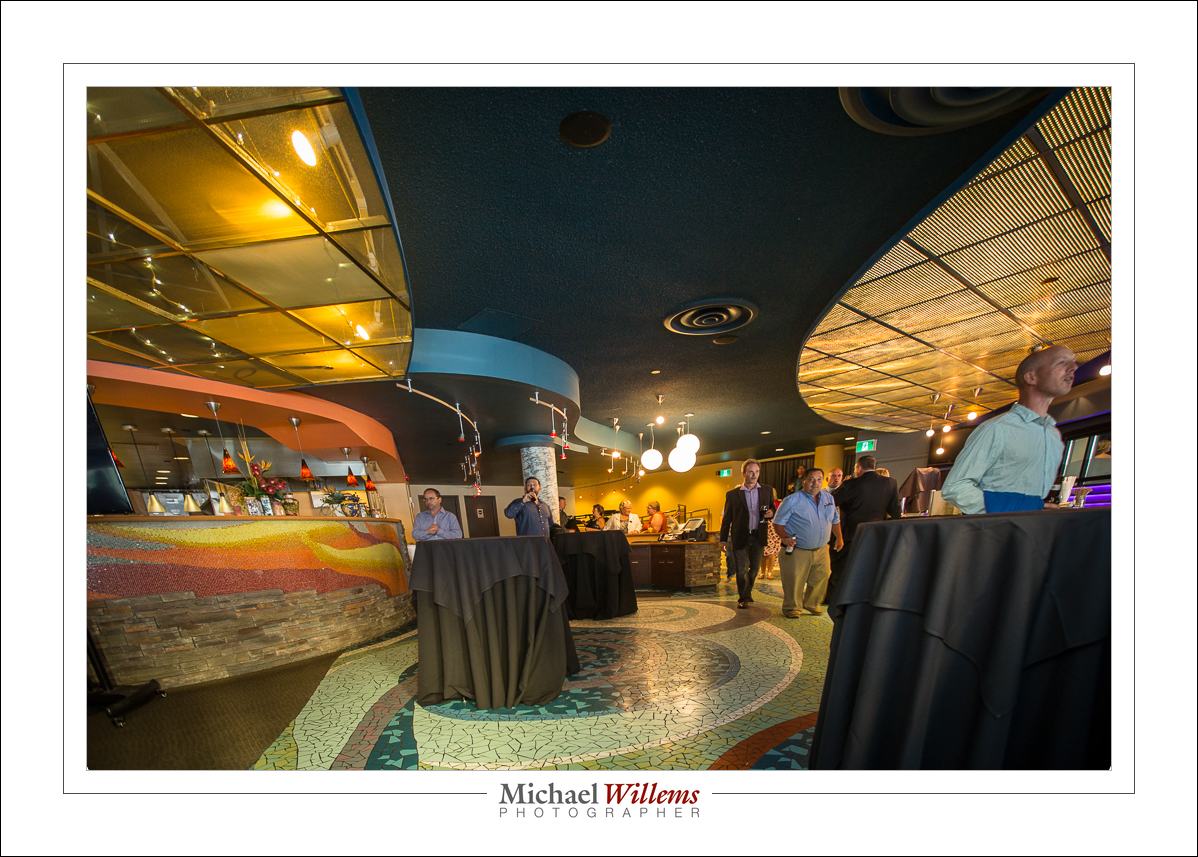
If the camera had been pointing downward, you would have seen this instead:

20160916-1dx_0486-1024-3

And it is only if the photographer aims the camera straight ahead, parallel to the horizon, that we get the proper picture:

20160916-1dx_0486-1024

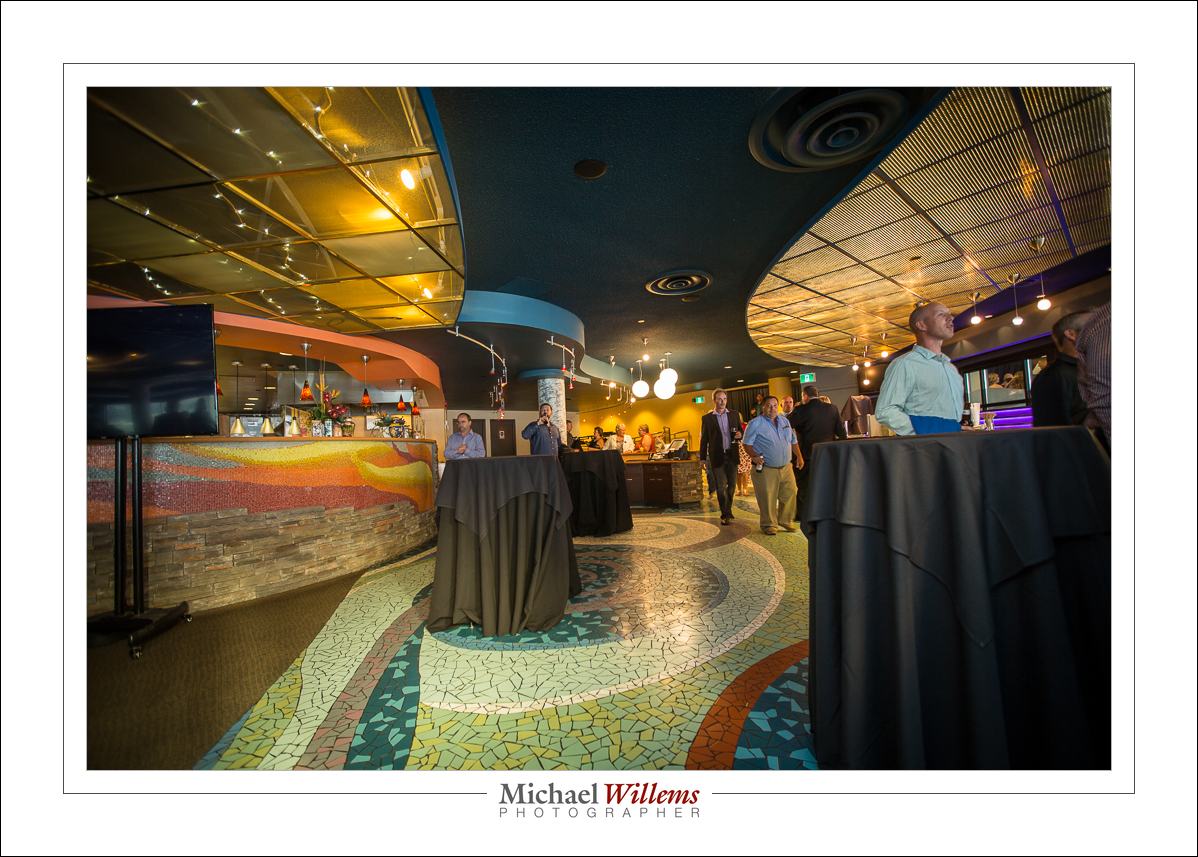
And now a little secret: that one, the third, was in fact the actual photo taken by the photographer, Because the photographer, and that was me, knows to hold the camera parallel to the horizon. Check the verticals before you click!

So how did I create the other versions? Simple, by using TRANSFORM in Lightroom. And just like I can make a good picture bad, I can make a bad picture good.

So why not just shoot as you like and fix them all later? Mainly because this takes that most valuable of all commodities, time.

So. Last question. Flash you say. Really? How do I know this isn’t just ambient light?

Well, let’s take one with the flash OFF. Here we go:

20160916-1dx_0491-1024

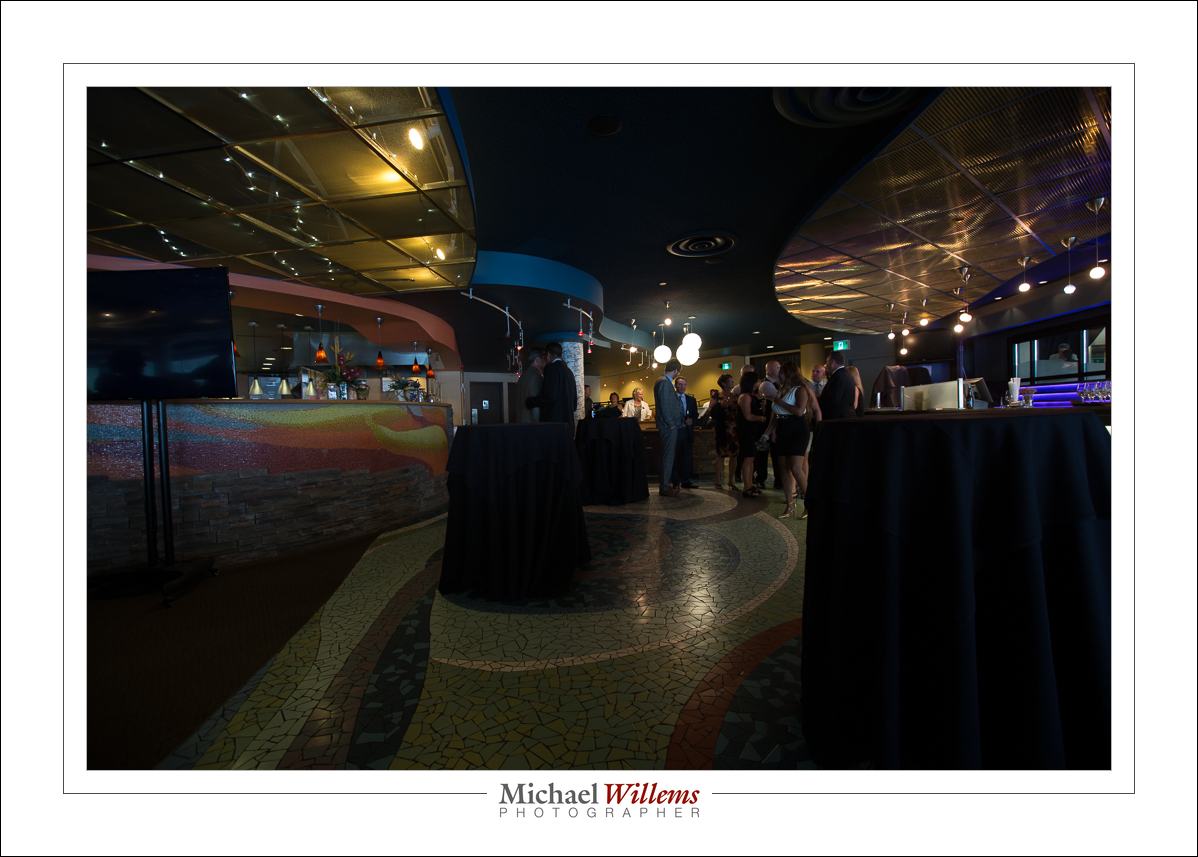
Now, we could have used ambient like this but just increase the exposure by three stops. That is true (higher ISO, lower f-number, and/or slower shutter). But then two things would happen: a) you would notice the drawbacks of those actions (e.g. more motion blur, less depth of field, more grain), and b) the picture would lose its magic. You would get this:

20160916-1dx_0491-1024-2

Well, de gustibus non est disputandum, but I prefer mine:

20160916-1dx_0486-1024

Isn’t this “creative” stuff fun?


Want to learn from me in person? 5 hours in Brantford, Ontario, on Sunday Oct 2. With a maximum of 5 students. Sign up tonight and save big: 

HANDS-ON SESSION: Master On- and Off-Camera Flash, Manual & TTL

Sunday, Oct 2, 2016, 12:00 PM

Michael Willems Studio
48, Wilkes Street Brantford, ON

2 Emerging Photographers Attending

UNLEASH YOUR CREATIVITY, LIKE THE DUTCH MASTERS, AND BECOME A FLASH PRO!This unique small and intensive hands-on workshop, held in my fully equipped studio, will be both practice, for those who know a thing or two about flash, and a revelation, for those who do not.I took this picture  two days ago, on Friday. In a dark Niagara Falls restaurant …

Check out this Meetup →


Trixie

I shall now repeat a flash trick I have mentioned here before years ago. Time for a refresher.

You all know how important it is to avoid, at least when the flash is on your camera, direct flash light reaching your subject. Both in order to avoid “flat” light, and especially to avoid those nasty drop shadows, like this (don’t do this at home, kids):

But you have also heard me talk (and those who come to my upcoming flash courses will learn hands-on) that you should “look for the virtual umbrella”. For most lighting, this means 45 degrees above, and in front of, the subject.

So when you are close to that subject, you aim your flash behind you to get to that point. Good.

But what when you are far, as when using a telephoto lens? Then the “virtual umbrella” may be in front of you. And aiming your flash forward is a no-no, since the subject will be lit in part by direct light.

A-ha. Unless you block the direct part of that light!

Like this:

As you see, I use a Honl Photo bounce card/gobo to block the direct light. Simple, affordable, and very effective. I use either the white bounce side, or the black flag side, depending on the ceiling and position.

Simple, effective – done!

And one more thing. Direct flash is not bad per sé. Not at all. As long as it is not coming from where your lens is, it can be very effective, like in this “funny face” shot of a recent student (you know who you are):

Lit by a direct, unmodified flash. And the hairlight, the shampooy goodness? Yeah. The sun. Just saying.

(And yes, that too is something I will teach those of you who sign up for one of my upcoming flash courses.)


Direct the light

Following up from my post the other day about simple light. Remember this shot:

As I said, the bounce light was directed so that the subject’s face is lit. That is the key here.

Let me show you what would happen if I did not do that right.

Say I just bounced the flash behind be. That would be “OK”, but no more  than that. The face would look dimensionless – flat, even:

And if I bounced behind me on the left – nowe that would be just plain wrong:

Badly shot (deliberately, and kudos to student Kayleigh for allowing me to demonstrate on her!)

Go back and look at all three – see how much better picture one is?

So the essence is: shoot not from your camera’s perspective, but from your subject’s perspective. Decide where the light should be coming from with resepect tou your subject; then direct your light to that point.


Ready.. aim (flash)… shoot!

An event shoot the other night prompts me to point out how important it is to bounce your flash into the right place.

When you shoot an event, you:

  1. Set your camera to a good starting point: Manual mode, 400 ISO, f/4.0 and 1/30th sec.
  2. Use the right lens: perhaps 35mm prime (on a full-frame camera, or 24mm prime on a crop camera).
  3. Aim your flash roughly behind you.
  4. Fire.

That gives you images like this:

You now adjust aperture, shutter and ISO according to ceiling height, available ambient light, background colour, and “how you like it”. For a neutral, normally lit background you want your in-camera meter to read roughly -2 stops when taking an average reading. So take a test shot, adjust where needed, and carry on.

Fine. But where exactly do you aim?

You aim the flash:

  1. Where you want the light to come from. Usually this means behind you.
  2. And it should throw light into your subject’s face, not onto the back of their head.
  3. This flash bounce area must be outside the image area.
  4. And it must have a nice bounce surface (not too far, not too coloured).

If you do not get the bounce area right, you get this, where I got it wrong (I aimed the flash too far forward):

Instead of this, where I did it right (I aimed it behind me):

Because I aimed correctly, the wall behind me became a big virtual umbrella, and cast natural light throughout the room, not mainly into one area like in the previous shot.

Another couple of shots from the event:

I like warm backgrounds. That’s my style.

Dancing in dark rooms is hard to capture. Shoot a lot.

Yes – you can shoot in wood-paneled rooms too, but it can be challenging.

Want to read more? Watch out for the June/July issue of Photolife Magazine, with my article on “Flash: 20 problems, 10 solutions”. It should be in the stores any day now.


What if there’s no wall?

I keep recommending that when you use TTL flash, you bounce it off walls or ceilings.

So what if there is no wall or ceiling?

Then you do the following.

  1. Ensure you expose the background well, with high ISO, open aperture, and slow shutter as needed.
  2. You may be able to bounce after all, when your ISO is high and aperture is open. Flash can reach farther than you think! So – try.
  3. You can move the subjects! Ask them to “move over here for a second” – near a wall. Every venue has some wall or other, or perhaps a low ceiling in one part of the room. No reason you cannot ask people to move!
  4. If that fails, bounce of “anything”, using a Fong lightsphere. Not creative light, so this is not your first choice, but it can save your behind.
  5. And if all else fails – direct flash, but perhaps still modified by a bounce card (or even a Fong thing aimed forward). And do not forget flash compensation.

So you see, there are always options.


High-key black and white

One of my favourite photo styles is this: high-key black and white, against a simple white background. This reduces the clutter to a minimum and starkly emphasizes the subject. Like in this image from the 20 November Mono, Ontario all-day workshop:

Tara, by Michael Willems

What I would say if I were to discuss this:

  • The image screams out “black and white”.
  • Clothes (white)  and wall (white) both disappear. I like the emphasis this gives the subject and the pose.
  • I like the 1970s feeling. I added a little grain to this image in Lightroom to emphasize that.
  • Slight, very slight, soft beautiful shadows are important.
  • Light is simple: one flash bounced behind me.
  • Of course you use exposure compensation and the histogram to check your exposure. But you knew that. Hit the right side (just).

Try a portrait like this! All you need is a white wall, a camera, an on-camera flash, and a model in white.

Reader post

Joel, a reader who came on a recent Creative Urban Photography walk with me, says the following – and I thought it worth it posting this today, to emphasise what I have said before:

Just circling back after the Urban Photography walk in Oakville that I did with you and the group on Oct. 23rd.
Despite the rain, it was a nice blend of technique and discussion.  I putzed around after we wrapped up down by the waterfront.

I had been on the fence about purchasing a flash after the Henrys show, but spending an afternoon with the Speedlighter had me sold.   Your quick demo about flash compensation and CTO was enough to push me over the edge.

[…for Canon users: Joel then points out there are cheap deals on for the 430EX: price match the Adens Camera offer at $274.99. I believe Henry’s also has a great offer on this flash…MW]

Not that you need any proof yourself, but I took a quick comparison shot (attached) to bring back to the camera guys here at work.  Images are unedited (but very compressed).  Left side is bounced behind me with the 430, right side is standard pop up flash.  Both shot at ISO 100 in my poorly lit living room at night.  Very happy with it and excited to learn more.  Keep posting on your speedlighter site – lots of good advice…

Thanks, Joel. Here’s your two shots:

Bounced vs Straight

Bounced vs Straight

(Click to see them larger).

As you can see,

  • The bounced shot is much warmer (note, if due to wall colour it is too warm, this is easily adjusted with one little tweak in Lightroom).
  • Its shadows are softer. Look at the dog on the right and at the annoying shadow on our right.
  • Its background is not inky black, unlike the direct image’s background.
  • The catch lights are more natural (the straight image has an unnatural looking tiny catch light right in the centre of the pupil; the bounced image has a much more natural looking and much more naturally positioned catch light).
  • The dog looks more natural in the left image. On people, this would be even more dramatic: the right image would have oily, overexposed skin highlights. The dog’s hair helps shield us from this.

Images like this are taken as follows:

  1. Attach the flash to the camera.
  2. Turn it on, and ensuring it is set to TTL mode (its default).
  3. Use program mode on the camera; or manual (preferred for more advanced users) or even “night portrait” mode.
  4. Turn the head so it points 45 degrees upward behind you.
  5. Shoot!

Joel adds, in a follow-up email:

Camera is Canon XSi.  Standard Kit Lens 18-55 EF-S. I’ve never seen this level of detail out of my equipment before.  It was so sharp that when zoomed in, you can see my kitchen in his eye.  Like you said – ‘A bright pixel is a sharp pixel’  J

Exactly. That is Willems’s Dictum: “Bright Pixels are sharp pixels”. Noise, grain, cockroaches and bedbugs all hide in the dark areas.

All this is subject of my next November 20 all-day course (see www.cameratraining.ca) – you will learn these techniques and many more, and go home with some great portfolio shots using a professional model.

Flash consistency – a note

So you are surprised that your flash pictures always turn out differently and unpredictably, especially when using automatic (“TTL”) flash?

Then this may help:

A. First, worry about the background, ambient light:

  1. First, decide “should the background light do any work?”. If you are using an automatic or semi-automatic mode, like P, Av/A or Tv/S, the camera will try to light the background well. so it will not just be the flash doing the lighting.
  2. Realise that there are limits to the previous: on Canon always in P mode, and on Nikon in P and A when “Slow Flash” is disabled, the camera will limit shutter speed to avoid blur.
  3. So if you want total predictability of the background, use manual, and set your meter to the desired ambient lighting level (I recommend you start at -2 stops, i.e. the light meter points to “-2”). See a recipe below.

In a typical room, a starting point might be 1/30th second, f/2.8, 400 ISO, and the flash pointed behind you. Auto ISO is not recommended!

B. Then, concern yourself with the flash:

  1. The foreground is mainly lit by flash, not by your Av/Tv/ISO settings.
  2. Canon cameras in particular try to avoid overexposing part of the picture, so even a small reflective object in the flash picture can result in a dark, mainly underexposed photo.
  3. The flash exposure metering is, on most cameras, biased toward your focus points. So the camera looks mainly where you focus.
  4. If you take a picture of something bright (a bride in the snow) the camera will underexpose it to give you a grey bride. If you take a picture of a dark object (a groom in a coalmine) the camera will overexpose it to give you a grey groom.
  5. To fix this, you can turn the flash up and down using flash exposure compensation (“Flash Exp Comp”).
  6. Play with the light: aim your flash at walls or ceilings if you can. and create a “virtual umbrella”.

Try it and see if you get more consistent!

Here’s a typical recent flash picture, of a nice photographer I met recently:

Flash picture

A flash photo - yes really.

Doesn’t look like your usual “deer in the headlights” snap? That’s because I was following my own suggestions above. Note I also used a Honl Photo 1/2 CTO gel, to make the flash light look a bit more like the background Tungsten light. I like warm backgrounds, but I often make them a tiny bit less warm this way.

Go wild.. and get creative

Creative lighting is all about what you do not light:

A chiaroscuro picture of a model, by Michael Willems

Recent chiaroscuro picture of a model

I used one bounced flash and a prime 35mm lens on a full-frame body.

The camera was on manual of course, and shutter, aperture, and ISO were set to make sure the background was dark, but with colour showing in the background.

Flash was on TTL.

I wanted to emphasise the girl’s striking eyes and hide her face, and emphasise her look, so I bounced off a black ceiling above her. Yes, even a black ceiling will reflect some light! And 1600 ISO and the lens wide open ensured that “some” light was “enough” light.

Not your typical party picture – precisely because I did not light all of the girl.