Focus Tip: AF-C/AI-Servo and back button focus

I am often asked “can I not leave my camera on AI-Servo (AF-C if you are a Nikon etc)?

The answer is: not a great idea normally. Because you cannot recompose. The moment you try that, taking your focus spot(s) away from your subject, the camera focuses on whatever is behind the subject!

But there is a trick, and I used it today to photograph these amazing insects:

Namely this:

  1. Set your autofocus mode to AI Servo/AF-C.
  2. Select “back button focus” in your camera’s menu (i.e. focus when you press a button on the back of the camera, not whenever you half-press the shutter button).

Now you focus as follows:

  1. Follow the insect, or hockey player, or whatever you are shooting.
  2. While doing this, keep the back button focus pressed, so your camera adjusts to follow the subject’s distance.
  3. But when the butterfly sits and you want to recompose, let go of the back buttoin focus. You can now move the camera to recompose, yet when you shoot, the camera will not adjust its focus.

Done and done!

A quick note about that amazing insect. Nature knows what many beginning photographers do not: you need a catch light in the eye to make it look real and alive. The butterfly’s owl eye has that catch light (the white circle part ion the “pupil”)! Amazing, eh? So learn from nature and always include a catchlight in your portraits.


Autofocus point

An important point about autofocus (and forgive the pun).

You have a number of AF points. One in the middle, and then 2 more, or 8 more, or 40 more: whatever. Lots, on my 1Dx:

These “points” are sensors that look for focus by looking at lines and sharpening them. But did you know that some points are sensitive only to horizontal or vertical lines? That’s why, when you select one AF point, sometimes you cannot focus even though you are pointing the AF point at a nice lined surface.

The centre AF point is always sensitive to both horizontal and vertical lines. But many other AF points are sensitive to only horizontal, or only vertical lines.

What’s more, this even depends on:

  • The mode you are in
  • Auto or manual AF point selection
  • The minimum f-number of your lens. Some points are points (sensitive to both) when used with an f/2.8 lens,. but horizontal only, or vertical only, when used with an f/5.6 lens.

So, my strong advice: Read up on how your camera does it. And if in doubt, use the centre AF point, since it is likely more sensitive and a cross-type sensor.


Live View—a tip

Live View (seeing the photo on the back of the camera instead of through the viewfinder) is not generally recommended. Use the viewfinder!

Except in a few special circumstances.

Namely, you would use Live View when you need accurate manual focusing. This is often the case when shooting macro, or product, or night pictures, when the camera’s autofocus either will not work well, or is not accurate enough.

On many cameras, like on my Canon bodies, you can:

  1. Set focus to “manual” (slide on the lens goes to “M”);
  2. Put the camera on a tripod;
  3. Activate Live View;
  4. Zoom in on the preview (press the “+” loupe symbol, or just the loupe symbol on many Nikon bodies). Repeatedly: on the Canons, when you press it twice, the preview shows (10x” (i.e. 10x magnification);
  5. Now focus accurately by hand;
  6. Now turn off live view.

You are now ready to shoot. Ensure that your subject and camera do not move, and that you do not zoom in or out after focusing (most lenses will lose focus if you do), and especially, that you do not accidentally move the focus ring.

I am writing this as I prefer to do some night sky shots in the next few days, provided I can find a clear sky without too much light pollution.

By the way, my favourite lens for night sky shots is my 35mm f/1.4, which offers pretty much the best combination of:

  • Large real aperture diameter (means more light gathering) and
  • Wider angle (means longer times are possible without creating star trails. To understand why, imagine a telescope: the longer it is, the more the stars will move).

14 seconds at 1600 ISO at f/1.4 should do it. And at that aperture, accurate focusing is essential—which brings us back to where we started: manual focus using Live View.


Another tip

One more beginners’ tip today for my readers. (The term “my readers”, it occurs to me, makes me sound a little like col. Qaddafi. whose Green Book I read when I worked in Libya for around a year, a few decades ago).

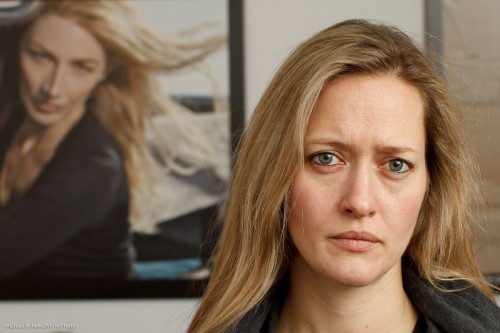
Anyway. I often see that my images are really, really sharp where others’ are often not quite as sharp. So how do you make your images sharp? I have written about this before, see here, among others. Operation, light, settings, and good (prime, or quality) lenses all come into this.

A student, photographed by Michael Willems.

Student Volunteer, photo Michael Willems. Canon 7D, f/5.6, 400 ISO, 1/125th sec.

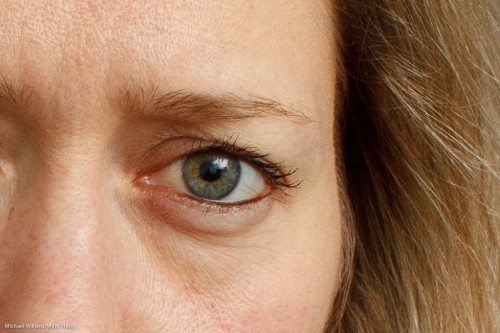
When you show that image large (original size), you see it’s sharp.

A student, photographed by Michael Willems. Detail.

Student Volunteer, photo Michael Willems. (Detail).

But today a quick tip about errors I see people make frequently.

Whenever I see people whose images, in spite of good lenses and the right settings, are not as sharp as mine, and when I then watch their technique, I often see these mistakes:

  1. People jam down on the shutter. I hear a beep, and a millisecond later, the click. This means the shooter is not giving himself or herself enough time to verify that focus was achieved on the right object. Instead, you should aim, press half way down, wait for the beep, then wait, and only once you have ensured the focus point activated properly where you wanted it, push down.
  2. The shooter leaves the beep off. This means no confirmation of focus unless you look away from the subject… bad.
  3. The shooter beeps and waits correctly – but then moves forward or backward before pushing down. Even a slight backward or forward movement shifts focus!

Watch yourself carefully when you shoot. If you discover that you are making any of the above mistakes, this will affect your sharp focus.

And that would be a shame. My people deserve sharp focus!

Autofocus assist: will it work?

My Canon speedlites (like the Nikon flashes) have an “Autofocus Assist Mode”, where a red pattern of lines emerges from the red square at the front. I am talking about big flashes, like my 580EX 2:

580ex2 Flash

580ex2 Flash

The flash emits the red beam when needed to help the camera focus. This happens:

  1. When it is dark
  2. When the subject has too little contrast (try focusing on a blank wall).

It is cleverly linked to the focus spot: when you are using a focus spot that can detect horizontal lines, it will emit horizontal lines; when using a focus spot that can detect vertical lines, it will emit vertical lines.

But when does it not work?

  1. When it is not dark and the subject is not low contrast. If the camera can focus without the assist light, it will. Why waste battery power?
  2. When you are not using “One Shot” focus (Nikon calls it AF-S). The red light helps the camera lock focus: when you are in a mode that does not lock (namely manual focus or AI Servo/AF-C focus), it will not try.
  3. When you are using a focus point that cannot be reached by the red pattern (think wide angle lens).

Hope that helps. Flash can seem very complicated, but if you know all these little things, it gets a lot easier to use.

Manual focus? Six reasons.

Should you ever focus manually? When?

Well, yes. Indeed there are circumstances where manual focus (setting lens or camera switch to manual focus, and turning the focus ring yourself) is the way to go.

And here’s a few of those circumstances. I can think of six right away:

  1. Macro. When shooting macro, for instance when shooting flowers, bugs, food or jewelry, use live view and zoom in electronically if you can, then use manual focus.
  2. You are using a Nikon D40/60/3000/5000 and a fast 50mm lens. Those lenses do not autofocus on those low-end Nikon cameras, so you have to do it by hand.
  3. It is night. Your camera cannot focus well in the dark.
  4. When shooting through glass, like on an airplane.
  5. The subject has low contrast. Ditto – you may have to do it by hand.
  6. When the subject is unpredictable in time but not in space – like fireworks. Or sports, when you know where the action will be. Pre-focus there manually!

Tip: Do not confuse manual focus with “using one focus point”. When using autofocus, you should always (or virtually always) use one focus point. When the camera chooses it will choose what you do not want to see sharp.

Homework: go take ten pictures right now where you focus manually. You;ll see how easy it is, and how consistent once you get it right.

Autofocus and how it works: the modes

A regular reader asks (and I take questions, you know that, right)?:

Can you possibly do a short blog entry on the focusing modes offered by Canon? You know the ONE SHOT – AI SERVO – AI FOCUS buttons?

Certainly!

These “focus modes” are not about where the camera focuses (the focus point selection is about that: select one point for accurate control). Instead, these modes are about how the camera focuses. There are two main modes and an in-between hybrid mode:

  1. One shot (Nikon calls this “AF-S”)
  2. AI Servo (Nikon calls this “AF-C”)
  3. AI Focus, where the camera tries to guess which of the above two you want.

“One Shot”/AF-S means: when you press the button, the selected focus point tries to achieve focus. Once it does, a few things happen, all at the same time:

  1. The camera beeps
  2. A green dot lights up steadily
  3. The focus locks, and until you remove your finger, it stays locked at the selected focus distance.

This One Shot/AF-S mode works well in most cases. But what if the subject you are shooting is moving rapidly towards you, or away from you? Then every picture will be blurred, because by the time you press, the object is no longer where you locked the focus.

So for those situations you have AI Servo/AF-C (AI Servo means “Artificial Intelligence Servo motor control”, while AF-C means “Autofocus -continuous”). The focus never locks, and the camera keeps buzzing away as the focus motor keeps turning and adjusting. Better, it even predicts where the object will be when the shutter opens (that is the “artificial intelligence” part). So you can try to use this mode when shooting “sports, birds, and kids”.  Not every shot will work out, but at least some will.

Finally, the hybrid mode (AI Focus) tries to guess which one of the two modes above you really want, and then switches to that. I am not a great fan, and expensive cameras like my 1-series models do not have this mode. I think you should probably decide whether you are shooting mainly stationary subjects (then choose One Shot), or moving objects (then select AI Servo).

Reader question: Focus

RG, a regular reader, asks:

I just still struggle getting my subject in sharp focus.

I shoot in Auto Focus mode on my Canon Rebel XSi (usually in Program Mode). I manually select my “red” indicator and try my best to focus on what I want sharp. But what do I focus on when my subject doesn’t fall neatly on one of the AF points? I tried to pick the nearest one to my subject — sometimes it comes in focus, sometimes not.

If I am taking a portrait of two people’s faces and they are cheek-to-cheek — sometimes one face is sharp while the other is not! Annoying! In that case, where do I place the red mark on?

Great questions. And the answer comes in three parts: motion blur, focus blur, and depth of field.

Let me start by saying “it’s not just you”. Everyone struggles with focus. I do, too.

  1. One important reason is that we are more critical today than in the past – we zoom in. Take your blurry picture and print it at 4×6 and it will probably look just great!
  2. We take many more pictures in low light, where we would not have tried in the past.
  3. We have two distinct kinds of blur: focus blur and motion blur. They are easy to confuse.

So then let’s start with motion blur. Your first picture’s unsharpness was mainly due to motion blur: it’s a shaky picture. It was taken at 1/30th at f/1.8 on a 50mm lens. The 50mm lens works like an 80mm lens on your Canon Digital Rebel. To get sharp pictures, a rough rule of thumb is: “stay at one divided by the ‘real’ lens length – preferably twice that”. So you should be at 1/80th second, maybe even 1/160th second, when handheld. 1/30th is  pushing it. No problem trying, but steady the camera, lock it onto your face, don’t breathe, and take the picture ten times, then pick the sharpest one. Or… use a tripod. Or go up to a higher ISO value to increase the shutter speed.

Now to focus blur. The second picture is blurred mainly due to focus: the closer part of the girl’s clothing is sharp while her face is not. That could also be motion (her motion this time – not yours; she is turning her head) but it is to a large extent it is focus.

You are focusing with one focus point: this is always the way to do it! But what if there is no focus point where your subject is?

How, in other words, do you take a picture like this?

Selective focus

Focus-recompose-shoot

Actually that is quite simple and I want you to reproduce that picture now. Use a technique called “focus – recompose – shoot”:

  1. Select a focus point near the subject;
  2. Aim that focus point at the subject;
  3. Focus by pressing half way down. Wait for the beep that indicates “in focus”. A green dot appears too, at the same time.
  4. Hold your finger there – do NOT let go! But also do not push all the way down.
  5. Now recompose the picture (while still holding your finger down).
  6. Now finally push down to take the picture

Hah – your hand is now still sharp, since pushing half way and holding your finger there locked the focus distance, until you either let go or push down.

Finally to depth of field. What if you want more than one thing to be sharp?

  1. Use Aperture mode (Av), and select a not-too-small Av Number. f/1.8 will give you very very shallow, selective, depth of field. f/5.6 gives you much more sharpness (but slower speed); f/16 and much of your picture is sharp (but now even longer shutter speed so you must use a tripod and tell people to not move).
  2. Aim at a point in the middle, So if you have to shoot three rows of hockey kids, focus on a kid in the middle.

So now you know how to avoid blur, how to focus accurately, and how to get enough in focus.

All you need to do know – and you know what I am going to say: practice!

Focus where you want.

…where you want, I mean. Not where the camera wants. So as a tip for beginners and reminder for others, a few words about how to focus.

When you look through your viewfinder, you see focus areas, also known as focus points. Depending on your camera there are three, five, seven, nine, or even 11 of 45 of them.

When you press the shutter button half way, the camera indicates one or more of these by flashing them; then it beeps. As long as you hold your finger on the shutter button, these selected focus points stay active. Meaning that when you press down, that’s where the camera will focus.

How does it select which points to use?

It looks at all the focus points, and selects those that are on the closest subject. That’s how. So you’ll get this:

And therein lies the problem. What if you want not my hands in focus, but my face? Or what if you are shooting a relative in the forest and you keep getting that closest branch in focus rather than the relative?

That’s why you can disable this automatic selection of focus points.  And most people do most of the time. Ask a pro how many focus points he or she is using and the answer is almost always “one”.

Then you can:

  1. Select a suitable focus point
  2. Aim that one point at your subject
  3. Press half way down until your focus points locks and the camera beeps
  4. Hold your finger on the shutter, do not let go
  5. Recompose if necessary
  6. Press down and take the picture.

Q: In a portrait, what really needs to be sharp?

A: The subject’s closest eye. The rest is optional.

My student yesterday in a Henry’s Canon 7D class, taken with the 7D with 35mm f/1.4 lens using available light and, um, a TV:

Advanced users, did you know the following:

  • Focus selection is done in areas that are actually wider than the indicated focus spots.
  • The centre spot is the most sensitive.
  • The faster your lens (low F-number), the better it works.
  • Focus squares detect lines. The centre spot is sensitive to horizontal and vertical lines. Others can usually detect only horizontal or only vertical lines!

Well, now you do.

And if you are new to this, here is your assignment: reproduce this photo. Hand sharp in the very corner of your photo.

(Use aperture mode with a low “F-number”, or use program mode and get close).