Portrait using two flashes

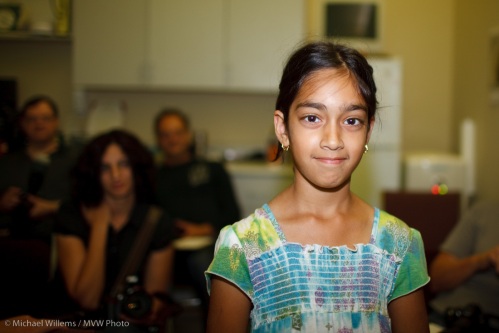
Here’s an impromptu portrait I took on Tuesday, of a lovely student who kindly volunteered to be the subject, in the Flash for Pros course:

And here’s how I did this:

  • Camera: The camera was a Canon 7D
  • Lens: I used a 50mm f/1.4 lens. (50mm on a crop camera, even the very cheap f/1.8 version, makes a great portrait lens).
  • Settings: The settings were Manual mode at 1/30th second, f/5.6, 400 ISO
  • Flashes: I used two 430 EX flashes on light stands, fired from the pop-up flash (like most Nikon cameras, the 7D allows this). Other than that, the pop-up flash was disabled. (I could also have used a 580EX on the camera as master.)

And how I used those flashes:

  • I used e-TTL, so I did not have to meter and set the flashes manually.
  • The main flash (“A”) was on camera left: a 430EX fired into a Honl gold/silver (half CTO) reflector. It was about a foot away from her.
  • The second flash was also a 430EX; this one fired straight at her from 45 degrees behind, through a Honl 1/4″ grid. This flash was also about a foot away from her.
  • I set an A:B Ratio of 4:1, so the main light was two stops brighter than the hair light.

Another student that night wrote a blog post, here, where you can see a few pics with some of the modifiers I used.

So it’s actually quite simple: now you go try. It is amazing what you can do in just a few seconds with just a couple of flashes (speedlites) and some small, light, convenient modifiers.

Light direction tip

Here’s a “quick start” for lighting a face:

  • For a man, start with having the main light come from 45 degrees above, at an angle of 45 degrees left or right (“Rembrandt lighting”)
  • For a woman, start with having the main light come from 45 degrees above, straight in front (“Butterfly lighting:)

The latter looks somewhat like this:

I took that snap at last Tuesday’s Phoenix “Advanced Flash” workshop. And you can see how: another course participant is holding a 430EX flash off camera, which I am firing from the main camera using TTL light control. Aperture and shutter speed, and ISO, are set so that available light is two stops darker (i.e. it provides the fill light).

Why this rule-of-thumb of “from straight in front” for women? Because it minimizes texture and features, and hence best shows beauty.

Please do not be hung up on these “rules” – they are merely good start points.

To some extent this snap is also an example of “short lighting”: I am lighting the side of the face that is narrower to the camera. This thins, which in the case of this beautiful woman is not necessary, but in case of larger people, or people with very round faces, can be a useful technique.

Does TTL work when bouncing?

Does the fancy automatic “TTL” flash mode work when you bounce your light off the wall behind you?

Yes, and that is exactly the point of TTL (“eTTL in Canon terms; iTTL for Nikon).

You press the shutter button: Click.

But it is not one click! In the milliseconds after you press the shutter, your camera does all the following:

  1. Fires a low power test flash
  2. Measures light returned
  3. Calculates power needed
  4. Raises mirror
  5. Open shutter
  6. Flashes with power setting calculated  in step 3
  7. Closes shutter
  8. Drops mirror.

Steps 2 and 3 are crucial: that’s why it works wherever you are pointing the flash.

And that is also why you see the flash through the viewfinder: you are seeing the pre-flash. Try it: look through your viewfinder and shoot. If you see a flash, that cannot the be real flash – after all, the mirror is up when that goes. It is the preflash that you (and your camera’s light meter, near the pentaprism) are seeing!

Sometimes you can't get it.

MVWS9449

Like the other day when I shot a company event in the Hockey Hall of Fame in Toronto. Shooting the Stanley Cup was tough, and sometimes you just have to take what you can get.

This quick grab-shot of the Original Stanley cup is illustrative. The cup reflects and you have to get close in a small room (the vault). Little space for umbrellas. The Plexiglas around the object reflects. The Plexiglas behind the object reflects, too. The existing lights cannot be turned off. Oh and there is limited time.

So then, you get this – best I could do under the circumstances. And my hands give it charm. That’s my theory and I am sticking to it.

One thing to keep in mind: flash systems will be confused by strong reflections. Either switch to centre-weighted flash metering, or use FEC (Flash compensation) of up to +2 or +3 stops, as needed.

The mysteries of life…

Take your flash and put it on your camera:

IMG_1076

Aim at a subject while looking through the viewfinder. Take a picture.

Did you see the flash? Through the viewfinder? Yes you did.

How is this possible? When the picture is taken on an SLR, the mirror is raised. When the mirror is raised, the viewfinder is black. So it is impossible that you see the flash through the viewfinder. You cannot have seen what you just saw!

Those of you who do not know, click on.

Continue reading

Indoor Flash

Here’s a few demo shots from a kind volunteer (a student’s daughter) at a recent camera course I taught. This bit was about “flash”.

First, pop up the flash and use “P” or “Auto” mode and you get the picture that makes people hate flash:

MVWS0106

Then enable “Slow flash” or “Night portrait mode” and you get a better picture.. yeah, it’s better. But not all that much:

MVWS0105

Then put your big flash on top of the camera (e.g. an SB-900 or 580EX II, or their slightly smaller equivalents SB-600 or 430EX II). And aim that flash behind you.

Yeah. Behind. So it bounces off ceilings and walls behind you.

Much better. Much. See:

MVWS0107

And then if you want extra “character” and “depth”, bounce off a side wall, if you can find one.

Now you get three-dimensionality, depth, character as well:

MVWS0108

I mean – how cool is that? And all this was done in “P” mode, with no special stuff, with no settings on the camera, no required knowledge of aperture, no complicated techniques.

Flash is wonderful once you learn how to play with it. And it is easier than ever.

Shot of the day

..is me shooting my friend Dal yesterday on the Lakeshore in Port Credit:

MVWS9175-2

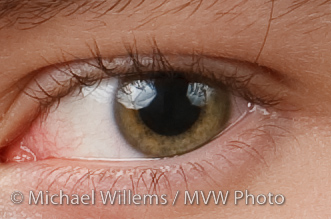
As you see I am reflecting in his glasses (with brightness enhanced to show me, not him, of course). I am using my 1Ds MkIII with a 580EX Flash on it, and a 430EX in my left hand close by, fitted with a small Lumiquest Softbox connected to a Honl speedstrap.

That softbox (held at about the same distance from the face as its size) gives nice soft light, which is very important for someone with darker skin. You can see my favourite Domke camera bag in the background.

And yes I tend to wear a tie.

And I’ll show you the photo tomorrow.

Let there be light

..and let it be managed.

I have talked about this many times before, and I will do it again. When you add light, and manage it, massage it, and work with i, you get drama, cheerfulness, whatever you like. So when you make the light, you make the mood.

Case in point. In the model shoot I did Monday on Toronto Island, here’s the light the way it might look to a casual observer, and the way it might appear in a properly exposed photo:

MVW_2600

Fine. Nice. Pretty young lady (Miss Halton, incidentally) on the beach.

Now let’s work with that. That background is a bit bland to my taste, so let’s darken it. The colours on the model are OK but I’d like them to stand out more.I want drama, and I want the model to stand out, not to be just a thing on a beach.

So first I turn down the ambient exposure. Two stops.That will make light blue into dark dramatic blue. Then I add a flash, on a light stand – shot through an umbrella to get soft light.  I fire that from my on-camera flash using E-TTL II IR technology. I turn the flash up or down as needed.

I now get the result I had in mind.

MVW_2601

That’s better.

And more importantly: that’s entirely different. And that is the photographer’s task, to make things the way he or she wants them. You can say you like, or you don’t like – but you can’t say it isn’t different!

Know your A:B C

MVW_9056-1200If you use Canon’s excellent multi-flash E-TTL II, you can get great results with simple speedlites like the 430EX.

But you have to know how the system works. There are a few gotchas – like the sensitivity of the E-TTL system to highlights: one reflecting item in your shot and the entire picture is underexposed. except that reflective item.

One other thing to know is the way you set ratios. This is under-explained in the existing literature, and yet, is very simple once you know it.

You can divide your remote flashes into “groups” A, B, and C. The options for setting up these groups are are A+B+C, A:B, and A:B C.

A+B+C simply means “fire all as one big group”.

A:B means “I have set one or more of my flashes (including the one on the camera, if that is enabled to flash) as group “A”, and one or more flashes as group “B”. I want to fire so that the ratio between group A and B is as set; e.g. if I set 4:1, then the “A” flashes fire four times more brightly than the “B” flashes”. So unlike the Nikon CLS system, which sets “stops with respect to neutral exposure”, the Canon system sets “ratios with respect to each other”. Not difficult: just another way of looking at it.

The one mode that gets most people is A:B C. (Note, just a space between the B and the C). This option simply means “A and B are as before, but any flashes in group “C” will fire at high power and this group will not be taken into account when calculating overall picture exposure”. This means you use group “C” to light up a white background.
Like in the pictures here of my son Jason, which I took in five minutes this morning before work. Including setting it all up. Pictures like this one:

MVW_9055-1200

This picture was shot as follows: on our left, the “A” flash firing through an umbrella. On our right, the “B” flash also firing into an umbrella (you can see that in the reflections in his eye – you do always focus on the eyes, right?). And behind Jason firing at the white wall behind him, the “C” flash, aimed at the wall. All three of these are 430EX speedlites. On the camera, a 580EX II speedlite. This on-camera flash is disabled; it simply drives the three 430s. The system is set to A:B C, with an A:B ratio of 4:1 (the camera left side of the face is four times, i.e. two stops, brighter than the camera right side).

MVW_9055

Simple, really.

If you want to learn more about this subject, Michael teaches Flash at Henry’s School of Imaging, or for more in-depth or customised training, privately, to a wide range of clients.