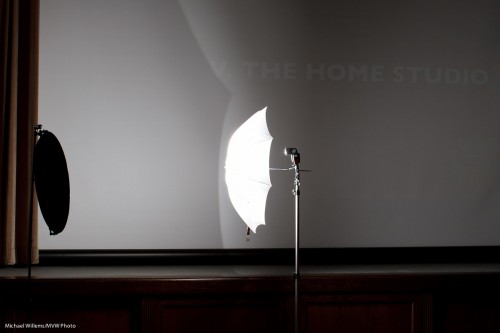
One more about the simple TTL home studio. I can give you some pointers to do your own.
Here’s how.
You need:
- A modern SLR camera.
- A lens – anything over 50mm will do. A 50mm f/1.8 might be a great choice: sharp and affordable (and if you need it, fast).
- If you have a Nikon, or a Canon 60D or 7D, just one flash (a 430EX/580EX for Canon or an SB600/SB900 for Nikon).
- If you have a different Canon camera, an additional 580EX to command the other flash.
- An umbrella (shoot through).
- A stand for the flash, with a mount for flash plus umbrella.
- A reflector (silver or gold or white, or a multi-purpose one).
- A stand for that reflector.
As an option, another flash with a small stand to light up backgrounds, but this is not a must have. You can just move the umbrella and subject closer to the wall if you want the wall to be lighter.
Now that you have the equipment:
- Set your flash to “slave” (Canon) or “remote” (Nikon) mode. Use the manual to find out how. On a modern Canon with a modern flash you can use the camera to set the flash.
- Set up your on-camera flash to be the “master” (“Commander”, on Nikon).
- Ensure that the on-camera flash is not going to fire (it will only send commands to the remote flash, but it will not actually fire – else you get a shadow).
- Move the umbrella close to your subject. For a “standard” portrait, the best position is 45 degrees up, off to the side 45 degrees.
- Move the reflector close on the opposite side.
- Set your camera to manual exposure mode, f/8, 1/125th second, 100 ISO (or 200 on a Nikon).
- Take a test shot.
- Check the histogram. If you are shooting a dark subject against a dark wall, you may need negative (perhaps -1 stop) Flash Exposure Compensation; if you are shooting a light subject against a white wall, you may need positive (perhaps +1 stop) Flash Exposure Compensation.
- Make sure there is a catch light in the subject’s eyes. Ensure that any glasses do not reflect (move subject or umbrella if they do).
It is as simple as that. You will have studio quality shots, for very little investment. Shots like this (which I made with the exact setup above):
With a modern camera and flash and a little knowledge, it really can be that easy.


Thanks as always for the great post!
It helps me think of setup when I am practicing with the portrait lights.
Hoping to actually set up this weekend and give it a go.
As for the portrait lights (I have 2), would I put the lights at equal distance from subject or should I put one (right) closer and the other (left) further back?