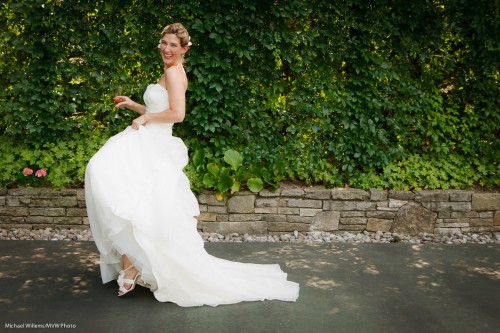
In today’s lesson in my ongoing master flash course, a word or two about outdoor fill flash.
First: you need it, quite often, and for various reasons:
- To fill in dark areas on those bright sunny days;
- To brighten the foreground subject and get a darker background subject (i.e. to make your subjects “bright pixels”, which you have heard me say many times is a Good Thing, since Bright Pixels are Sharp Pixels);
- To add a catch light in the subject’s eyes.
So what techniques are best to get pictures like this, at the wedding I shot the other day?
When deciding on modes and techniques, look for where the issues may be; the constraints. The need to stay clear of these will help you decide the most appropriate modes and settings.
The issue in using on-camera flash outdoors is that (and follow the deductive reasoning here, step by step):
- I want the darkground to be darker than the subject, as said above (especially when it is dark, like these plants).
- Outside being well lit by our local star (that would be the sun), I can achieve that by means of a low ISO and small aperture.
- But these will both reduce flash effectiveness! Exactly what I do not want on a bright day.
- But fortunately I can also do it by selecting faster shutter speeds – these do not affect flash.
- Until, that is, I get to the flash sync speed – beyond that, if I exceed that I can either no longer us flash at all, or I go to high-speed flash (Nikon: Auto FP flash), and that decreases the flash effectiveness enormously.
Ergo: my shutter speed should be at my flash sync speed (1/250th second on my 1Ds Mark III) before I start reducing ISO and increasing the f-number.
Ergo: I need to chose a mode where I set the shutter speed.
Ergo: Only Shutter Priority (Tv/S) or Manual mode will do. QED.
A common technique for finding a good fill-flash starting point when using an on-camera TTL flash in variable outside light:
- Tv/S exposure mode (Shutter priority).
- Select your camera’s flash synch speed (if unsure, select 1/200th second).
- Exposure compensation: -2 stops.
- Aim at your subject and check that aperture is somewhere around f/5.6. If not, change ISO until it is.
- Flash compensation: if and as needed (do a test shot. On a Nikon, and when shooting a bright white dress, you may need it, up (+). At other times, down (-) may be called for).
A common technique for finding a good fill-flash starting point when using an on-camera TTL flash in more predictable light (as on the day I shot the picture above):
- M exposure mode (manual mode).
- Select your camera’s flash synch speed (if unsure, select 1/200th second).
- Set Aperture (Av) until your meter reads -2 stops.
- Aim at your subject and check that aperture is now somewhere around f/5.6. If not, change ISO until it is.
- Flash compensation: if and as needed (do a test shot. On a Nikon, and when shooting a bright white dress, you may need it, up (+). At other times, down (-) may be called for)
The shot above was made in manual mode at 1/200th second at f/5.6, ISO 400.
Joseph Marranca and I will be teaching Advanced Flash as part of the “Advanced Creative Lighting” workshop we teach on August 13 in Millgrove, Ontario . Click here to learn more.


With the nice weather we’ve been having (and bright sunlight) it’s a perfect time for me to try out these tips.
Thanks Michael!