When you import images in (or handle images in) Lightroom4, you can choose the “Process version”: 2010 or 2012 (or even older). The new default is 2012, which gives you all sorts of new tools and a new interface.
In the Develop module, the first choice under “Camera Calibration” looks like this (2012 being the default):
![]()
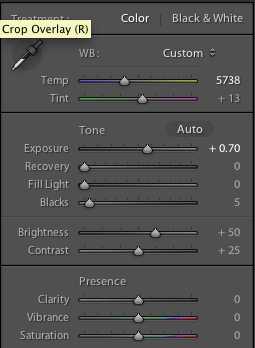
The old edit basic pane with LR 3 was like this:
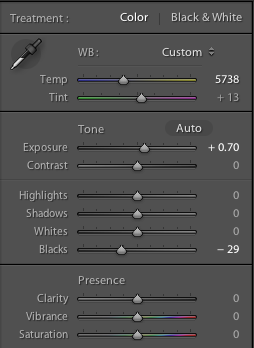
The new one is very different and looks like this:
The problem is that the new process version (“PV”) has “auto highlight recovery”.
So when I shoot an image with a blown out background, as I do in many shots like this, I used to see:
The red areas are Lightroom’s way of indicating a blown-out area where all detail has been lost.
Just as I like it.
But in PV2012, Lightroom assumes that blown-out highlights are a mistake, and automatically, without giving me the option to disable this, brings them back! Which is quite easy from a RAW image, so now I see detail where I do not want any:
So now the only way is to set “Whites” up (by perhaps +50 to +80 on the slider), or do a curve adjustment. The Whites adjustment gives me this:
The drawback is that now I need to do this manually, and that it does affect the rest of the image.
So here’s my tip: one way around this is to go back to PV2010, which you can do with individual images or with entire shoots. That way you get the old controls – and the old behaviour – back for the images you choose to handle this way.
When converting, you may want to convert to the new PV only on an image by image, or at least a shoot by shoot, behaviour.
Another way to “disable” the automatic conversion that has been suggested to me (but that I have not tried – it may take a little work to get to the same appearance as in PV2010):
- Create a curve that is linear 1:1 from lower-left to somewhere close to upper right, and then curves straight up to the top. You may need a few points to get this to stay straight below the curve.
- Save the curve.
- Import a fresh image or reset one that’s already in, and apply that tone curve.
- Now create a preset that just has that tone curve.
- Now, anytime you want to “disable” the automatic highlight recovery, just apply that preset. You can do it to any number of images at once, even applying it on import.
And you should probably convert at some stage – Lightroom 4, although it has a few minor issues and is slower than LR3, is very good and has some compelling new features.


