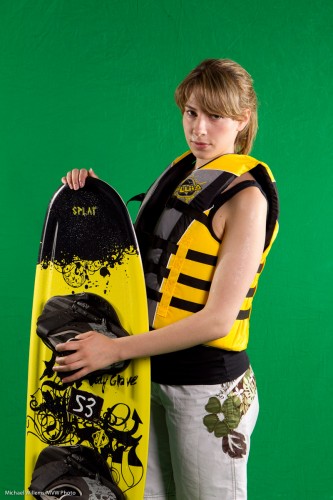
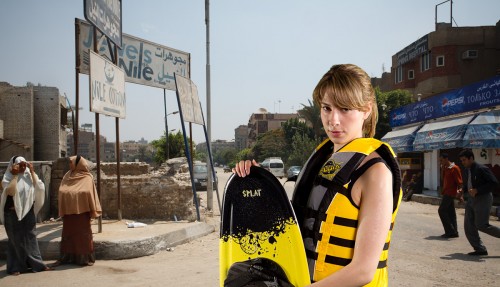
Why do we use a “green screen” background to shoot subjects sometimes?
Here’s why. The simple colour (usually a specific green, though it could be blue or some other colour) can be replaced easily by a new background.
Say I want to shoot a wakeboarder in Egypt. Makes sense, the desert, wakeboarding, right? So to do this, I can fly her and a bunch of lights to Egypt.
Or, I can do the following instead.
First, shoot her against a green screen background:
Then go to Photoshop (not that I like Photoshop – I do not, but for serious manipulation work like this it is the standard) and do the following:
- Open the photo in Photoshop.
- Select ‘Color Range…’ from the ‘Select’ menu.
- After the Color Range dialog box comes up, click on the eyedropper tool, drag the ‘Fuzziness’ slider to around 30, check the ‘Invert’ checkbox, choose ‘Grayscale’ from the ‘Selection Preview’ popup and make sure the ‘Selection’ radio button is pressed.
- With the eyedropper tool, click in the green area of the image. You should see much of the green area as white, and the rest of the image (which gets selected) as black. If there are still areas of the green screen which are not white (e.g. wrinkles in the backdrop), hold down the Shift key and click on them with the eyedropper until all of the green area is selected.
- If there are still pixels here and there that are white, you can lower the Fuzziness until it is easier to click on the areas. You can use the ‘Refine Edge’ dialog from the ‘Select’ menu.
- Once you’re satisfied with your selection, click ‘OK’.
- You should see the object you are trying to select selected. If there are any problem areas (i.e. you see scrolling ants in areas inside or outside your selection that shouldn’t be selected), use the lasso tool (hold down Shift or Option (Mac)/Control (Windows) to add to or subtract from the selection) to make your selection perfect.
- Now you are ready to remove the green screen. Make sure you’re working with the proper layer, and, if you are on the ‘Background’ layer, double-click it and click ‘OK’ to make it into a normal layer, then select ‘Inverse’ from the ‘Select’ menu to reverse the selection.
- Now press the ‘delete’ button or select ‘Clear’ from the ‘Edit’ menu to remove the selection.
- The edges of your object/person may have a slight ‘halo’ around them. Clean them up by selecting ‘Layer>Matting>Remove White Matte’ or ‘Layer>Matting>Defringe…’; usually 1-3 pixels will do the trick.
- Now you can put any background you would like behind your cut-out object. I select ALL in the first image, then COPY, then I open the second image, and select PASTE. Now I scale, rotate, etc.
Now you get this:
(Go to full screen to see the detail.)
Much cheaper than flying to Egypt. No? And it took only a minute or two. If you have never tired “green screen”, you might find it occasionally fun or necessary.


Great Post….
I have one question
Is your green screen background seamless paper or something else(cloth). The reason why I ask is that I bought a green screen kit last year at the Henry’s show, The problem I am having is that the green screen background is cloth and sometime has creases that are noticable when you layer the forground and background photos together. Thanks for your help inadvance
Ray
It is cloth. When you select the colour, you can select the colour with a bit more latitude, so the entire background is selected. Yes, this takes a bit of doing – so light as directly as possible, to minimize the creases. Also – move your model from the background, so as to throw the creases out of focus.