Generative Fill

Adobe has added “Generative Fill” to Photoshop. This is a game-changing function, that uses AI to fill in areas of your photos. The future is here.

And I use Generative Fill widely and constantly, but I have some serious reservations. We should all be aware.

First, you need to stay with it: it is “AI”, not quite “I” yet. Great as it is, it usually needs some manual intervention. It still saves time, but if you think that it will do things automatically without supervision and correction, you are in for a disappointment.

The second objection is more serious. By using this and becoming dependent on it. you are allowing a US-based comp ay to censor your work. Try to remove a body modification (like a nose ring), or even worse, try to take a background object out of a photo that contains a naked woman, and you get this:

Yes, it is not the lady we are trying to edit, it is merely a background item. But just the fact that the photo contains something somewhere that this American company’s puritanical excuse for morality does not like, means I cannot edit this photo.

In other words, if I use AI (which soon will be part of every action you do), my photo needs to be approved by the American Ayatollahs. Talk about Cultural Imperialism… one more example of why America is so often disliked in the world.

And this is not about nudity. It is about the fact that your work will now increasingly be censored by American censors. Before you get too reliant on AI features, think hard.

Photoshop, Elements or Lightroom?`

An often-heard question, here at Willems Central: which one should I use?

  • Adobe Photoshop Creative Suite, at around $1,000?
  • Adobe Photoshop Elements, around $ 100?
  • Adobe Lightroom, around $300?
  • Apple Aperture, around $150?

Actually, that’s a comparison of Apples to Oranges. They are different and address different needs.

Photoshop and Photoshop Elements address the need for “deep editing” single images. Getting Vogue front page and want to move a nose? Stretch legs? Turn red into green? You probably want to use Photoshop.

Lightroom and Aperture address a different set of needs. They offer:

  • Asset management. Great tools for comparison between images. Ranking, rating, organizing, searching, sorting, filtering, keywording, and so on. Amazing tools.
  • Quick editing – much quicker than in Photoshop. Not as deep, but as deep as a photographer usually needs.
  • Non-destructive editing – your original images never get touched.

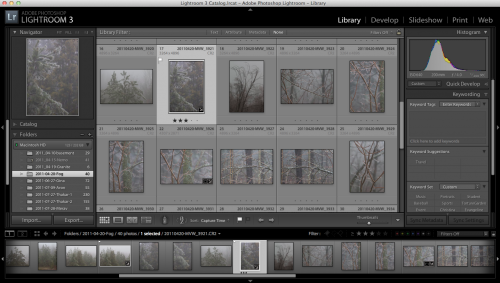
You can see Lightroom here:

Other differences:

  • Lightroom and Aperture can be learned in a few days. Photoshop will take you months to fully master.
  • Aperture is more Apple-like in that it wants to organize where your files are; Lightroom is more free in that it more readily leaves it to you.
  • Aperture is for Apple only; Lightroom is for Apple or Windows.
  • Photoshop CS contains “everything”; Elements is “for photographers”.

So what did I choose:

Both.

I work in Lightroom 99% of the time. LR saved me 75% of my post-production (finishing) time. ‘Nuff said! But occasionally I need to pop from LR into Photoshop. If you have more tan one image to finish, I recommend you start with Lightroom (or Aperture); and add PS/Elements later.


How now, green screen?

Why do we use a “green screen” background to shoot subjects sometimes?

Here’s why. The simple colour (usually a specific green, though it could be blue or some other colour) can be replaced easily by a new background.

Say I want to shoot a wakeboarder in Egypt. Makes sense, the desert, wakeboarding, right? So to do this, I can fly her and a bunch of lights to Egypt.

Or, I can do the following instead.

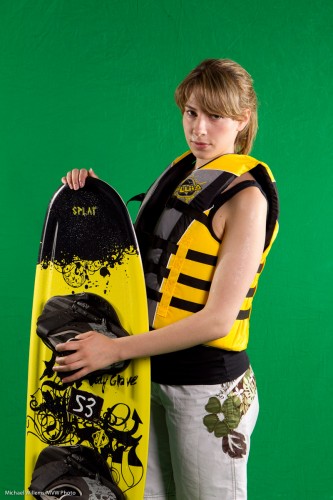
First, shoot her against a green screen background:

Jenna Fawcett against a green screen (Photo: Michael Willems 2011)

Jenna Fawcett against a green screen

Then go to Photoshop (not that I like Photoshop – I do not, but for serious manipulation work like this it is the standard) and do the following:

  1. Open the photo in Photoshop.
  2. Select ‘Color Range…’ from the ‘Select’ menu.
  3. After the Color Range dialog box comes up, click on the eyedropper tool, drag the ‘Fuzziness’ slider to around 30, check the ‘Invert’ checkbox, choose ‘Grayscale’ from the ‘Selection Preview’ popup and make sure the ‘Selection’ radio button is pressed.
  4. With the eyedropper tool, click in the green area of the image. You should see much of the green area as white, and the rest of the image (which gets selected) as black. If there are still areas of the green screen which are not white (e.g. wrinkles in the backdrop), hold down the Shift key and click on them with the eyedropper until all of the green area is selected.
  5. If there are still pixels here and there that are white, you can lower the Fuzziness until it is easier to click on the areas. You can use the ‘Refine Edge’ dialog from the ‘Select’ menu.
  6. Once you’re satisfied with your selection, click ‘OK’.
  7. You should see the object you are trying to select selected. If there are any problem areas (i.e. you see scrolling ants in areas inside or outside your selection that shouldn’t be selected), use the lasso tool (hold down Shift or Option (Mac)/Control (Windows) to add to or subtract from the selection) to make your selection perfect.
  8. Now you are ready to remove the green screen. Make sure you’re working with the proper layer, and, if you are on the ‘Background’ layer, double-click it and click ‘OK’ to make it into a normal layer, then select ‘Inverse’ from the ‘Select’ menu to reverse the selection.
  9. Now press the ‘delete’ button or select ‘Clear’ from the ‘Edit’ menu to remove the selection.
  10. The edges of your object/person may have a slight ‘halo’ around them. Clean them up by selecting ‘Layer>Matting>Remove White Matte’ or ‘Layer>Matting>Defringe…’; usually 1-3 pixels will do the trick.
  11. Now you can put any background you would like behind your cut-out object. I select ALL in the first image, then COPY, then I open the second image, and select PASTE. Now I scale, rotate, etc.

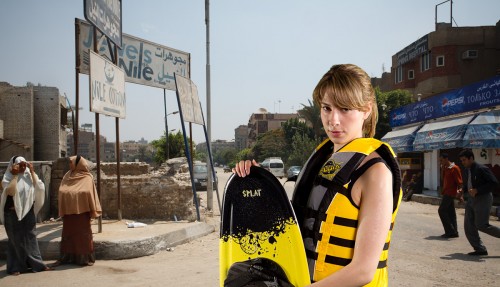
Now you get this:

Jenna Fawcett in a virtual Egypt (Photo: Michael Willems 2011)

Jenna Fawcett in a virtual Egypt

(Go to full screen to see the detail.)

Much cheaper than flying to Egypt. No? And it took only a  minute or two. If you have never tired “green screen”, you might find it occasionally fun or necessary.