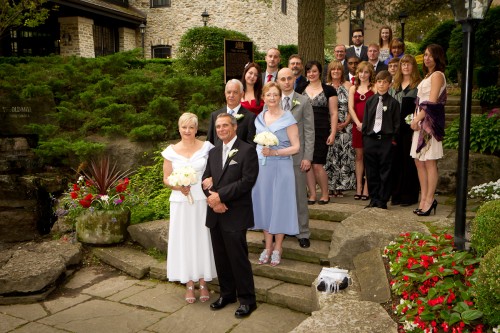
I shot this at a wedding the other day: a group shot featuring bride and groom Pat and Jim, relatives , maid of honour, and best man.
How did I shoot this? I thought it might be good to go through the process that went into creating a shot like this.
Setting
The day was ideal for photography (bright overcast). So I had lots of options at The Old Mill in Toronto. But therein lies a problem: which one to choose, out of hundreds? So I decided to look for…
- Background: A nice, full, non-distracting and darker background.
- Context: the background should say something about the event: it supports the image so it should provide context (notice the venue’s sign).
- Colour: I want some colour. The flowers provided this.
- Space: A space large enough to pose over 20 people.
- 3-D: Preferably some various levels (e.g. steps).
Steps give you an automatically full background, so these steps were the chosen spot. So far. so easy.
Arranging
I would often do a sit-stand-lean arrangement, but in this case, all standing is OK. Arranging 21 people takes time and by the time you tell the last person what to do, the first person has turned around again. So speed is of the essence. I arranged bride and groom, best man and maid of honour, and from there on much of the rest fell in place and only minor adjustments were needed.
I then arranged them so I could see them all. This takes a fair amount of doing, because people move – my experience shooting sports clubs came in handy.
Now I told the group to relax – I would be doing test shots, so no worries yet – and to all breathe in deeply, and then all to breathe out at once. I demonstrated this. Silly, and silly is good, it relaxes people.I avoid saying “Smiiiiile…!” – it brings out the worst fake smiles in people, especially in men.
Then I watch body language and go, “checklist-fashion” through everyone, to see any awkwardness. If I see any, I ask them to adjust.
Technical
I used a slightly wide angle lens on my Canon 1D Mk4 body – the 24-70 f/2.8 set to 33mm effective focal length, meaning not very wide (distortion) but wide enough, giving me the following benefits:
- The ability to get it all in.
- Extended depth of field.
- Tolerance of slow shutter speeds.
I first of all exposed for the background. I wanted it to look nice and dark. This emphasises the people, and it also allows background colours to become saturated.
So I set my camera to:
- f/7.1 (which gave me enough depth of field, which I needed with 8 rows of people!);
- 1/80th second, which is fast enough for a 35mm lens hand held;
- Getting a dark background (between -1 and -2 on the light meter) now necessitated 800 ISO, which is great on today’s cameras. This also enabled the flash to reach far.
I then used my on-camera 580EX II flash to light the people.
On-camera, from the speedlighter? Yes, outside you can get away with it. If I had had more or more annoying shadow I would have used my Honl Photo softbox.
And there you have it. Simple shot, took a minute to make, and with little or no post work.

