I would share, but…

Adobe Lightroom is the only game in town.

Hence, Adobe has zero incentive to fix large bugs. Like this apparent bug: slideshow export fails if both portrait and landscape mode slides are included. It is incredible that a corporation would let a huge bug like that just sit there, but I too cannot make an export of a slideshow that contains both portrait and landscape images. It just hangs at 1% or thereabouts.

On top of that, Adobe tries to force everyone to sign up for the Creative Suite, i.e. online software as a service with regular payments, and pay at least double what you would pay for a simple app.

Don’t be evil, anyone? Adobe does not even pretend to not want to be evil. The global dislike of corporations really is not a surprise, when you look at this.

Personally, I would not mind paying fair prices for Lightroom. Even high prices. But being manipulated and ignored at the same time by a huge corporation leaves a bad taste in my mouth.


Again: No Deleting

As I said in 2016: Today, I present to you an excerpt from my classes at Sheridan College and from my private classes. The subject: “Should I habitually delete my bad pictures?”

And the answer, my photographing friends, is a strong “no”. Deleting, whether “from the camera”, “afterward”, or “instead of formatting”, is always unwise!

So why is that? Let’s look at all three reasons in turn.

[A] Why not delete from your camera?

Well,

  • First of all, it is a waste of time. When you spend your time deleting images, that means that you are “chimping”, i.e. looking at the images instead of looking at the things you are photographing! You should use the time you have on location to be at that location.
  • Also, by all this looking you are wasting valuable battery power; power you may well need later on in the day.
  • And you are losing learning opportunities: why exactly were they bad? The EXIF data usually shows you why—and without the image you may never know.
  • It may be As Good As It Gets: The bad image of uncle Joe may be the last image you have of him.
  • You may be mistaken: Often, you cannot really tell how good or bad the image actually is.
  • And finally, when you make a habit of deleting, you will delete the wrong image soon enough. Guaranteed. Law of nature.

[B] OK. So why not delete afterward?

This too is simple once you think it over…

  • Statistics, is one reason. “How many pictures do you take with wide angle lenses? What proportion if your images is out of focus? How many photos has your camera taken? All these are questions you cannot answer if you have deleted bad images.
  • As before: maybe it’s the only picture you will ever get of this person, even if it is out of focus. I would love too have an out of focus or badly composed picture of Lee Harvey Oswald the day before he shot the president.
  • Processing techniques improve with every iteration of Lightroom/ACR. Maybe that terrible image will be usable 10 years from now.
  • They don’t matter. The drawback of “they get in the way and slow things down or make my photos hard to work with” no longer holds at all with modern image resource management tools like Adobe Lightroom.

So you use 1TB of your 8TB drive for bad stuff. Who cares! Storage is cheap today.

[C] OK then. But why not “delete the card when importing”, or “delete after use”?

  • Because formatting is much, much better than merely marking as deleted (that is all that happens when you “delete”) . It removes lost clusters, fragmentation, and all the other disk error that occur naturally over time on every disk, even virtual disks. Formatting fixes all these and is much safer. It actually deletes.
  • “Deleting when importing” is also unsafe because “what if the import fails”?

But remember, friends, do not format until you have made at least one backup of your images: one main copy, and one backup on other media. All hard drives fail—then question is when, not whether.

So my conclusion: there are lots of reasons to not delete your work. Leave all the bad images intact; format card after backup.

Trust me on this. You will be happy you listened, one day.

Next question.

Q: Should I format the memory card? And where?

A: Yes. After you copy the pictures to a computer and make a backup, and only then: put the card back into the camera and format it. Yes, in the camera, not in the computer. And every time. After your pictures are backed up.

‘Nuff said.

Michael

Booth

I spent Sunday night shooting pictures at a wedding—photo booth pictures, to be precise. And while some photographers think of this as a low-end endeavour, I love it, and I recommend it to all.

“Photo booth” means photos of people using props and funny poser, and printing images on site.

This needs a computer and special software:

IMG_7717

And a tethered camera with a studio-type lighting setup:

IMG_7716

And, ofcorse, props…:

IMG_7720

And finally, technical knowledge as well as people skills.

IMG_7719

The printouts people are handed look like this:

2017-06-04_222331

Look, by the way, at that last picture. How do you fit around 15 people in front of a backdrop meant for two? Here’s how!

20170604_222321_174_1DX_5398

And that’s why I love booths: all my varied photography knowledge comes together for this single purpose.

The result: as the bride told me: “They will remember this wedding because of the booth photos”. If that isn’t the best compliment ever, I don’t know what is.


Nothing changes?

Well, not in 8 years. Here’s a technical note in the form of a post from October 2009 that is still valid…:


A reminder to all flash photographers: you need your shutter speed to be below the camera’s flash synch speed.

What does this mean? Let me explain.

The flash fires for the briefest period, of course. Like 1/2000th of a second. That is why we call it a flash.

So when it fires, if the light is to reach the entire film or sensor, the shutter needs to be totally open at that point.

That much is obvious. But what is not obvious is that there is an engineering limitation in your shutter. Beyond a certain shutter speed, the camera’s synch speed, the shutter never totally opens. Instead, a small (increasingly narrow) slit travels across the shutter to give each pixel a brief exposure time.That’s cool – the shutter does not have to be super-fast and expensive and you get a fast shutter speed.

But this gets in the way when you are using flash. When you fire during those short exposure times (on most modern cameras, faster than about 1/200th second), the light does not reach the entire sensor. Look at this example I shot to illustrate this, at speeds from 1/200th to 1/1000th sec:

SHUTTER

You can see that as I exceed the sync speed, the light only reaches part of the shutter.

You should also note that especially when using external flashes with Pocketwizards or similar, flash takes time to set up. My 1Ds MKIII has a synch speed f 1/25oth second but as you see, at that speed it is already beginning to cut off. Best stay a bit below your synch speed (I typically set my shutter, when I am using studio flash, to 1/125th second).

(There is a way to overcome that: fast flash, which some high end flash units offer. This continuously, all the time that the shutter travels, pulses the flash at a very rapid rate, so that the slit, as it travels across the sensor, has light coming in throughout its travel time. It works great – do use it when taking flash images outside – but it uses a lot of energy, and hence decreases the range of your flash.)

(Advanced tip: I know of at least one photographer who uses this effect to introduce an electronic version of a neutral density filter or a barn door: he sets his camera to 1/320th second while using flash, and turns the camera upside down. That makes the top part of the image dark, at least as far as the flash part of the light is concerned!)

Why RAW or JPG?

Shoot RAW? Or JPG? Or both?

I would generally say: “Shoot only RAW”. Why not? It’s just another format.

But why could you do RAW+JPG, or just JPG? What would be valid reasons?

Here are a few.

  1. You want to be sure that you have the shot – a pic could be corrupt, but if you have two you may be OK.
  2. You may need to print a copy, like on a printer, straight from the card
  3. You have to upload loads of pictures quickly, like for a newspaper shoot of a sports match
  4. You want backups as in the first example, but you have two memory cards and can write to both at the same time. Every time I shoot, I save RAW to card 1, and JPG to card 2 – that way card 2 can be a 32GB while card 1 is a 64 GB.
  5. You want to compare the camera’s treatment of the raw data with your computer’s.

So a you see, there’s quite a few valid reasons. When you see super simple solutions on the Internet, like “Authority Figure X says ‘shoot RAW only” – well, the world may not in fact be that simple. Be wary of simplicity, while you chase it at the same time, because “less is more”.

Don’t Give Up.

A student recently sent me this picture, saying that unfortunately, she could not use it as homework because of the low quality:

IMG_4935-1024-2

It was a small (700 pixels height) picture. Blurred, low contrast, and inaccurate colour. So she has a point: not great, though an excellent moment.

But wait. If I put that picture into Lightroom (just drag it onto a grid view), I can use the “Develop” module to fix exposure, white balance, sharpness, highlights, blacks, contrast, and not to forget clarity (presence). Would that help?

It certainly would:

IMG_4935-1024

Much better, and now suddenly it is a useable picture.

I suppose the take-away is this. First, of course, that Lightroom is easy to use and powerful. Second, that even “bad” pictures can often be fixed later, especially when small sized, like for use on the web. We often inspect too closely: usually, even a bad picture today can easily beat any picture made from a negative in 1980.

From all this, a few things follow. Namely:

  • Do not delete bad pictures: you may find a use with them anyway, if not now, then maybe tomorrow, with new digital processing techniques.
  • If a picture is bad, try making it smaller. Imperfections are less noticeable in smaller size photos.
  • Try alternates. Black and white, for instance. Or shift colours. And so on: often, these things can bring out the quality in a photo.
  • Use parts. Crop off the bad part, or selectively sharpen the important parts.
  • Learn to use Lightroom (see yesterday’s post).
  • Above all: do not give up on a picture too soon.

The improvements I made to the above picture were from a small picture. Imagine what I could have done with the original sized picture: I am sure it would have been even better.

A bad picture of a great moment may still be worth it. But often, you can make that bad picture into at least an acceptable picture.

A fun exercise is this: go  through your old photos, those of five years ago, and see what the processing techniques since then can do with them. You will often be surprised.

Do consider coming to my Lightroom seminars in a few weeks. See the post immediately below this one.


Come Learn Lightroom—once and for all!

One of the most spectacular changes in photography over the past decade has been the emergence of Adobe Lightroom (officially called “Adobe Photoshop Lightroom”) as the tool for photo asset management, editing and production for everyone from beginners to pros.

Lightroom was conceived as an additional utility that would make “managing your photos” easier.  But it has become much more: rather than just a utility, it is now the centre of a professional workflow that can save 80% of the time you used to take before for the same job. A wedding that took me 8 days to finish in Photoshop now takes a day.

So what does Lightroom do more, or better, than Photoshop?

The question is a little misleading. They are different beasts, aimed at different tasks. Photoshop is for illustrators that need to spend an hour on one photo; Lightroom is for photographers who need to do 100 photos an hour. Nevertheless, they both overlap to some extent: both offer some asset management (using Bridge, in Photoshop’s case), editing, and some production.

Where Lightroom shines is in its practicality. Lightroom offers:

  • Non destructive editing. Your original photo is never touched.
  • The RAW conversion does not happen until the very end, when you export or print an image, so you can change your mind about any setting at all times.
  • Lightroom offers really, really solid asset management. Even if like me you manage a quarter of a million images, you can rank, rate, search, organize, sort, rename, and a gazillion other things to your hearts content.
  • Practicality. A typical shortcut in Lightroom is, let’s say, “D” for “Develop”. Not, as in most apps, “Ctrl-Alt-Shift-D”, or some such hard to remember combination.
  • Great editing tools for photographers. True, you cannot move a head from one torso to the next, but I consider those functions “illustrator functions”. For what photographers do it is excellent. Especially if you know “the tricks”.
  • It works your way – unlike most apps, where you have to work the app’s way.
  • Everything you do can be undone, or redone differently, so you never have to be afraid that you are setting things up incorrectly, for instance. You can always re-do it a different way.
  • Lightroom is an excellent production tool. Exporting, printing (straight from Lightroom to your paper profile; not via some intermediate file), making web sites: it’s all included, and it has the functions you need.

By now, with Lightroom 6, it is mature and works the way it should.

But you do need to learn it. And like with so much software, it’s the little “A-ha” things; the tips and tricks; the “I had no idea this worked that way” things that makes you a star.

Well, good news. I am teaching Lightroom on 26 February and March 4. In Brantford, Ontario (just 20 minutes west of Hamilton). Morning on both days is “File organization”; afternoon is “Editing”.  So you can take one or two, on either day. Limited to four students each time (plus myself =5).

You can book on meetup.com at https://www.meetup.com/Brantford-Photography-School/ (get a free account, join the group, and book); or you can contact me separately and book in person. But do it soon: as said, space is limited.

Also, stay tuned for other courses in Brantford and in Toronto in the next few months. Unshackle yourself and unleash your creativity!


Sunday 22 Jan: Learn Lightroom

This coming Sunday, January 22, I host two Lightroom courses at my home studio. Small size, only a few students (4-5 max).

Adobe Lightroom: optimize setup and file structure

Sunday, Jan 22, 2017, 11:00 AM

Michael Willems Studio
48, Wilkes Street Brantford, ON

1 Emerging Photographers Attending

Lightroom ROCKS. Forget Photoshop, Lightroom can doing all if you’re a photographer. But to get maximum benefit, set up your file structure, preferences, and presets properly! That’s not always done… I see many users with messy file structures and sub optimal settings and presets. The good news: everything in Lightroom can be changed, an…

Check out this Meetup →

… and part 2: https://www.meetup.com/Brantford-Photography-School-Meetupome-join/events/236919051/

Who is this for?

For you, if:

  • You have always wanted to use Lightroom effectively.
  • You are not sure how to set it up: where to store the files? How?
  • You are always losing files.
  • Importing is a big gamble: you always end up with things more confused than before you started.
  • You see question marks meaning “can’t find file”.
  • You wish you . could make your own presets.
  • You still use Photoshop for editing, but you wonder if it is doable in Lightroom.
  • You, too, would like to edit your shoots in one fifth of the time it took you in Photoshop.
  • You get the big picture but it’s the tips and tricks that elude you.
  • You know a lot of functions, but you’re not sure when to use them.
  • You want to learn an effective workflow

…and so on. Come join me; bring a camera and a laptop and, if you have it, an external drive, and I’ll set it all up for you.  Lightroom is the way to manage your files, and to edit them and to use them: in one day, learn how. 

Follow the links above, or contact me to reserve your spot. Only 4 students allowed, so hurry before it’s full .

Don’t.

When it comes to finishing pictures (call it “finishing”, not “editing”) I adhere to a few rules.

  • If it is news, only changes in colour, exposure and crop are allowed.
  • If it is art, anything is allowed, but that said, I do the minimum.
  • If it is portrait work, I am happy to lessen shadows, to lessen contrast in skin tones, and to lessen permanent blemishes, and I am OK with removing temporary blemishes such as pimples. But I do not remove permanent blemishes.

That last one is important. Read it carefully, and you see that I do not want to change people into what they are not. Not like this (and I have nothing against this particular software, I do not doubt that it is wonderful, but I really, really dislike this kind of advert):

screen-shot-2017-01-03-at-22-06-08

“It does wonders to my pictures”? That means that either the photographer does not know how to light them properly, or she makes everyone into some kind of plastic thing that they are not.

And I think that this shows a lack of respect for the person. Like saying “you are too ugly to display as you are; we have to fix you first”. It also gives young women and men the idea that they do not meet society’s beauty requirements.


Review: Alpine Labs Pulse Camera Controller

“Late December” is a great season, with Christmas, Hanukah, and various other gift-giving opportunities. Especially when Santa brings presents. And Santa brought me presents this year—did he ever!

For starters, my son Daniel bought me this:
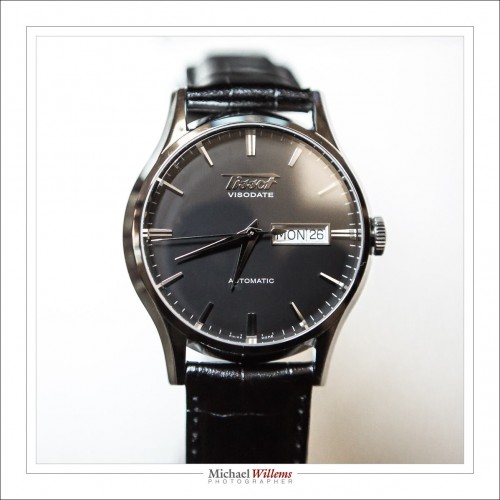
20161226-mw5d2449-1024

Superb.

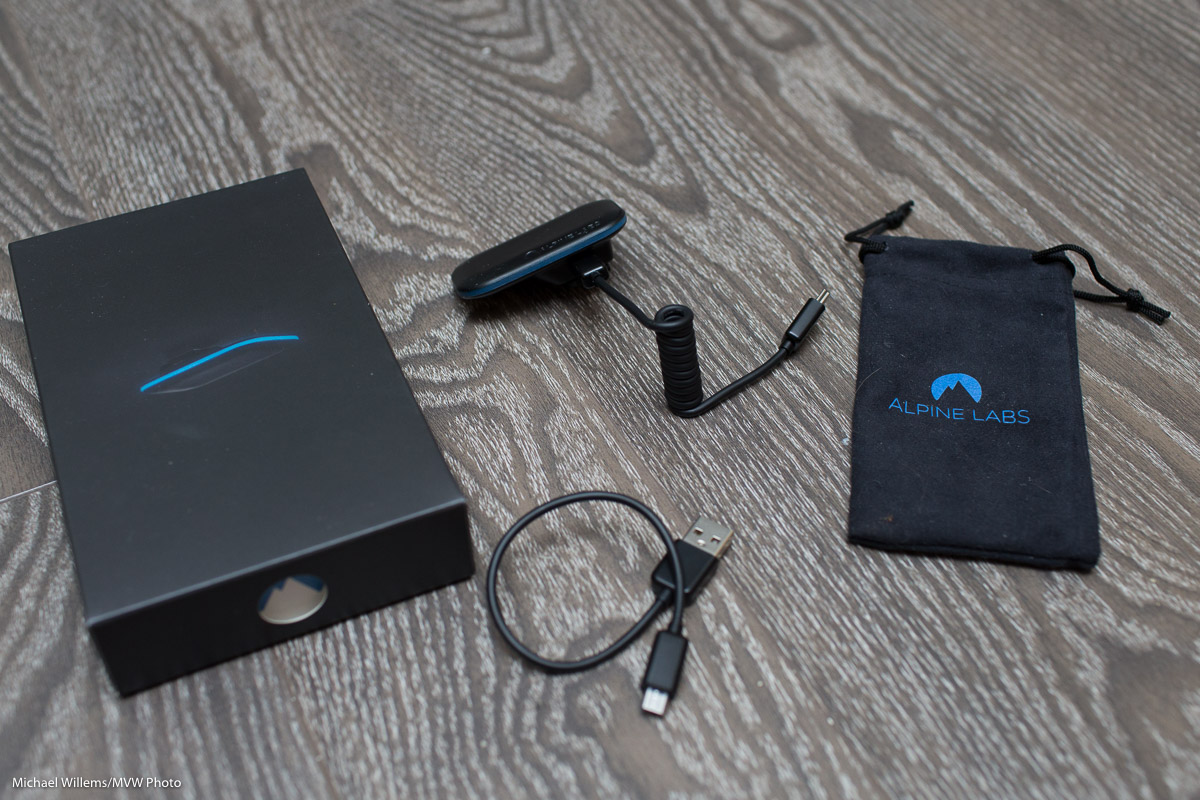
But hardly as interesting to my readers as one of the gifts Jason, my other son, brought me from California—namely, the device I am reviewing here. Here it is:

20161228-1dx_2974-1200

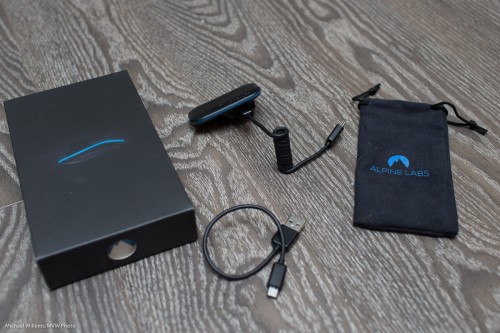
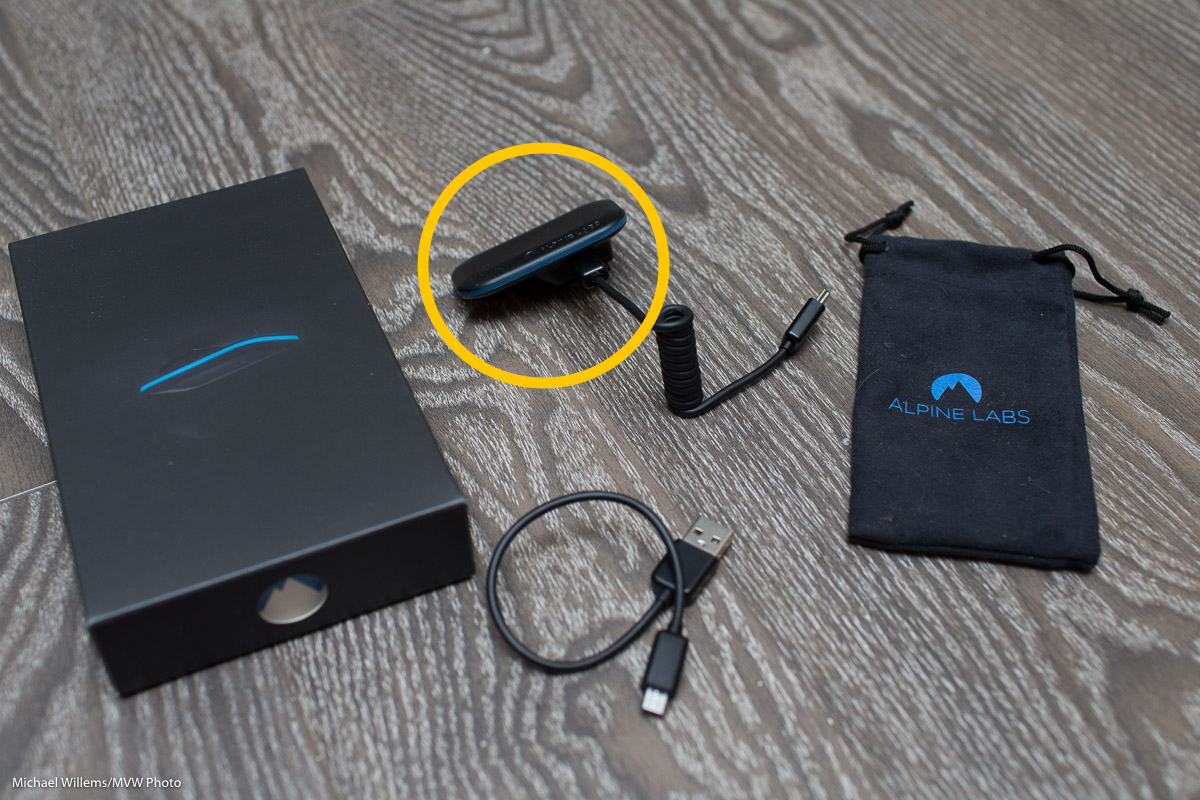
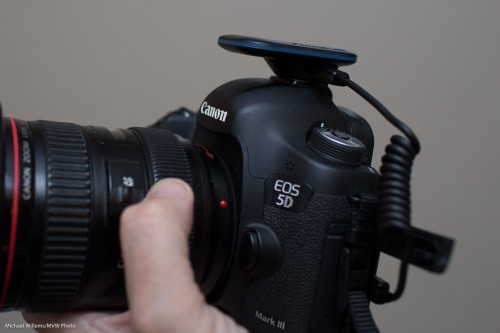
This $99 (US) device is the extremely cool Alpine Labs Pulse camera controller:

20161228-1dx_2974-1200-2

What does a camera controller do? Um… It controls your camera. Duh.

Let me explain. First, here’s how you operate it:

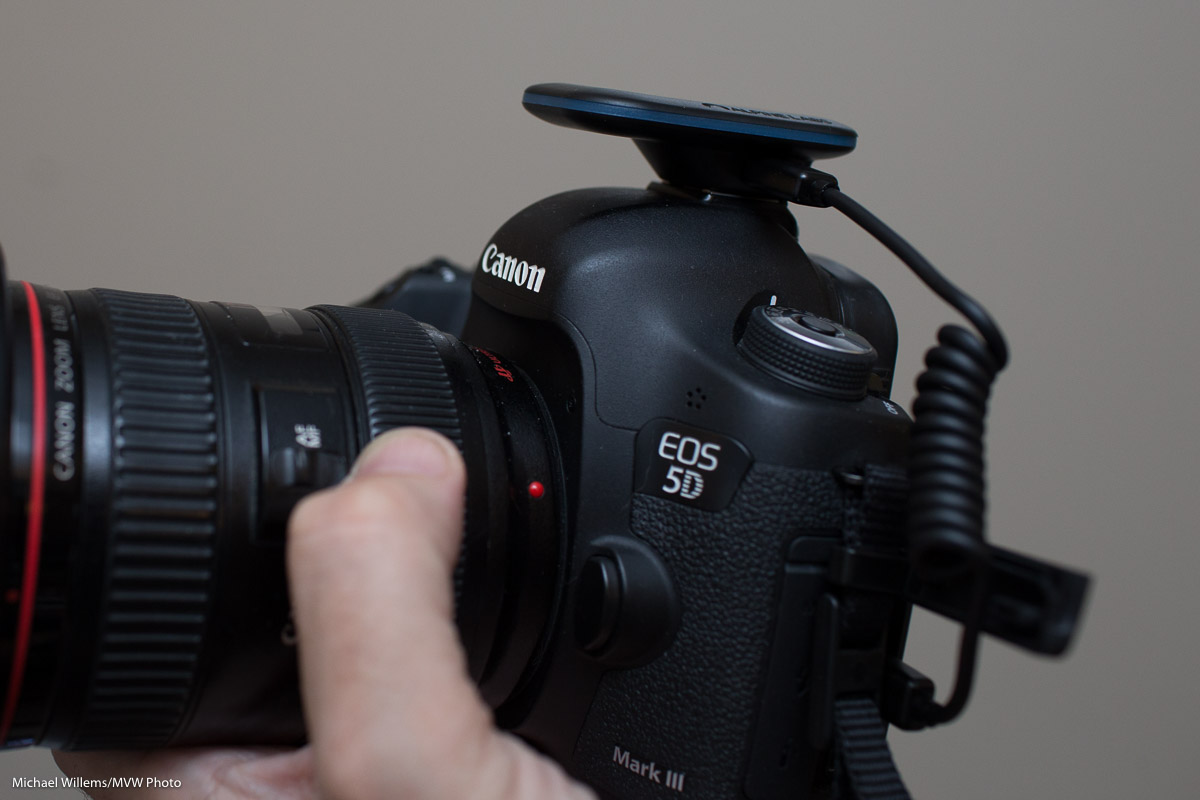
  1. Mount this controller on the flash hotshoe on your Canon or Nikon (but not Sony) camera.
  2. Connect the cable to the mini USB/micro USB input on the camera. Unlike traditional remote triggers, this one uses Bluetooth, and it connects to your camera using the USB port, not the trigger port.
  3. Install the “Pulse Camera Control” app on your phone/tablet (search for it under that name). Both iOS and Android are supported.

20161228-1dx_2970-1200

20161228-1dx_2971-1200

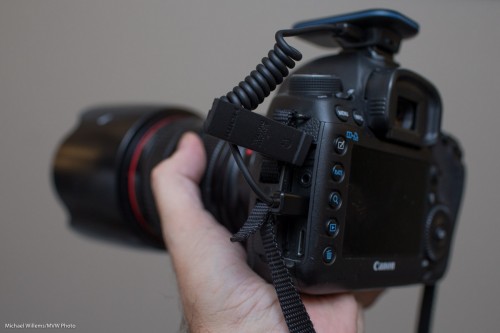
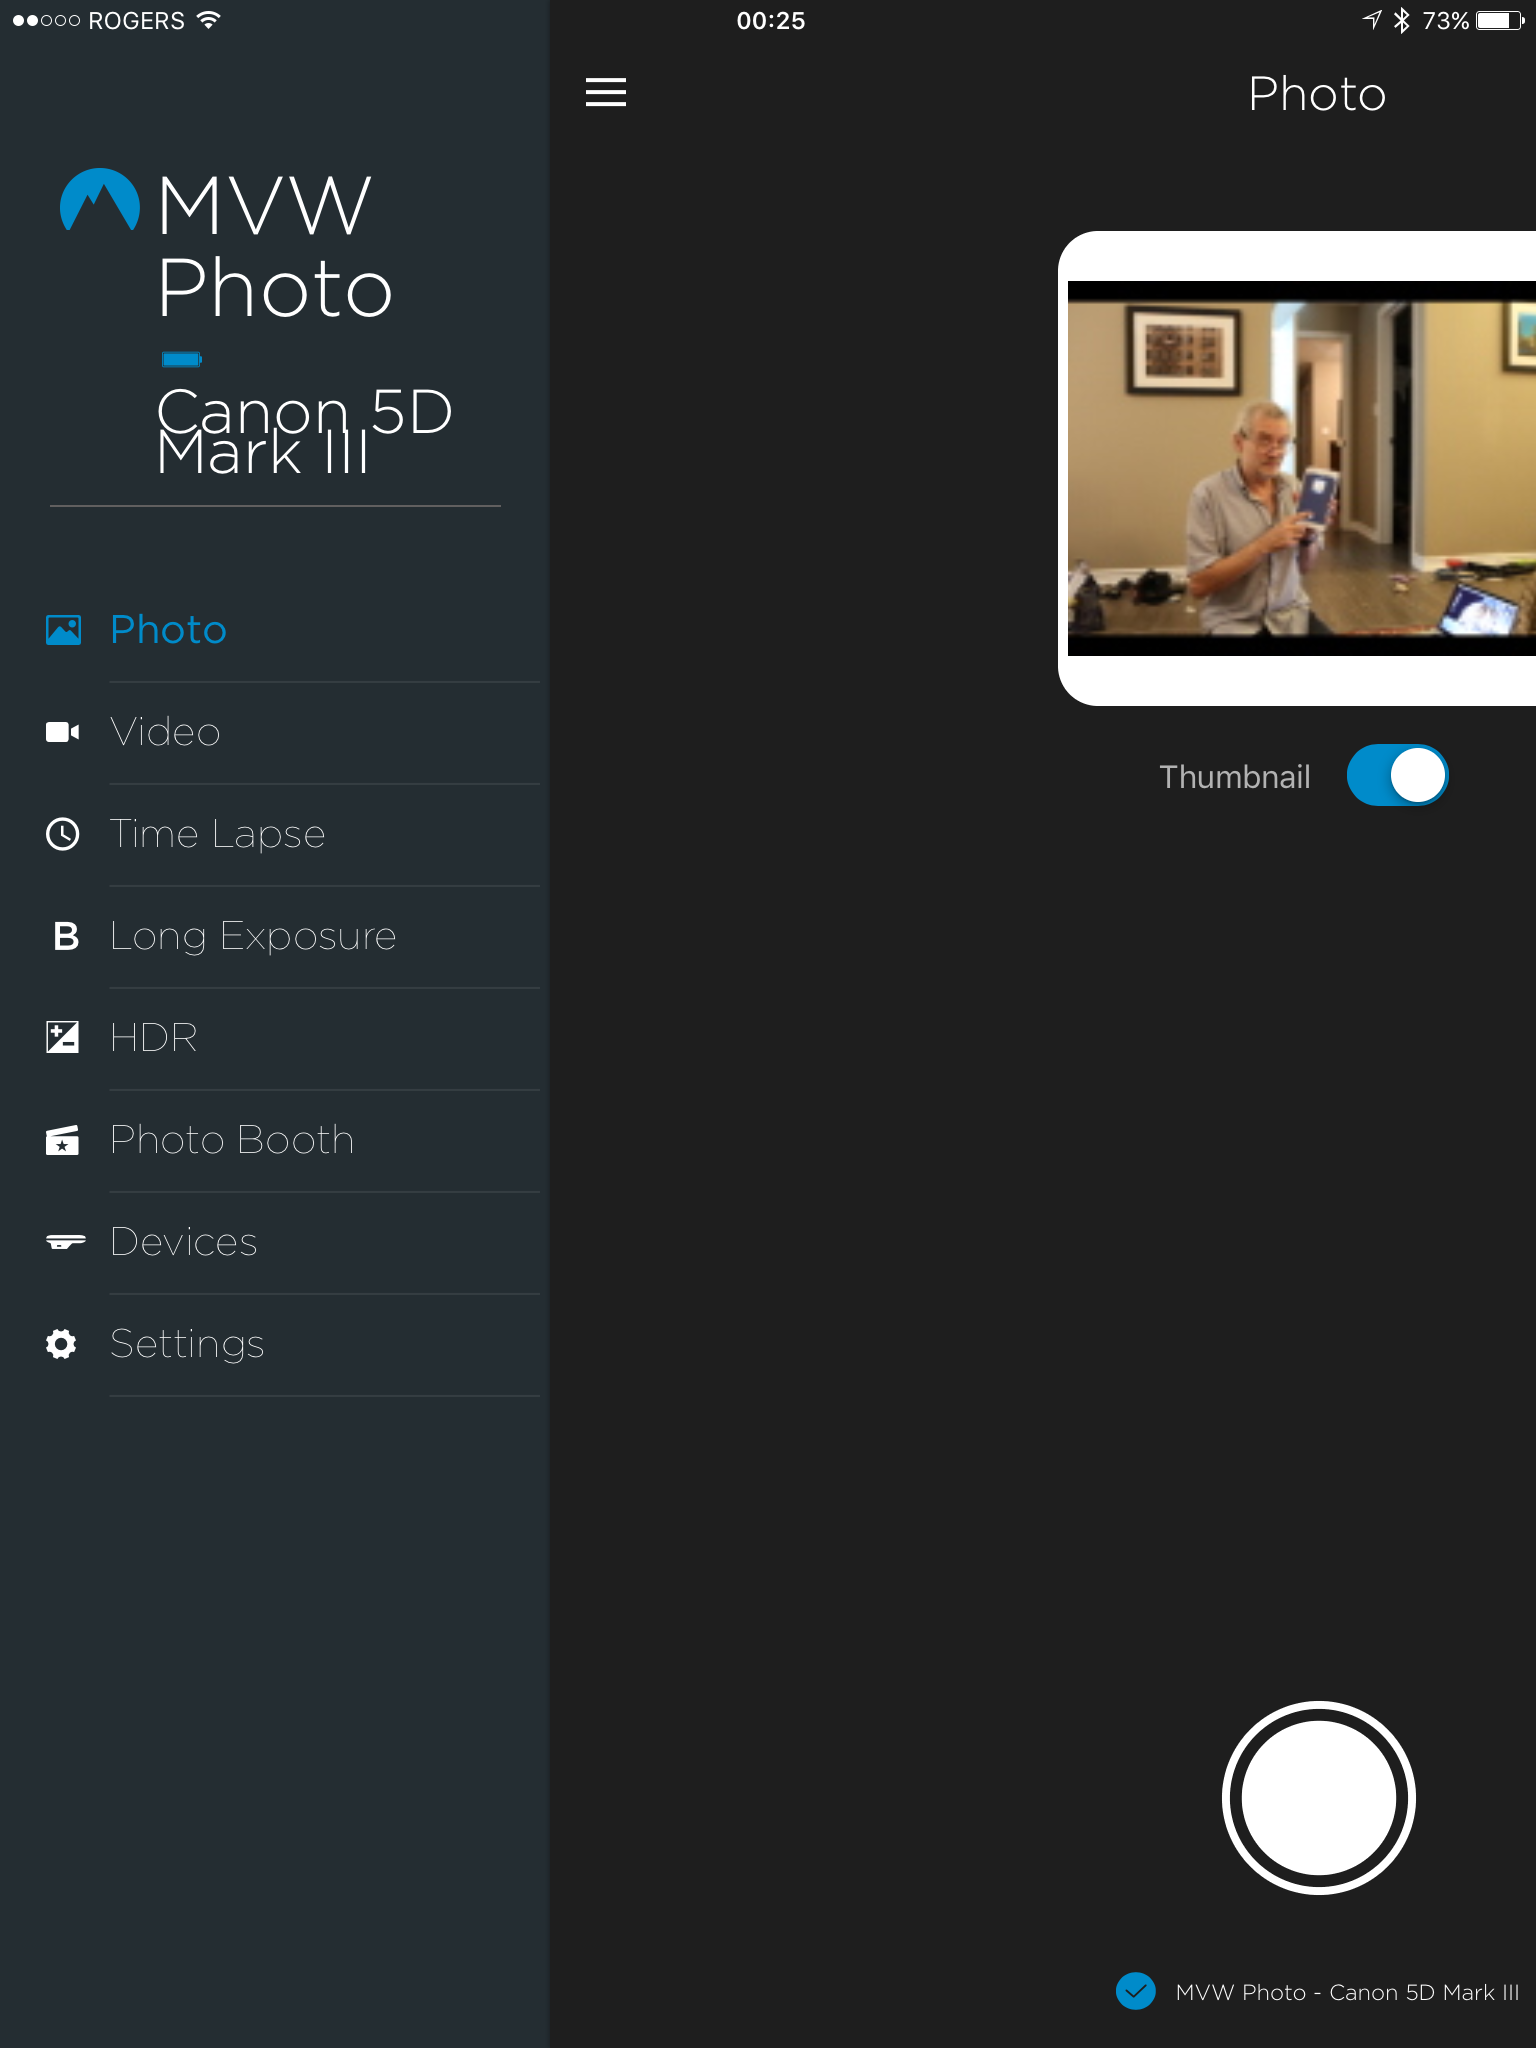
You can now pair the device and use the app:

img_8660

(That pairing, incidentally, could be handled more elegantly. Rename your device and yet it often returns to the default name. But that is a minor issue, and even during my testing I received at least one firmware update, v.1.21. The iPhone app I tested with is v1.3.0.506e570. More about bugs later.)

The device had no trouble recognizing my Canon 5D Mk3 or 1Dx. The Alpine Lab web site has a list of cameras that will work: most current Nikon and Canon cameras are supported.

You can now use the app to control your camera in the following way. First, set the camera to manual focus and preferably to manual exposure mode.

Now use the app to:

  • Set exposure: i.e. set Aperture, Shutter and ISO (your camera should ideally be in Manual mode, and it should be set to manual or back-button focus).
  • Take pictures by pressing the “shutter button” on the app. After you take a picture, you get a preview, which although it is small, low-resolution, an blurry, is very useful. You can also get a histogram, which is also very useful.
  • Take Video, the same way.
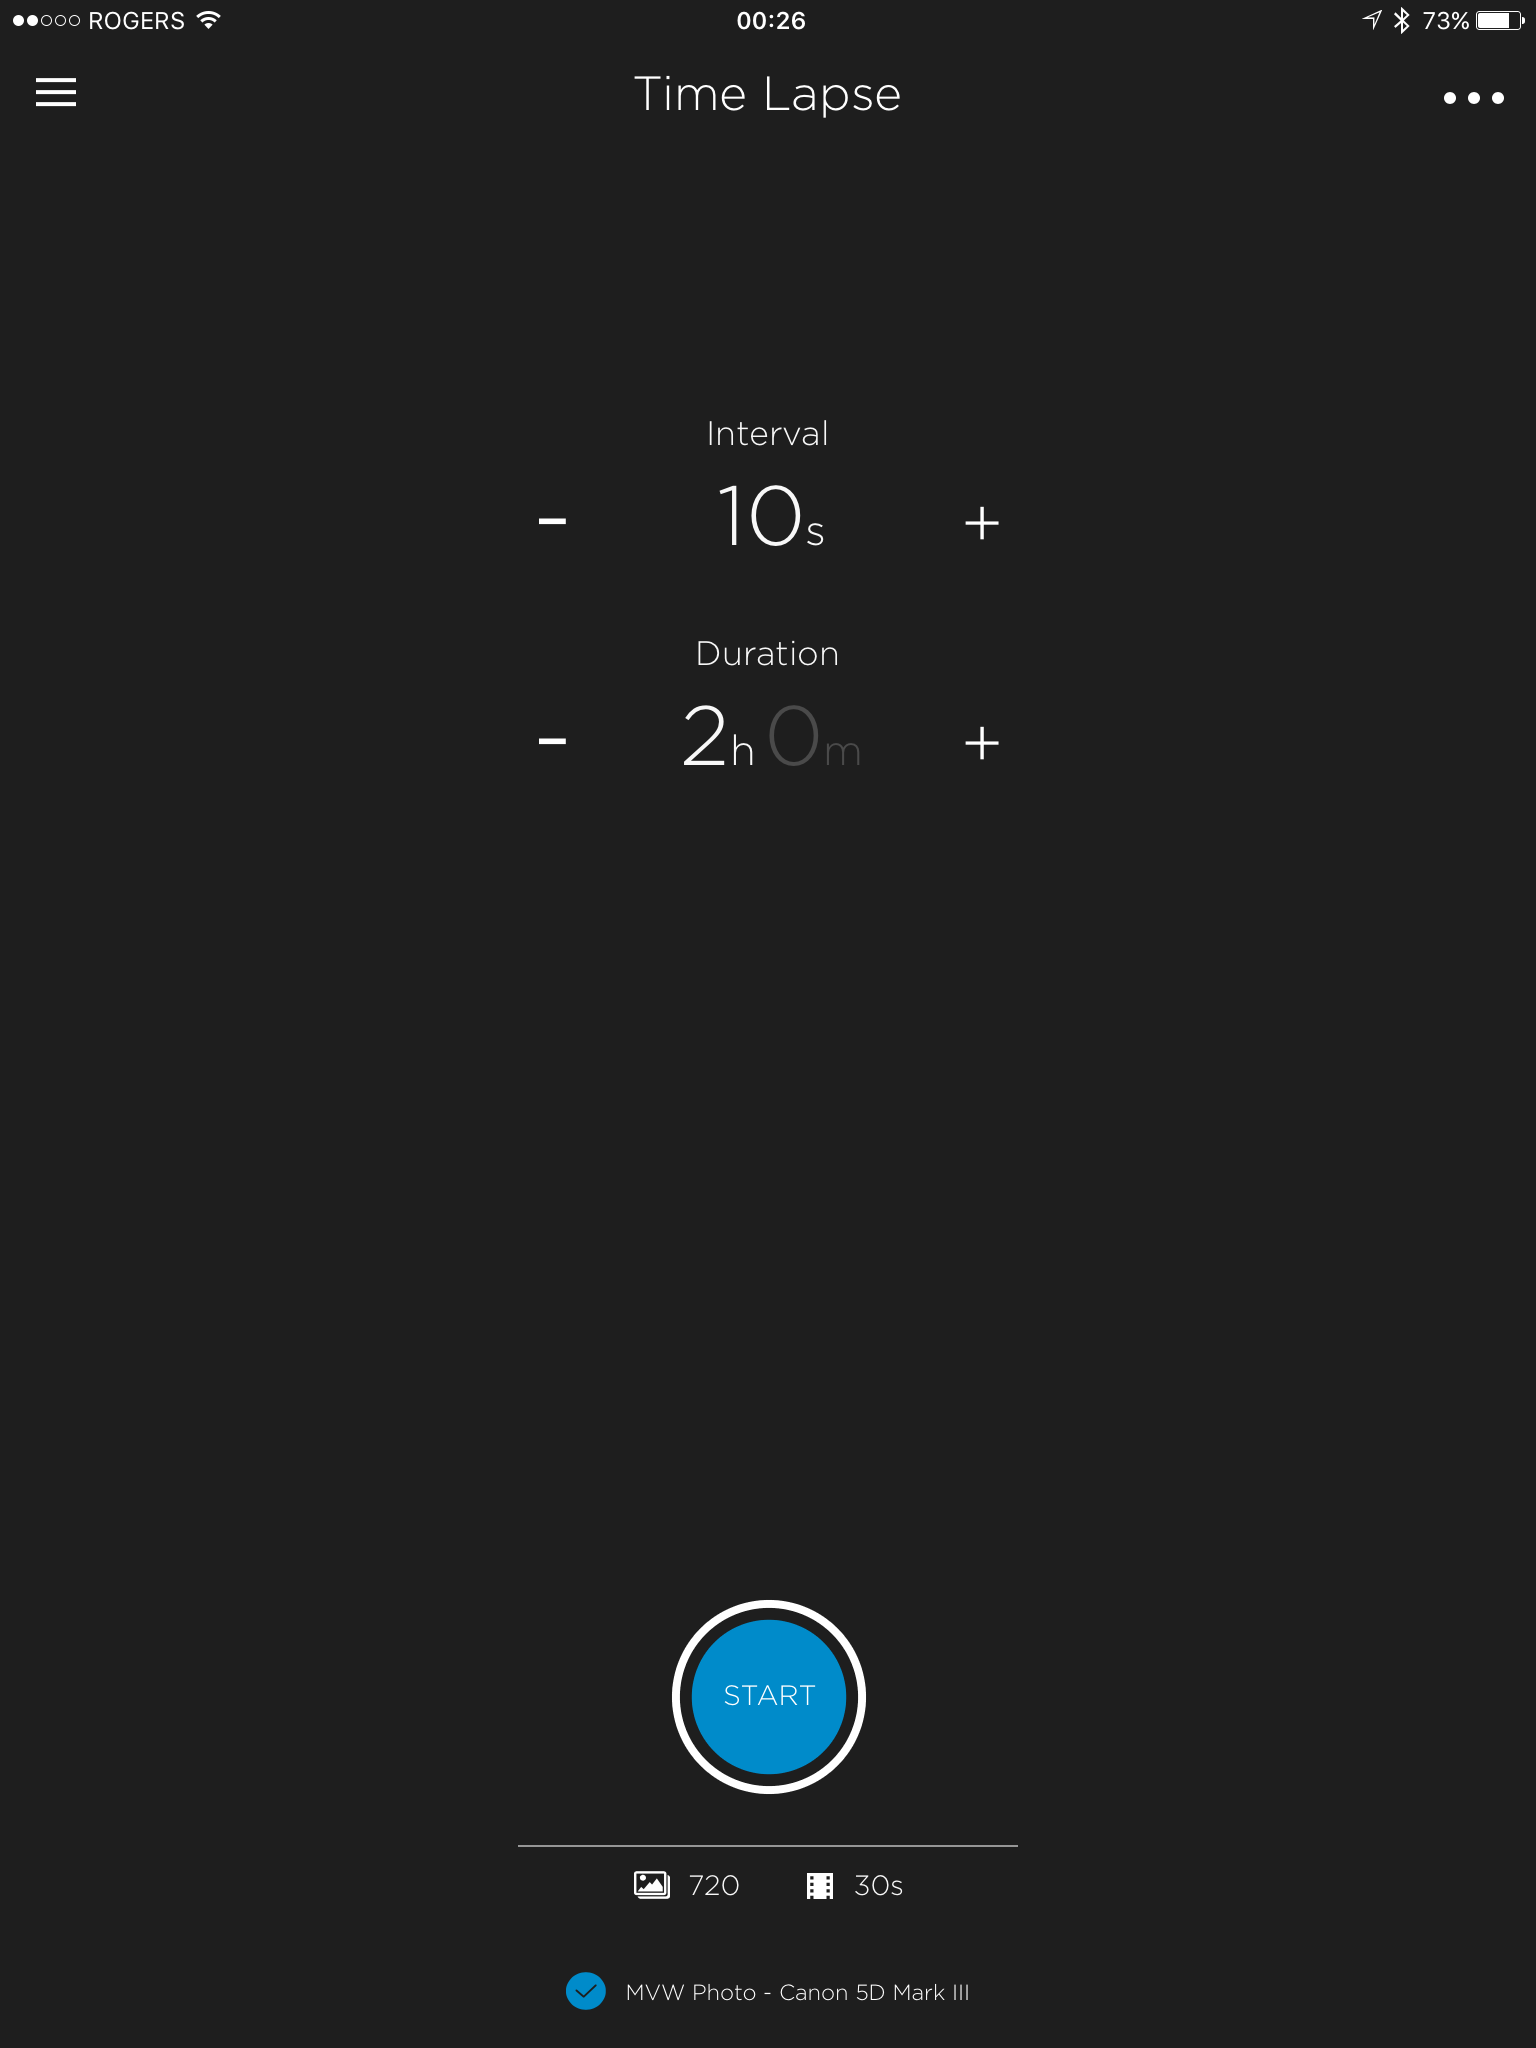
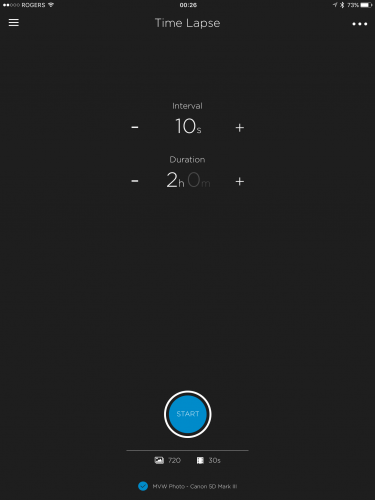
  • Make Time Lapse sequences. This is an extremely cool and easy-to-use feature; see the screen capture below. Easy and flexible: It allows exposure ramping, and you can even pause the exposures. Don’t forget to turn off picture review on the back of the camera when using this mode, or you will drain your battery unnecessarily quickly.

img_8662

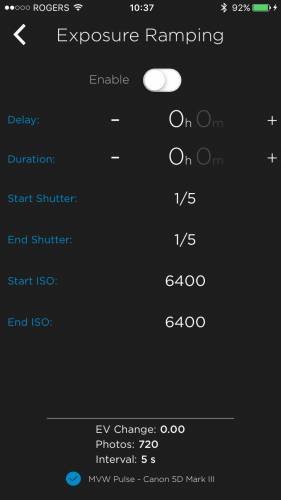
Exposure Ramping is a very cool feature:

img_0058


  • Take Long Exposure pictures. Without this, all you can do is up to 30 seconds, or use the “Bulb” mode, where you yourself have to hold down the camera’s shutter for the required shutter time. Now, you can easily take 35 second exposures, or 55 second exposures, or any exposures up to an hour and a minute. (You can still use “Bulb” mode also, if you wish, and you can start with a delay).
  • Take HDR combinations. Take 3-9 images, up to 7 stops (!) apart from each other. Pulse allows you to take the pictures; it does not combine them for you. You can do that in Lightroom or whatever app you use.
  • Photo Booth: a very simple photo booth mode where the app takes 1-10 pictures when you hit the shutter; 5-10-15-20-etc seconds apart.

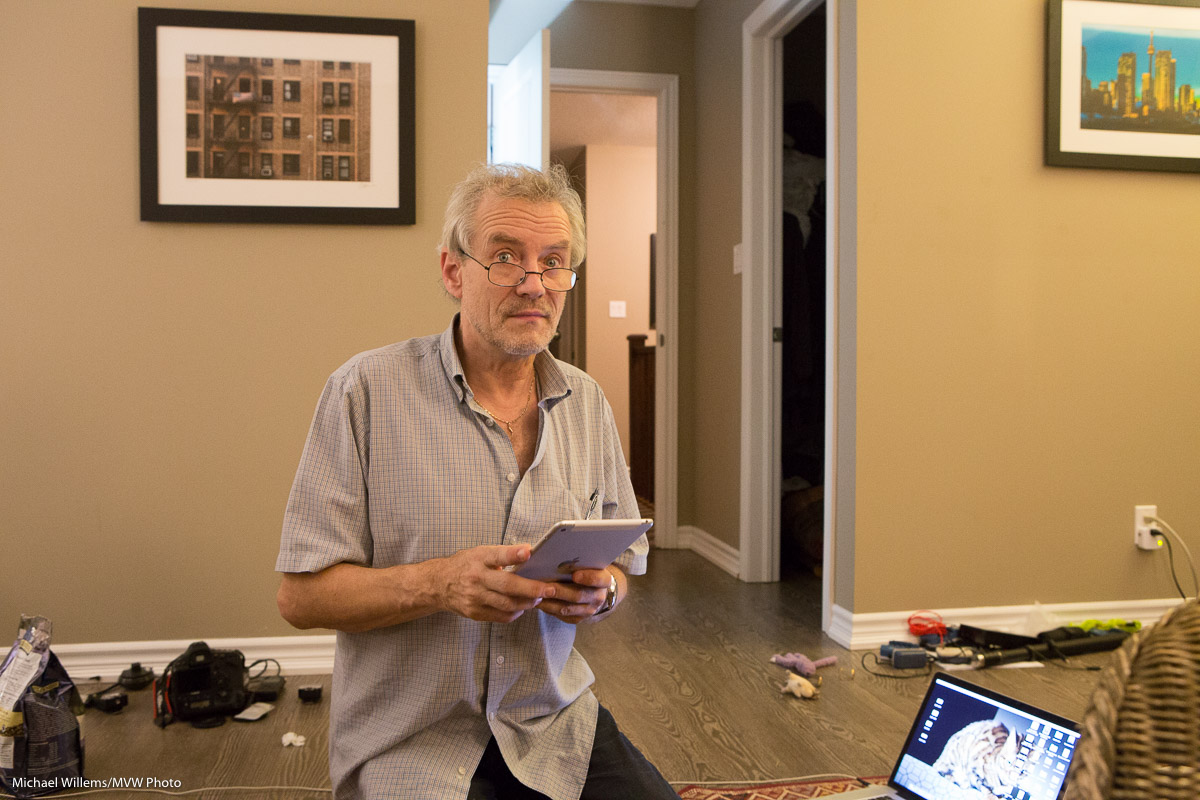
Here’s the selfie, taken with the Pulse, whose preview you saw in the earlier screen shot:

20161228-mw5d2480-1200

This great app does have a few little bugs, but seeing the frequency of updates I am sure they will be fixed soon. Bugs I observed included:

  • The “LED brightness” setting did not work reliably (or at all? Hard to tell).
  • The LED stays on sometimes. Just constant, i.e. non-flashing, blue. At other times, it is completely off. Perhaps these states mean something, but if so: I have no idea what.
  • Several times, the “OK” button on the app screen was obscured by the iPhone’s keyboard. Resetting was the only fix, since there was no down arrow “remove keyboard” key.
  • The “select an accessory (this may take a few seconds)” screen takes up to 20s to appear sometimes.
  • Cosmetic bug: see the camera name in the first screen shot above?
  • The app (or device?) went to sleep sometimes. At these times, a complete reset of camera, device, and app were sometimes necessary to get everything working properly again.
  • When I connect the Pulse to the computer, every few minutes I get this warning:

screen-shot-2016-12-28-at-10-05-18

These are relatively minor issues, most of which will no doubt be fixed soon. None of these stop me from using the camera, and some may well have been the result of me trying out all the modes. Still, robustness could be improved.

Overall

Many devices do some of what Pulse does; few or none do all; and none do it in such a simple and, I dare say elegant, way. This device will have a permanent place in my bag, and you can expect to see time lapse photos etc in my future.

EDIT: Jan 15, 2017: a firmware update fixed at least some of the issues I mention. Stand by for more updated information soon.