Alternative ways

On most modern cameras, there are many ways you can tune the camera to your own needs.

One such way is how to focus.

The standard, of course, is: “shutter button focuses (and meters) when held half way down”.

I have a 1Ds Mark 3 with a “noisy” shutter button: it lets go of the focus even when I am holding the shutter button down.

So, custom functions come to the rescue. I have just switched that camera to an alternate way:

  1. The shutter button, when pressed half way down, only meters.
  2. It is now the asterisk (“*”) on the back that focuses when I press it (on Nikon cameras, this could be the equally customizable AE-L/AF-L button).

Now I focus with the button on the back. Takes only a few moments to get used to – for me, anyway – and I have worked around the problem.

The point is that you often have alternate ways to operate your camera, and it pays for you to know all these ways. Read the manual and check out all your custom operation functions!


Glasses are not a problem

In a shot with glasses, avoid reflections – and it is easy. Move the lights (umbrellas, softboxes, whatever you use) 45 degrees to the subject’s side, and 45 degrees up.

If you see a reflection, like this:

..then do the following:

  • move the lights a little further up
  • or ask the subject to aim his head down just a little.

And often, “simple” is all you need. Just remember to pay attention to possible reflections!


Coaching Tip and special offer

I have a tip, a bit of self-promotion, and a suggestion for you. (You wil allow me a little promotion for once, I hope – if only because it can benefit you).

The tip: In addition to the schooling you take at commercial venues (like the School of Imaging or Sheridan College, both of which I teach at), consider doing some private or small-group coaching.

As it happens, December and January are great months for it, for four separate reasons:

  1. You have many events that need photos – family get-togethers, Hannukah, Christmas, you name it. You want to do well and impress everyone with what you can do now with your camera.
  2. You will have some time off, perhaps.
  3. You may even have new camera equipment… the world’s Santas do a lot of work in the dark months
  4. Coaches like me have time – December and January are months when much of the “normal” course work stops.

Small-group or provate coaching are especially great as a complement for class teaching:

  • You get the syllabus you need, not a set course. Your needs, your gaps, your equipment, your likes.
  • You get individual attention. Individual problem-solving.
  • You can do things you do not do in class – in-depth review of your images, to learn from them, for instance (this kind of “portfolio review” is incredibly useful in quickly making you a real photographer in the way you want).

So for the reasons above, to motivate you, I have a special on for December and January: a further 10% off the normal hourly price. As always you only pay me if delighted.
See more on this link and contact me (click on “contact” above) to learn more and to reserve your time right now – the months do fill up!


Mood and meaningful

Try to do the following: create an image that evokes a mood. And your images are more valuable if they convey mood and have meaning more than the strictly documentative and factual.

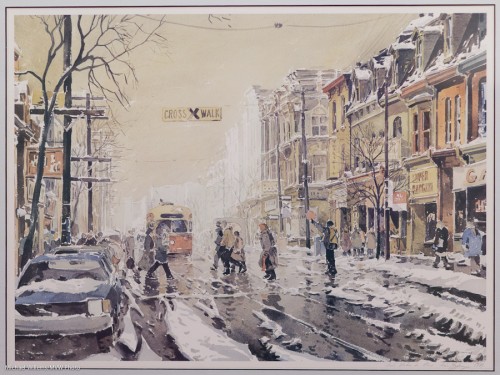
Images, more than any other artistic expression except perhaps the written word, can do that. The other day, I was in a venue that had art on the wall, and I came across a water colour that more than anything evokes “depressing”… a scene, incidentally, that we in Toronto will see soon enough:

So your challenge is to do the same in a photograph.

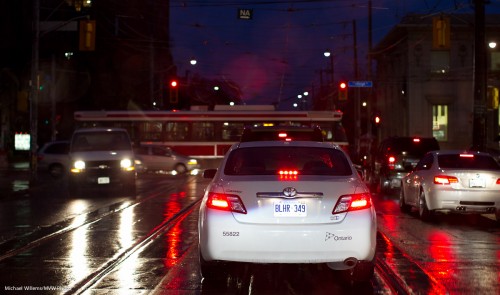
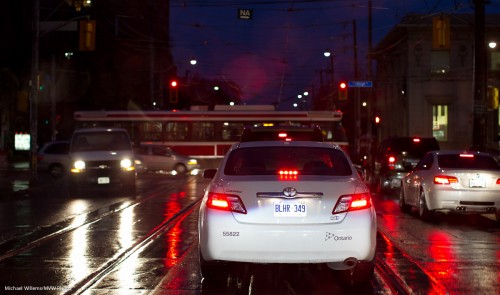
An example snap to get you started: in mine, too, weather plays a role, but traffic, my nemesis, does as well:

See what you can come up with: a good exercise in any case.


Depth of field…

….is affected by aperture – the lower the “F-number”, the more shallow the depth of field.

But let me repeat…  also by lens length (the longer the lens, the more shallow the depth of field), and, importantly, by proximity. It is the relative distance difference that matters!

Same settings in these two pictures:

Slightly blurry background… Now with the same settings, but we get closer:

Tip: to learn these things well, use a prime lens. That takes one variable out of the equation.


Does Lightroom overwrite files?

A word about how Lightroom uses files.

Lightroom is a “database of changes”. It never touches your original file (whatever format it is). We call that “non-destructive editing”.

Here’s how it works:

  1. You have your original file. Lightroom simply knows where it is (that is basically all that “importing into Lightroom” means!).
  2. Every time you make a “change” (like cropping, adjusting exposure, etc), Lightroom stores that instruction n its database (which it calls its “catalog”).
  3. What you see on your screen is that original file plus “what it would look like with that change”. But no new file is actually generated (except perhaps a little internal preview)!

It is only when you use a file that the changes are applied to make a new export file (or a printout, a web site, etc). This export file is made suitable to its particular purpose, and it is temporary: you create your export file, then use it, and then delete it.

Advantages:

  • You always keep your original file intact.
  • You do not fill up your disk with additional files.
  • You can always review and redo any setting (including all the “RAW-settings”.

These are great benefits over the old ways of editing images, and they are why Lightroom and Aperture, which basically does the same, have taken over photographers’ workflow so quickly.


I wanna know…

….haveyou ever seen the rain?

With a tip of the hat to CCR, I do wonder if we look at rain the right way. Rain, especially in winter or at night, is great weather to take pictures.

This snap, although it is just a snap, and I clearly did not take it while driving a motor vehicle since that would have been illegal, shows us why.

Saturated colours. Colours, those of brake lights and umbrellas, street lights and human activity. Reflections, of all the lights and colours. Textures. And the mood corresponding with rain.

So next time it rains, go out and take some pictures. Your camera will be fine: just keep it a little dry with a cloth.


Effective shutter speed

When you are using flash, your shutter speed is not necessarily really what you think it is.

A flash, you see, fires at 1/1000th second or faster.

So if the only light falling onto your subject is the flash (an important qualifier), then the shutter speed will effectively be 1/1000th second. Even if the shutter ia actually open for a long time. It’s like opening a bedroom door and flashing the light switch on for a short flash. Then whether you open the door for 1/10th of a second or for a second to do that flash, you will see the same.

If the ambient light also hits your subject, you wil get a mix. This leads to ghosting, like this:

The image was taken at 1/10th second with me moving the camera rapidly.

What all this means to you? That you can often shoot a picture slowly, say at 1/15th of a second, without materially adversely affecting your foreground, flash-lit subject. You’ll get nice light into the background, and the only thing that will really see motion blur is the background.


The best camera…

…it is often said, is the camera you have on you.

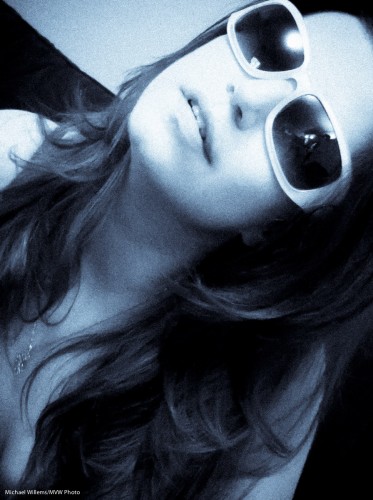
But you need to use it well. I shall share with you an example of an iPhone picture I took, to illustrate this.

To do an iPhone picture is easy. But to do it well, you need to:

  1. Compose well. Do not take a pic with the subject in the centre – use the Rule of Thirds, tilt, get clos, do what you need.
  2. But do not get too close or you will distort.
  3. Light well. Not the intensity – this pic was taken in very low light with no flash – but the direction (I turned the subject to the light and tilter her head up to catch that light)
  4. Post-process – in my case, in Lightroom. First, I converted the image to black and white.
  5. Then I applied an enhanced contrast style.
  6. Then I reduced the noise
  7. But then I applied lots of film grain. Love that grainy look (view full size to see it):

The result:

Model Kim Gorenko (Photo: Michael Willems)

Not a bad shot eh, and taken with an iPhone in low light.

Here is another example, with Selenium Tone style applied (and the same other tuning done):

Model Kim Gorenko (Photo: Michael Willems)

So do not make the mistake of thinking a good photographer is nothing without great equipment. Yes, it expands your possibilities, but if all you have is an iPhone, use it well!


Studio tip

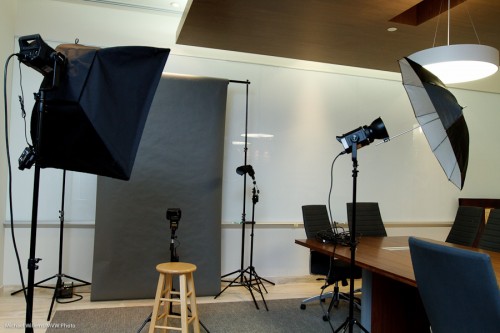
In a studio setup, we usually use strobes – big, outlet-powered lights. Like the two main lights here, with softbox and umbrella:

Studio (Photo: Michael Willems)

Fired by a pocketwizrds: you can see one on the left.

But if you look carefully, you will also see two speedlights there.

Speedlights? Yes, but fired manually, also via pocketwizards. For which you need a pocketwizard and a cable from www.flashzebra.com for each one.

Why do I small flashes for hairlight and background light?

  • Smaller
  • Lighter
  • Less cabling, since they are battery-powered
  • And not least, the ability to use Honl Photo small flash modifiers such as grids, snoots, and gels.

All of which I use here, and the resulting photos look like this (shot on a 1Ds MkIII with a 70-200mm lens):

Studio shot (Photo: Michael Willems)

(PS if you are buying those modifiers, and I recommend you do, as a reader of this site you are entitled to use the Honl Photo web order discount code which Dave just made available for you: enter code mvw2011 which gives you 10% off the price!)