February 1: one more chance to do the Six Day Seeing email course.
Read more here: www.michaelwillems.ca/SixDayCourse.html
Sign up today. It’s free and it’s fun. See you February 1!

February 1: one more chance to do the Six Day Seeing email course.
Read more here: www.michaelwillems.ca/SixDayCourse.html
Sign up today. It’s free and it’s fun. See you February 1!
Yesterday, I shot a portrait session in my Brantford studio with a recent graduate from McMaster University (Congratulations). Here’s a little description of how I do such a shoot.
We did various shots (LinkedIn, Informal, Low Key, and the “Graduate Photo”. The latter because the one the university itself took wasn’t great. Here is a proof of mine:
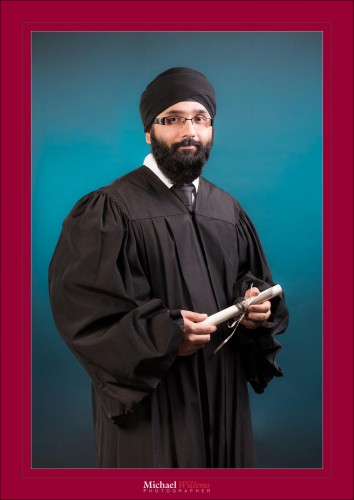
A few notes about this picture:
As you see, shooting something as simple as a graduation picture does take a little more than just smiling, positioning the subject right, and clicking. All that is essential, but the rest is, too. It all has to come together in a successful shoot.
And these milestones are of course very important. Not just for parents and grandparents, but also for the person him- or herself. You need to have a visual record celebrating your life events, and one that is better than a bunch of cell-phone shots. Don’t get me wrong, those are great also, but an event as important as this deserves more.
If you want me to do yours, contact me. 416-875-8770, or better, michael@willems.ca
As you’ve heard me say many times: turn on the xml file option in Adobe Lightroom “catalog settings”.
Look it up: “save settings to xmp”. That allows Lightroom to save all edits you do into a separate XML file. That gives you some redundancy, in case your catalog file somehow gets corrupted. And that is important, because the catalog IS Lightroom. And if you are a serious photographer, that means that the catalog is your life.
So I just noticed something that I never noticed before: this does not work for jpg pictures. It only works for raw pictures. So if your catalog gets corrupted and you shoot jog: you’re out of luck. Unless yin make daily backups. Which I hope you do.
But the main take-away from this? Shoot raw. Now you have yet anoth reason to do so.
This is virtually straight out of camera (“SOOC”):

Life model Kim Gorenko straight out of the camera, in Toronto, Ontario, this evening.
I would hope that all shooters take photos out of the camera, rather than after an hour or two of photoshopping…!
The best news: sign up TODAY to get an amazing $200 off!
“How do you optimally set up a Canon 5D Mark 3?”, asks a student.
OK. Glad to help. Because yes, you do need to make a few changes. Canon has most options set up right, but there are a few exceptions, and a few settings that make this excellent camera significantly better for pros.
So let me take you through them.
Finally, set your personal menu to contain some useful options. Personal choice. Mine are, in this order:
That’s it. You are in business.
Of course settings are personal, so you can set anything you like, any way you like. But I am sure you will find most, if not all, of these suggestions very helpful.
You can use your iPhone for some pretty good photos. If you know how.
Exposure is one of them.
Click on a dark area, and you get a light exposure. See the yellow box, where I clicked:

Click a light area, and you get a dark exposure. Now the yellow box is on the light window.

At the same time, you will focus where you clicked.
And finally, you can adjust exposure in addition, by dragging up or down after you tap.
The moral of the story: even for an iPhone you need to know things. “Automatic ” is never the best option.

Click above to see the new PRINTED “Pro Checklists” book —out right now! Keep it in your camera bag as an essential resource for all your photography needs. No more forgetting rules of thumb, tables, checklists, and Best Practices.
I am often asked: “why use Lightroom instead of what I already use? I use Photoshop, Photopaint, Picasa, or some other app, and I am happy with it”.
Good question. But yes, there’s very good reasons to use Lightroom.
They include:
I have saved 80% of my production time since switching to Lightroom full time. Yes. 80%.
Worth looking at, and worth a lot more than the $150 that Adobe charges… But please don’t tell Adobe that I told you so. 🙂
Come see me for an hour and I’ll show you Lightroom and I promise you that you will be impressed. The best thing since sliced bread, verily.
Michael
Say that it’s cold out, and you want to shoot a family photo. You would perhaps want to go to the forest, or to a park, to shoot something like this:

(If that’s your family, you have issues).
But going back to the subject for a moment: I didn’t shoot this in a park. Instead, it is in my comfortable studio. And I can shoot this during hurricanes, in the rain, in snowstorms, at 3AM: any time I like.
Now there are a number of ways you can do this.
Or there is the “brute force” low-tech way:
Buy a backdrop with the scene on it. Like so:

So… if you have always wanted to emulate my “nudes in nature” shots, like these:

…and you never had the nerve (or have never been able to find a model with the nerve), then I guess I have just solved a huge problem for you. Donations welcome! 🙂