A baby shower shoot

Two baby shower shoots in a week: yesterday was the second. Lots of event photos, but also a few more formal shots, like this:

Taken outside with a flash on camera: 1/200, f/2.8, ISO 800. Why? Because:

  • 1/200 is needed for sharp, no motion-blur images;
  • f/2.8 to get the blurred background
  • So, 800 ISO to get the right exposure.

That’s how it works!


Adobe again

I am helping a client re-install Lightroom 6 on a new laptop. NOT EASY! In fact Adobe is doing everything to make it well nigh impossible to not go to Lightroom Creative Cloud version.

Try to find LR 6 on the web site. And try to find a download file so you do not need to buy a new license when you buy a new laptop. I have been trying for a day. In vain, so far. In the past, you would download a trial version. Today, there no longer seems to be a trial version of Adobe 6.

And Lightroom perpetual license 6, as they call it, is not going to be updated, and it is slowly dying anyway. Look what Adobe’s web site says today, for example:

  • Due to an API behavior change introduced by Facebook, the Facebook publish service will no longer work in Lightroom 6 with a perpetual liscense [sic]. See this tech note for more details.

Also, the updater (from 6.13 to 6.14) shows this:

This sort of thing is what gives corporations a bad name. Awful corporate behaviour! Adobe, your commitment to killing LR6 an updating us al to a version where we pay every single month for the rest of our lives is noted. Your stock price reflects it; but there is such a thing as karma. As soon as there is an alternative, I expect a lot of people will go to it.

Meanwhile, I found an old .DMG I still had. I’ll use that. No thanks to Adobe.


iPhoning

Even when using an iPhone, you need to know stuff in order to take the best photos.

Like this one here (click to see it large):

Here’s Five Tips for this type of iPhone photo.

  1. Focus, if needed, by tapping the screen on the object you want to focus on.
  2. Adjust exposure as needed by dragging up or down on the screen at that point.
  3. For a macro shot like this, actually back off a little and crop the photo later. This is a key point.
  4. And most importantly, add plenty of light. This needs to be non-direct light. I prefer outside, but out of direct sunlight.
  5. Finally, adjust your crop and white balance, and anything else needed, afterward, by clicking on EDIT.

Enjoy!


Want to shoot like a pro? Scroll to the previous post to read about the one-week-only Spring Madness Discounts!

Spring Special!

SPRING SPECIALS! Because the spring has started, I feel exuberant and generous, so I added spring discounts – only valid for one week, until May 4!

—————40% OFF TRAINING:—————

Have you always wanted to be able to shoot pro images? Well… a short course can get you to an amazingly professional level.

And for just one week, all personalized individual or group training, at your location or at mine, or via the Internet using Google Hangouts, is $60 per hour instead of $100 per hour – that’s 40% off! 

This offer is valid only until 4 May, but you can prepay now for later training. Take advantage if this opportunity and kick start your craft: Contact me today to book.


—————25% OFF EVERYTHING:—————

And whether you want to book a shoot or buy my books, do it this week for a 25% discount. Use discount code SPRINGSALE at checkout or follow this link:  https://learning.photography/discount/SPRINGSALE 

As above, this offer is valid only until 4 May, but you can prepay now for later fulfilment. Take advantage if this opportunity now: Contact me today to book.

Flare.

Sometimes, you will experience lens flare, a lowering of contrast due to incoming bright light. Like here, from a recent event:

You can’t do much about this: it will happen especially with longer lenses and lenses prone to it.

What you can do is minimise it and its effects. Here’s how:

  1. Remove any protection filter that your lens has on it. These make flare worse.
  2. Ensure that the lens is totally clean.
  3. Use the lens hood your lens came with.
  4. In addition, shield your lens from incoming backlight with your hand if you can.
  5. Position yourself so as to minimise incoming backlight. As you can see in the photo, this is not always possible.
  6. Avoid overexposing.
  7. In Lightroom afterward, use “remove chromatic aberration” in the lens correction section of the Develop module.

If you follow those tips, you have done all you can!


SPECIAL–SPECIAL–SPECIAL! … I have a very special opportunity for you:

Have you always wanted to be able to shoot pro images? Well… a short course can get you to an amazingly professional level. And for just one week, all personalized individual or group training, at your location or at mine, or via the Internet using Google Hangouts, is $60 per hour instead of $100 per hour – that’s 40% off! 

This offer is valid only until 4 May, but you can prepay now for later training. Take advantage if this opportunity and kick start your craft: Contact me today to book.


9 years…

This blog has been active for nine years, and it is fully searchable: use that function!
Here’s a re-post from 2009:


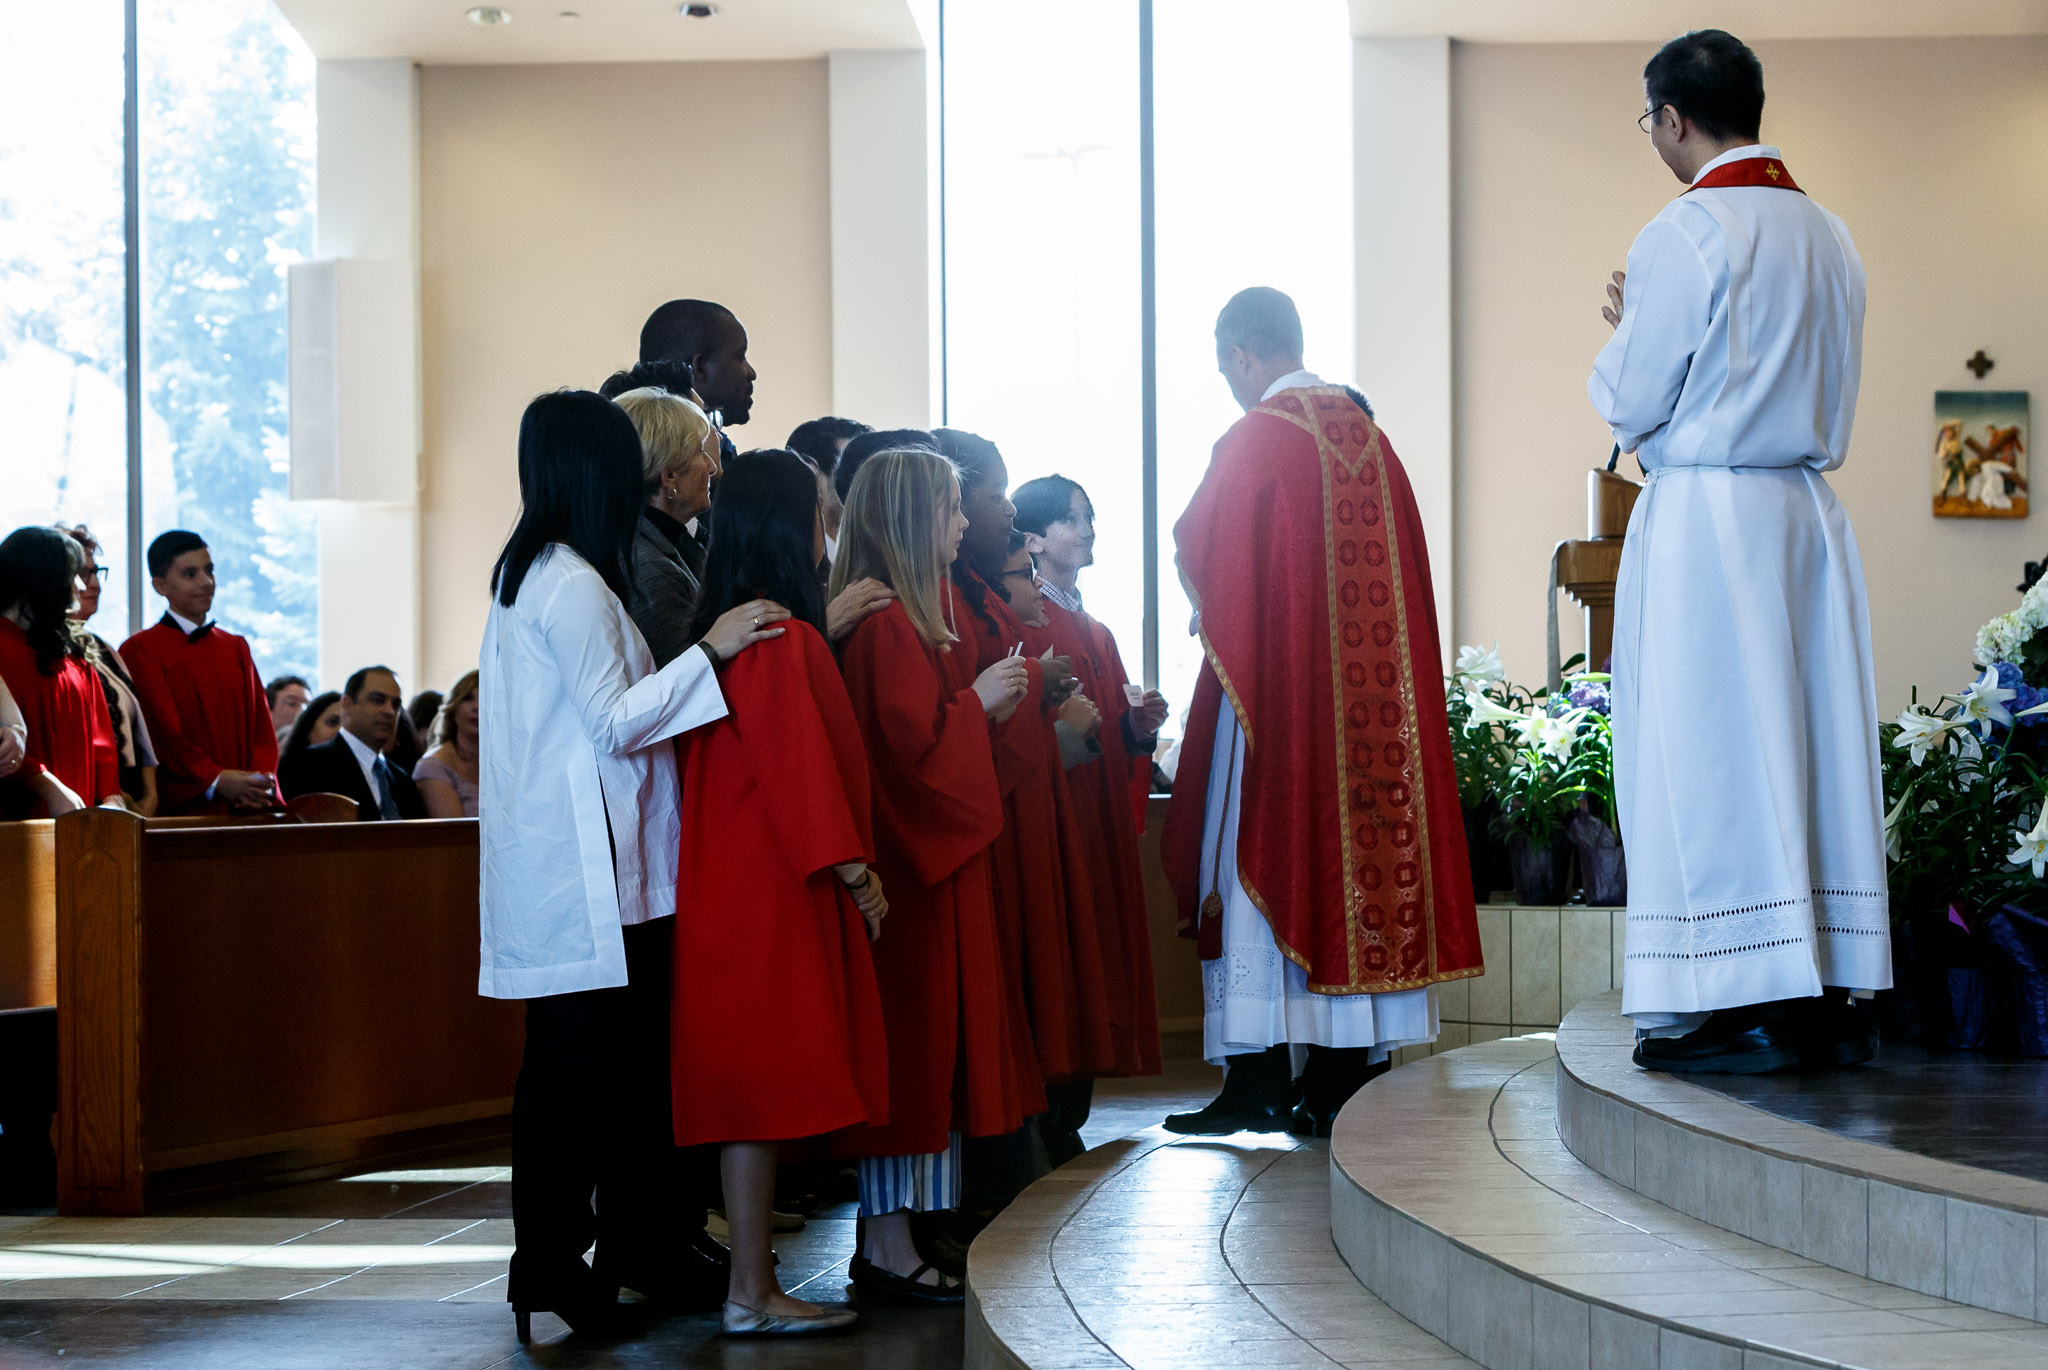
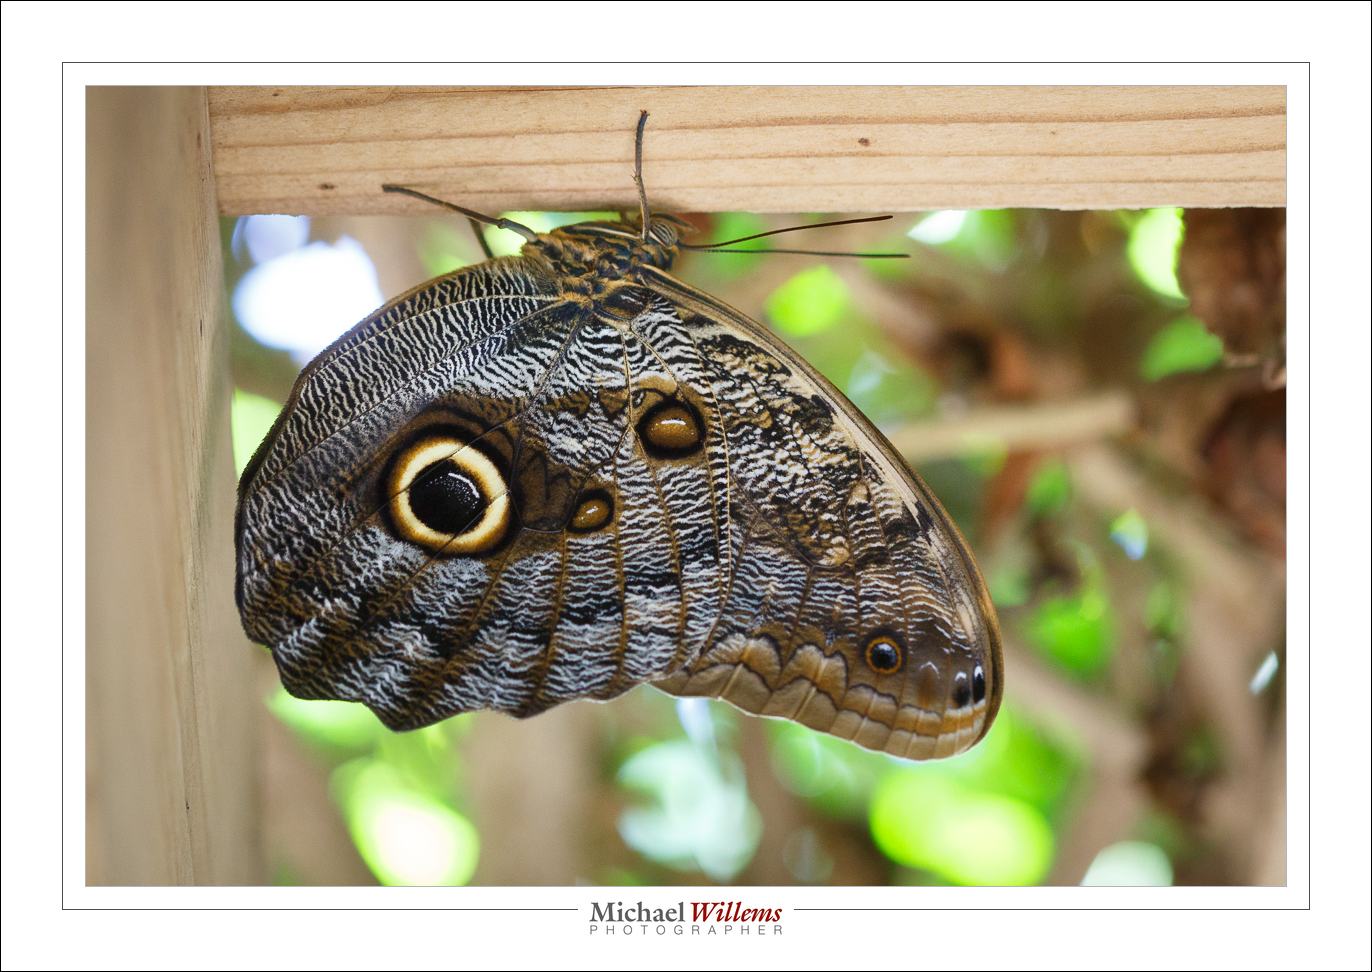
If you have been in any of my composition or travel photography classes, you will have heard me recommend that you simplify – this is essential.

And one way of doing this, I then go on, is to fill the frame. Get close. Concentrate on the essence and ignore the rest.

Like in this shot:

Candy Jelly

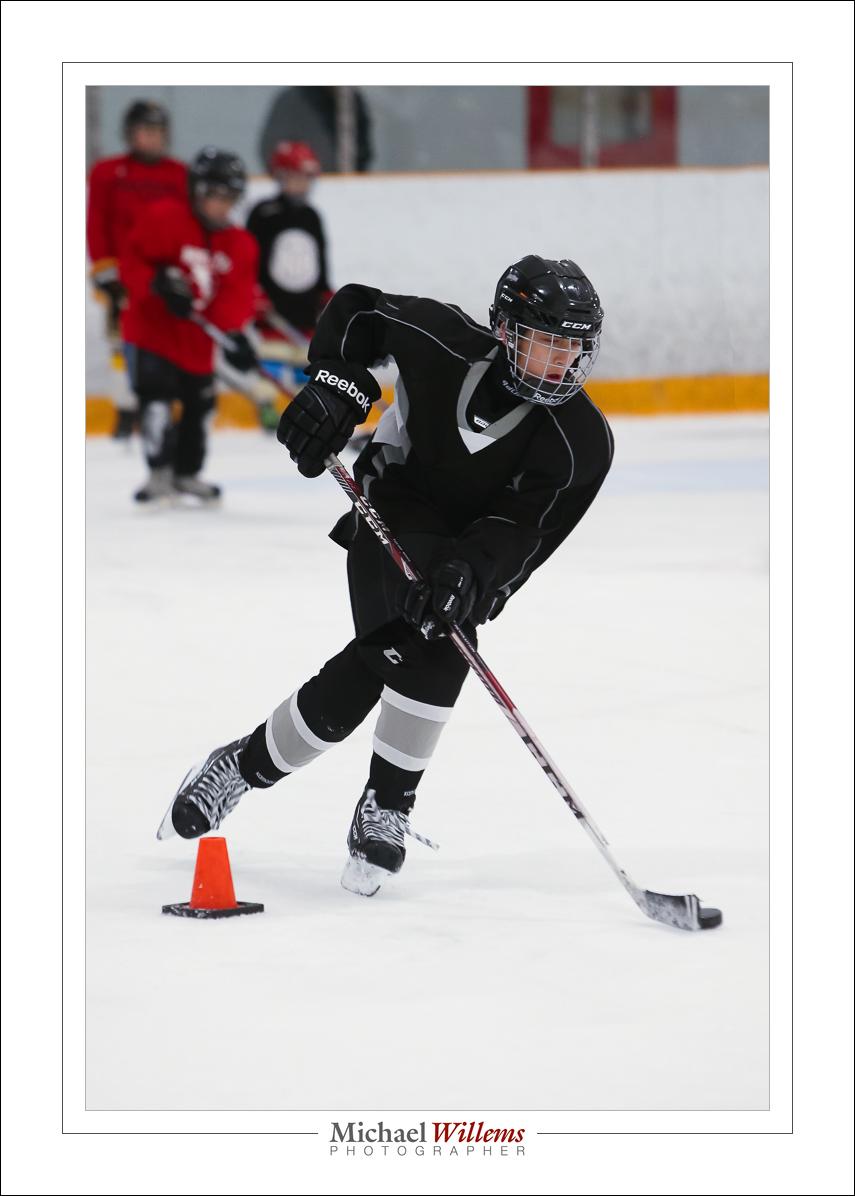
“Fill the frame” often meets resistance.

  • “But I’ll cut off bits!”
  • “But I’ll miss essential stuff”.
  • “But you can’t cut through someone’s head! Not allowed!”
  • “But then I won’t show the whole story”.
  • “But I was always taught I must never cut people off at the feet!”.

All very well. But think about it: if I had not filled the frame above, I would had had mess on all sides, black tables, hands, trays: clutter. The shot would have been much less effective. And sometimes you tell the story better by getting close-up.

I have a tip for you. Next time you hear my voice talking to you as you are about to shoot – or could it be your conscience? – just shoot twice. Once close in, like in the shot above; and once wider, with lots of stuff on all sides.

Then at home, see which one you actually prefer.

Focus Tip: AF-C/AI-Servo and back button focus

I am often asked “can I not leave my camera on AI-Servo (AF-C if you are a Nikon etc)?

The answer is: not a great idea normally. Because you cannot recompose. The moment you try that, taking your focus spot(s) away from your subject, the camera focuses on whatever is behind the subject!

But there is a trick, and I used it today to photograph these amazing insects:

Namely this:

  1. Set your autofocus mode to AI Servo/AF-C.
  2. Select “back button focus” in your camera’s menu (i.e. focus when you press a button on the back of the camera, not whenever you half-press the shutter button).

Now you focus as follows:

  1. Follow the insect, or hockey player, or whatever you are shooting.
  2. While doing this, keep the back button focus pressed, so your camera adjusts to follow the subject’s distance.
  3. But when the butterfly sits and you want to recompose, let go of the back buttoin focus. You can now move the camera to recompose, yet when you shoot, the camera will not adjust its focus.

Done and done!

A quick note about that amazing insect. Nature knows what many beginning photographers do not: you need a catch light in the eye to make it look real and alive. The butterfly’s owl eye has that catch light (the white circle part ion the “pupil”)! Amazing, eh? So learn from nature and always include a catchlight in your portraits.


Mnemonic Monday

OK, it’s not Monday, but that alliterates.

You all remember my mnemonic “400-40-4” for indoors flash for events? If not, read up on the Willems 400-40-4 rule for ISO, shutter and aperture.

I have another one for you: 4000-400-4. That is 4000 ISO, 1/400 sec, and f/4. And that is for hockey in a well lit hockey arena. Easy to remember, and results are thus:

200 mm lens, 4000 ISO, f/4, 1/400 sec, stabilizer mode 2

Have fun!

See. Feel. Touch… and read.

Great news. The first of my books is now available as a printed book, from Amazon. 

Go here: https://www.amazon.com/Michael-Willems/e/B01CYO8Z92 and select the paperback edition. It is large (roughly 8×11″) and easy to read – it is also the very latest edition of this, the “know your camera” book.

Perhaps finally time to learn to use that expensive camera? I suggest you’ll find this book a very welcome addition. You’ll finally learn to take it out of the auto modes, for a start – freeing your creativity.  Become the photographer you always wanted to be!

And let me know what you do with your new knowledge.

More printed books soon.