Printing more prints

Adobe Lightroom offers great print functions. One of them is the ability to print multiple images on one sheet.

You can print the same image multiple times (a “Picture Package”), or many different pictures on a page (a “Custom Package”).

The latter is easy:

  1. To keep it easy, in the PRINT module, select a “normal” print size that you have previously defined (eg a 13×19 page, or an 8×10 page).
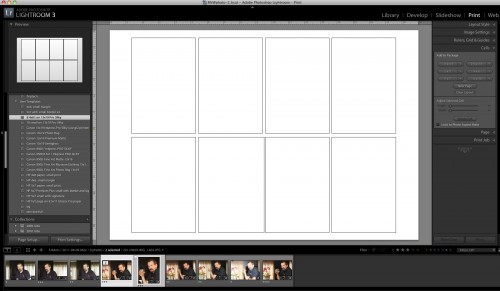
  2. Now go to “Layout Style” on the right, and select “Custom Package”.
  3. Go to “Cells”, and add cells of the right size( eg 4×6, 5×7, etc). These will show up as empty blanks.
  4. You can rotate and reposition each cell after you add it. You can also create multi-page layouts.

You see this:

Once you are happy, save the layout by using the PRINT – New Template function from the top menu.

Now you can make your actual print. To do this, drag the images you want into the layout from the negative bar at the bottom. Then print, and you are done!

My printer did overtime today printing a recent shoot – I find that a large page with small images is good for two purposes:

  • For me – It allows me to see an overview conveniently – a “contact sheet”, if you like.
  • For the client – I get many prints done at once. (Note that if this is for printing and cutting, I also enable “Cut Guides” in the Page section!)

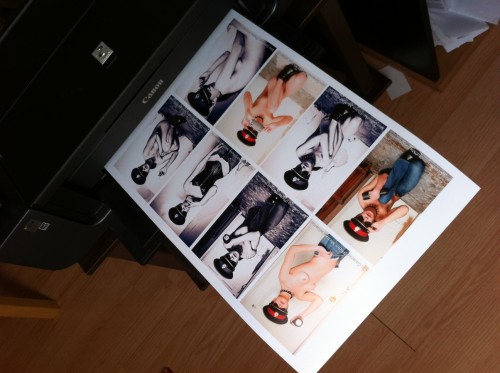
Here’s my Canon Pro 9500 printer producing a selection from a recent shoot:

Model shoot overview (Photo: Michael Willems)

Saves me a trip to the print shop, and the print is under my control – and one page is easier than 8 small pages. Once again Lightroom delivers the convenience that really makes it work well for photographers, by making life easy and saving time.

Personal note: today I honour the memory of my father, GTC “Eddy” Willems, who died of a stroke in 2002 at age 72. Today would have been his birthday.

 

Lightroom Tip: Perspective

When you aim your camera up, you get converging verticals – like this:

You can use an expensive tilt-shift lens to fix that.

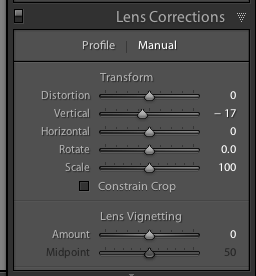
But there is an easier way: in the Lightroom “Develop” module, find “Lens Corrections”, go to the “Manual” tab, and you see this:

Pull “Vertical” to the left a little (as I did above), and you get this:

The verticals have been disciplined!

All you now need to do is crop off the edges (see bottom left).

Simple – takes only a second. Lightroom rocks!


Another student question

Shannon asks:

I really enjoy reading your blog, and I have a question/possible blog topic… I’m wondering how to deal with all the large raw files that I am uploading into lightroom. The other day, I had an alert come up that said that I had no more room on my computer for the files.. lol. So, I purchased a fairly large external hard drive, and thought I would move a bunch of the pictures onto it so that I would have more room. But I found it difficult to figure out how to move all the files out of lightroom and onto the external hard drive, and Im also not sure how I could access them in lightroom again unless I re-import them… do you have any ideas as to how to deal with this/managing all the files? I’d rather not delete the files if possible.

Great question.

And good news. Lightroom makes it easy. You can have your files live anywhere you like, anywhere at all – and you can move the files. Anywhere, any times.

Now for moving files.

  • When you move files using Lightroom, that is the end of the job. Lightroom knows where they now live since it moved them.
  • When you move files outside Lightroom, using your PC or Mac, then you are not moving anything “out of Lightroom”. You are just moving them, and now need to tell Lightroom where they now live. Lightroom will now show them with a question mark. Meaning, it does not know where they are. Simply right-click and “find missing files”.

As for where files live: I recommend files on an external drive; and the catalog file on that drive als (and everything backed up!). You may find this a useful post also in that regard.

Does that help? If not, a short coaching session will help sort it all out. Stick with Lightroom, sort it out – it is worth it!


Recompose during events?

A students asks:

What are your thoughts with focus and recompose when shooting events or portraits? Since it is very difficult to always move the single focus point, especially with event photography, I feel that sometimes focus and recompose is better. However, I have also read through other websites that doing the ‘focus and recompose’ technique could affect quality of the picture.

Good question.

Moving the focus point is always more accurate (because of geometry and because you might move), when you have the time – but it does take that small amount of time. So yes, I do that when I can – when I am shooting at, say, f/5.6 or brighter, and when I have a second.

When I do not, I just usse the central focus point – which on most cameras is the most sensitive! – and live with any small inaccuracies.

So if I simplify it is:

Recompose when it is dark or you are in a hurry; and move the focus point when you have time or when you need great accuracy.


Processing

I am not a fan of processing, of “Photoshopping” to make an image look different from what you shot. HDR? Only when used with caution.

But sometimes processing works – when it enhances the look you were after in the first place.

Take this shot. A good image from a recent shoot:

Photo by Michael willems

But the rough grunge look I am after.. how do I enhance that? We found the juxtaposing of odd subject matter and the rough background and floor, but what else can we do to convey the feeling?

Well perhaps this is one of those times where some work may help. Split Tone 4 processing in Adobe Lightroom – a standard processing filter – gives me this:

Photo by Michael willems

Ah! In this case, that is exactly what I am after.

So the best thing is not to be dogmatic about “I don’t do this” or “I must do that”. Never say never.


Lightroom 3.6 is out

…and I think that if you are a Lightroom user, you should upgrade now. New cameras supported and a number of bugs fixed – Adobe has details on this blog.

If you are not a Lightroom user, I hope you are at least an Aperture user.

And if you are neither, then you probably should be. Lightroom has saved me up to 80% of my previous post-production time. ‘Nuff said.


So wrong

The UK, in my experience, is one of the worst places in the world for photography. Photography on Trafalger Square? forbidden if it is “professional”.

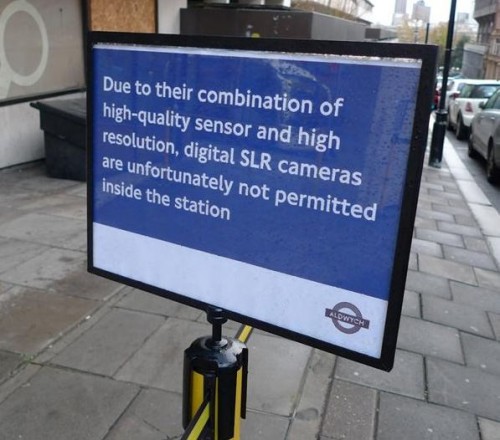
And now this, Aldwych Station, London, UK:

Of course this shows the UK’s obsession with controlling, and the UK’s diametrically-opposed-to-freedom views. It is no suprise that George Irwell was British. And see “Children of Men” for a great dystopia. China is more free than Britain, and this is a sad statement.

So what do you do?

  • Know the laws and try to stay within them.
  • But be vocal when you are within your rights.
  • Smile a lot.
  • Use a smaller camera and a smaller lens.
  • Use a wide angle lens and get the action on the side.
  • Or use  long lens and try not to be noticed.
  • Avoid being male and having a beard.
  • Be Quick!

These tips should get you by the worst fo the restrictions. Practice at home when it is not important yet.

(And I always carry a Fuji x100, which has a full APS-C sensor and many megapixels, but the silly people who make the rules do not know this).

Print for Christmas

Reader Robert G asks:

How does one prepare ones files in Lightroom to get them ready for Printing at a lab? I know a lot of people are doing photo books, calendars for Christmas gifts and it would be helpful. I still can not wrap my head around the whole sRGB, Adobe RGB, Pro Photo  colour space thing….

Good question.

First, though, the size. Typically for printing, the more pixels the better. But you can ask your printer – if you know the printer’s DPI and the size of the image, just multiply those. (a 10 inch long image printed at 300 dpi would need 300 x 10 = 3000 pixels).

Then the quality – assuming I am making a JPG, for print output I always set this to the highest quality (the lowest compression).

Now, the colour space for printing.

If you print from Lightroom yourself, it’s simple: no choice is needed since Lightroom and your PC use your printer drivers and profiles. But if you send out your image, the answer is simple if not helpful: it depends.

It depends on the printer used by the company that does your printing. Mostly, sRBG is what the print company expects. In some cases, it needs to be AdobeRGB – but usually you would be told if that were the case.

So produce a large high quality JPG in the sRGB colour space, unless your print company is able to handle one of the other colour spaces.

Which company, Robert also asked. I have recently used Vistaprint, and have been (and almost a year and a half later, remain) very impressed with quality, price, and speed.


Does Lightroom overwrite files?

A word about how Lightroom uses files.

Lightroom is a “database of changes”. It never touches your original file (whatever format it is). We call that “non-destructive editing”.

Here’s how it works:

  1. You have your original file. Lightroom simply knows where it is (that is basically all that “importing into Lightroom” means!).
  2. Every time you make a “change” (like cropping, adjusting exposure, etc), Lightroom stores that instruction n its database (which it calls its “catalog”).
  3. What you see on your screen is that original file plus “what it would look like with that change”. But no new file is actually generated (except perhaps a little internal preview)!

It is only when you use a file that the changes are applied to make a new export file (or a printout, a web site, etc). This export file is made suitable to its particular purpose, and it is temporary: you create your export file, then use it, and then delete it.

Advantages:

  • You always keep your original file intact.
  • You do not fill up your disk with additional files.
  • You can always review and redo any setting (including all the “RAW-settings”.

These are great benefits over the old ways of editing images, and they are why Lightroom and Aperture, which basically does the same, have taken over photographers’ workflow so quickly.


The best camera…

…it is often said, is the camera you have on you.

But you need to use it well. I shall share with you an example of an iPhone picture I took, to illustrate this.

To do an iPhone picture is easy. But to do it well, you need to:

  1. Compose well. Do not take a pic with the subject in the centre – use the Rule of Thirds, tilt, get clos, do what you need.
  2. But do not get too close or you will distort.
  3. Light well. Not the intensity – this pic was taken in very low light with no flash – but the direction (I turned the subject to the light and tilter her head up to catch that light)
  4. Post-process – in my case, in Lightroom. First, I converted the image to black and white.
  5. Then I applied an enhanced contrast style.
  6. Then I reduced the noise
  7. But then I applied lots of film grain. Love that grainy look (view full size to see it):

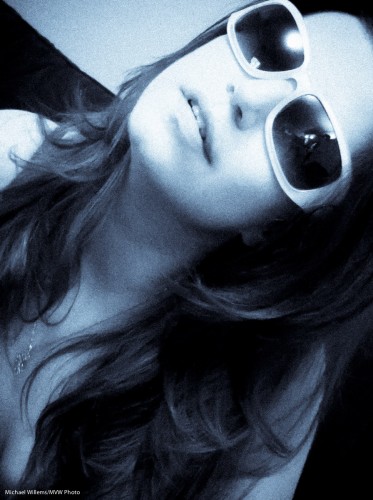
The result:

Model Kim Gorenko (Photo: Michael Willems)

Not a bad shot eh, and taken with an iPhone in low light.

Here is another example, with Selenium Tone style applied (and the same other tuning done):

Model Kim Gorenko (Photo: Michael Willems)

So do not make the mistake of thinking a good photographer is nothing without great equipment. Yes, it expands your possibilities, but if all you have is an iPhone, use it well!