Why go pro?

This is why. Just one example, a builder selling a wonderful, large, home in a prestigious Toronto neighborhood. So we’re talking millions. And in selling that, visual imaging is everything.

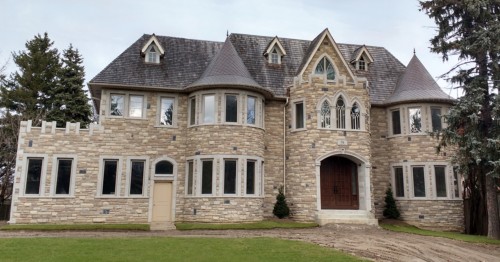
So this is what a non pro produces:

old

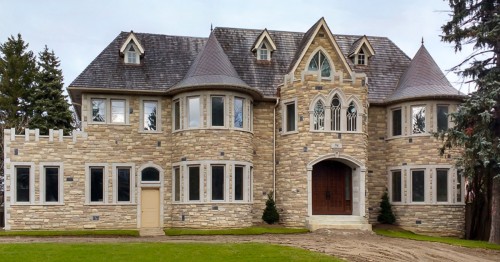
And this is what I made of that on a few seconds:

new

Colour, geometry, sharpness, all much better.

Details matter, and quality matters, and when you are a pro you take great care to get all the details right, both when shooting and afterward.

And I would have used a tilt-shift lens to get it straight without having to edit.

Just saying.

Lightroom Mystery Solved!

A while ago, I bought a new Mac. Now trying to print to that Mac, my print colours were terrible. Awful. I was using the same presets that worked so well before, and I had the same ICC profiles.

Took me all day but I figured it out!

I see that although when printing (“Printer…” button on Lightroom’s print screen) I manually selected the ICC profile for the paper type used (Pro Luster, Museum Etching, etc), and then printed from that dialog, it appears that LR nevertheless overruled this and went back to the profile saved in the printed preset. Which did not exist, so it went back to “Default”. A feature, or a bug? 🙂

Solution: I recreated the printer profiles on the new Mac, and once more selected them for each preset and “updated with current settings”. Phew, finally, I have good prints again.

This is something you may want to note: if a particular printer profile that was saved as part of a printer preset does not exist, like when you buy a new Mac, LR will default to “Default”, even when you have selected the correct paper manually in the final “Printer…” dialog, and you print straight from that dialog. LR will overrule that and select whatever paper your “Default” profile thinks it contains.

Good to know. Took me half a day, because I never thought my manual choice would be overwritten!


Crop thoughts.

Cropping your photos is important. Of course you are doing that while shooting, but you often do it while post-editing, as well. Remember a few things.

  1. There is a “feels best–orientation” for many photos.
  2. Simplify.
  3. Simplify
  4. Simplify.

Look at this:

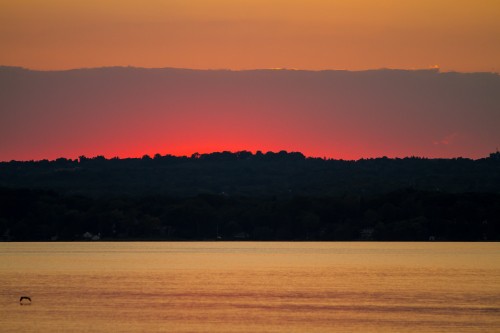
20160802-MVW_8259-2048

It is clear that a horizontal layout suits this best. It’s all about those four equal sized horizontal layers. Yes, I was lucky. And see how simple I kept it. The one bird. That’s the only item other than those layers. Every item you crop out makes your photo simpler.

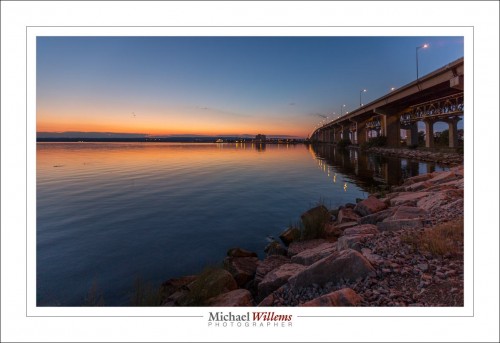
And this:

20160802-MW5D9519-1024

Also good and simple. But it occurs to me that this would also make a good magazine cover if cropped vertically, thus:

20160802-MW5D9519-1024 copy

Often, the only way to know is: try. So in Lightroom, experiment with closer crops and with altering orientation.

Have fun!

Michael

–––

Get Michael’s e-books on http://learning.photography and become the pro you always wanted to be,

EXIFtool magic

I have talked about EXIFTOOL before. A free command-line utililty that aloows you to read all the EXIF data in an image. And there’s a lot. A LOT!

But for those of you who use it, a little gem here: extracting the built-in preview images from a RAW file. You do it like this:

exiftool -a -b -W %d%f_%t%-c.%s -preview:all /Users/Michael/1DX_9187.CR2

This causes it to generate a file for each built-in preview (in this case, it creates thumbnail and “large” images:

  • 1DX_9187_ThumbnailImage.jpg
  • 1DX_9187_PreviewImage.jpg

So now you know how to extract the preview images from a RAW file. Just in case you ever want to do that!


Raw facts

..and another reason to shoot RAW: several functions in Adobe Lightroom do not work, or do not work consistently, when you shoot JPG pictures.

These include

  • Generating  the XML files that optionally copy the information separately for each picture in the catalog;
  • Profile corrections in Lens Corrections.

There’s probably more. So if you needed more reasons to shoot RAW, there you go.

On another note: how many flashes do you need for creative flash photos?

One. Like here. A speedlight with a Honlphoto honeycomb grid attached to it.

20160424-DSC_0010-1024

Or two:

20160424-DSC_0012-1024-2

And there you go!

And Now For Some Free Efex.

News for Lightroom and Photoshop users. The Nik Collection of photo editing tools, including Viveza, Silver Efex Pro, and so on, is now available for free. It used to cost $500. I suppose this means it is end-of-life, but you may want to add these tools for occasional use.

www.google.com/nikcollection/

Top right, select “download now”. Then install.

Note that this is not actually a plugin. It is simply an external app called from within Lightroom by right-clicking and selecting “Edit in…”, and then selecting the effect you like.

If you have sensibly selected “Store Presets with Catalog” in Lightroom, the presents do not appear and you have to add them yourself, like this: support.google.com/nikcollection/answer/3002259?hl=en

The drawbacks:

  1. You now lose both time and disk space, because when you edit, a new file (usually, a large .TIFF) is created.
  2. You are breaking the “fully reversible edits” paradigm in Lightroom!
  3. You have to learn new software.

In fact, frankly, after a fairly brief inspection I do not yet see a lot that Lightroom cannot do all by itself. No doubt there’s some, but not an awful lot—not that I would use regularly anyway.

But I do like the film types included in SilverFX Pro, for instance, and may just occasionally use these. The fact that this is not an actual plugin is a great thing: if I do not use these apps, they in no way degrade or affect Lightroom. So, I have installed them. You may want to as well, as long as you use them judiciously. Have fun!


Huge Adobe Bug

And this is why I hate “permissions”, “Creative cloud”, and so on: corporations deciding what *I* do.

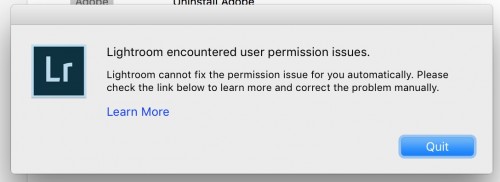
After the update of Adobe Lightroom 6.4 to 6.5, it will not start:

Screen Shot 2016-03-23 at 12.48.18

Huge, huge bug! Adobe.. this is mission critical!

The solution:

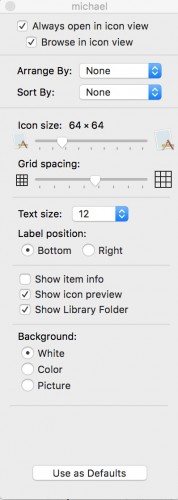
First, go to your home folder in finder, and in “VIEW OPTIONS”, enable “Show Library Folder”:

Screen Shot 2016-03-23 at 12.57.18

Now go to all three of these folders:

  • [home]/Library/Application support/Adobe
  • [home]/Library/Caches/Adobe/
  • /Library/Application support/Adobe

And for both those folders, right-click on the folder and  INFO.

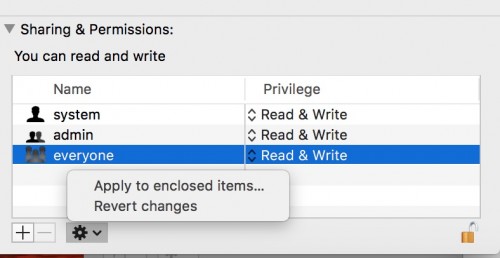
Then, change the access rights so that EVERYONE has READ/WRITE, not just READ.

But also, click on the lock to open it and then click on the gear to apply to enclosed items:

Screen Shot 2016-03-23 at 13.01.38

And now it will start.

But security… all rights to everyone? Doesn’t look secure to me! So beware before you upgrade.


RAW has space. Lightroom has attitude.

…and together, those two mean you need to do something sometimes.

Here’s a studio shot from just now:
20160316-1DX_7009-1024

That’s fine. But it appears in Lightroom like this:

Screen Shot 2016-03-16 at 13.23.52

…it only begins to look overexposed when I move “Highlights” to +30! While on the back of the camera it looks much more overexposed.

In fact, I have to push “Highlights” to +80 (almost all the way to the right) in order to see what I am seeing on the back of the camera:

Screen Shot 2016-03-16 at 13.23.18

Why is this? Because of two phenomena that combine, in a sort of perfect storm:

  • A RAW image has a lot more space than a JPG. And what you see on the back of the camera is the built-in JPG preview that every RAW file contains.
  • In addition to this, Lightroom “protects” us. If you blow out a background, for example, Lightroom pulls back the brightness to make that background NOT overexposed, as long is there is any room at all in the RAW file.
  • So combining these: unless you make it really extreme, when you see blinking on your camera, you will get an image without overexposure on your computer. If you are “overexposing” by a stop on the camera, you will not even notice that on the computer.

That is all very well, unless you want to overexpose. Like in the case of a background that you want to have pure white. Lightroom thinks it knows bette rthan you do, and that, in my opinion, is not a good thing.

Fortunately you can fix it by the method I describe above, or by using the earlier 2010 Camera Calibration process (bottom right panel in the DEVELOP module). Just so you know.


This is one of the things we will talk about at my Lightroom/Computer seminar this Saturday.  There is still space: Sign up soon if you are interested: space is strictly limited.

Saturday, 2pm… Lightroom/Computers

If you are interested in getting the most out of Adobe Lightroom, and you live in the GTA, then consider coming to my Lightroom workshop on Saturday. File organization, presets, best practices, and storage and backup strategies will all be shown, and I will help you do your own personal setup. I’ll also show you how to get there, if you are doing it differently today.

http://www.meetup.com/Brantford-Photography-School-Meetupome-join/events/228874541/


Truth—a beginner’s tip

Theories are best tested. Like the theory of exposure. Which, as it turns out, actually works. Let me show you.

Think: You are filling a bucket. Your aperture is like a faucet. Your shutter speed is “how long do you told the bucket under the tap”. Together, the time and the stream of water fill the bucket.

So here’s f/22 at 1/4 second. A triple of water, so filling the bucket is a slow process:

20160223-1DX_6957-1024

That should be equivalent to:

  • f/16 at 1/8. We open the faucet, but reduce the time.
  • f/11 at 1/15. We open the faucet more, but reduce the time more as well.
  • f/8 at 1/30… and so on:
  • f/5.6 at 1/60
  • f/4 at 1/125
  • f/2.8 at 1/250
  • f/2 at 1/500
  • f/1.4 at 1/1000

And indeed it is. Here’s f/1.4 at 1/1000:

20160223-1DX_6967-1024

You should be trying this stuff, not just reading this. We lean by doing. Muscle memory!

Bonus points:

How do I know the first one is f/22? Look at the star from the lamp top right. Star means small aperture (high f-number).

Why is the other lamp green in the fast shutter picture? Because it is a fluorescent light. It goes on and off, and changes colour, 60 times a second or more. A fast shutter speed will catch that. Your shots are all going to be a different colour/brightness.


Tip: Get my books at http://learning.photography. Amazing books which will have you actually understanding your camera and what to do with it, in record time.Â