Workflow, again

Another note on workflow.

You need to rate your images, to separate the good from the less good. But this only works if the process is:

  1. Quick.
  2. Unequivocal, objective.

Lightroom helps in both cases. The “quick” is addressed by the following process. First, you rate all images to a standard, say 3 stars, namely the standard that most of your pictures will be; and now you only mark the exceptions. That takes half the work away. And to actually mark those exceptions, you simply use the number keys on your keyboard (“1” for one star, “2” for two stars, and so on) combined with right arrow (“next”) and left arrow (“previous”) in the negative strip.

This only works, as said, if your system is clear. A system that needs you to indicate “how much you like an image” will not work: it has to be more objective.

My system is as follows:

  • One star: this image is technically bad; too bad to fix in post-production editing. It is out of focus, or too under= or overexposed, say.
  • Two stars: this is technically OK, but it is not an inspiring image. A snapshot. Something you’d rather not use of you do not have to.
  • Three stars: this is an image that meets my standard; i.e. one that I would be willing to share with a customer. (That does not mean I will share it).
  • Four stars: this is one of the best shots in this shoot.
  • Five stars: this is a portfolio shot.

Note that the ratings indicate the end status; i.e. after editing, not the way it looks now.

Your system may be different, but be sure that like me, you design a system that is simple and objective in the sense that it is not open to interpretation.

As a result of the system described here, I can rate a shoot in a few minutes, even when I have hundreds of images.


Work. Flow.

Your workflow needs to be exactly that: a flow. A logical sequence of actions.

In my case, that means:

  1. Import the images.
  2. “Asset Manage” them: add keywords; rate them 1-5; backup.
  3. Then from the ones marked 3 and over, pick the ones to actually use.
  4. Edit only these.
  5. Mark the edited ones as finished.
  6. Select the finished ones and output them for use.

So it is basically “input – handle – select – edit – use”. And whether you are a pro or an amateur, it is going to be the same flow for you.

And that flow is where you need to save time: you do not want to spend an hour making photos, followed by two hours in Photoshop.

That is where Lightroom comes in. Lightroom is a one-stop workflow tool. It handles all the steps above: ingestion—asset management—editing—using. And it does it in an amazingly efficient way.

Evidently, if you can save time in Lightroom, it saves time overall. And that is where Wacom comes in. I now also use a Wacom Intuos tablet, which I find very useful; much more useful than I would have imagined. Part of the reason is better quality than the last time I looked, years ago. And part is new functionality. Like customizable buttons per app.

This tablet is especially useful when editing, and especially because of its pressure sensitivity. When using the brush, the harder I press, the more brush effect I get.  Very cool. Skin fixes and other local edits are now much quicker—and that saves me a lot of time. This functionality is simply not available on a mouse.

In the next weeks I will keep you up to date as to how I am using the Wacom tablet. I will start with customizing the buttons: how do I do it? What functions are most useful? As I sort it out, I will give you my recommendations. Stay tuned.


Workflow and Lightroom

I talk about Lightroom a lot, as you will have noticed. The reason is that Adobe Lightroom is hands down the best workflow tool I know. Workflow meaning “what happens between arriving home with the camera to the finished product”.

Lightroom 6, as you will have seen, is a step forward. It has its issues—for now, the speed of the face detection module is way below par—but you can work around those, and they will be fixed.

But you do need to learn how to use it. Thank God it’s not Photoshop: it takes days to learn, not years. But it does take days.

Enter some help.

On May 30, I teach a workshop at Vistek: Lightroom and Workflow”. In it, you will learn backup strategies, computer strategies, Lightroom workflow and editing, and much more. Seating is limited, so sign up soon.

The same is true of the Flash workshop this Saturday in Oakville.If you missed the Vistek workshop, come on Saturday: 1pm, see http://learning.photography/collections/training-300-advanced/products/flash. Seating limited, so be quick if you want in.

Now, a (repeat of) a little flash tip.

If your flash looks too dark in the photo, why is it? It could have two very different reasons:

  1. Metering is wrong; the TTL circuitry decided on too low a level.
  2. With the current ISO and aperture, you simply do not have enough power (eg the ceiling you are bouncing off is too high).

To know which one: set your flash to manual mode, full power (1/1). Shoot. If the picture is overexposed, you had reason 1; if not, you had reason 2.

To solve the issue: For reason 1, go back to TTL and use flash compensation. For reason 2, go back to TTL and lower the f-number and/or increase the ISO.

That’s all – pretty simple, but often overlooked.


Lightroom 6

Lightroom 6 is the latest and greatest in the version history of Lightroom, the best thing since sliced bread. Asset management, editing, and production all rolled into one.

LR 6 is a worthwhile upgrade; as I mentioned in an earlier post, it has lots of new stuff. For me, the main features for me are:

  1. Face recognition. You can now recognize faces, so that all photos that feature uncle Bob can be quickly found. Remarkably accurate
  2. Panoramas. Stick together 2, 3, 4, or more overlapping photos that you have shot.
  3. HDR. Stake one normal shot, and one more more darker and one or more lighter, and pull them together to get either artistic “paint” effects, or just more dynamic range (i..e. the detail in the dark areas will be visible, as well as detail in the light areas).
  4. Brush in filters: you can now use a graduated filter and remove it (or add it) in specific, brushed areas:
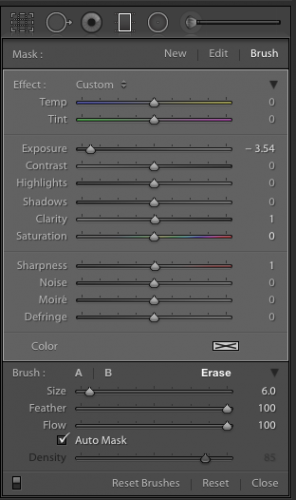
(The graduated filter here has the new BRUSH activated in ERASE mode, so I can delete part of the filter)

There’s more, especially the Mobile functions and the reputed speed increase, but I cannot comment on that since I have not observed or used them.

So, how to go about upgrading?

First, make sure that you have backups. And I mean good, verified backups. You never know. Don’t ever lose all your work… make backups and store them off site. Backups of both the photo originals and the work you have done on the (the catalog file, named <something>.LRCAT).

Then, the upgrade. Under “Help” select “check for upgrades”. Make sure that if you have the app, you keep getting the app, and not the “creative cloud”. Adobe really, really wants you to get the Cloud version, which works out much more expensive even in year one if all you use is Lightroom; and after year one the price will go up.  You will have to search the Adobe site; look for “All products”, and look for the price of around $80 for the upgrade. Not the $3-10 per month Cloud price. (Think about it: if the next upgrade is two years away, and I only use Lightroom, I pay $80 for those two years. Cloud users would pay significantly more: 24 times something is something big.)

Before you start, you will need to log in to Adobe, and under “My products”, find the serial numbers for previous versions. You will need the previous version’s serial number to qualify for the upgrade.

When, armed with the login and the serial number, you perform the upgrade, your catalog file will be converted. This takes time. On my catalog, with around 200,000 photos it took most of the overnight that I let it run.

At the end, when you can use Lightroom, you will have a new catalog. But your old catalog will also still exist. Just in case. I advise you keep that around for a little while. Just in case. You never know.

Also, make sure that when you want to use Lightroom you start the new app, not the old one. The new one is called “Adobe Lightroom” and lives in your app folder, inside a folder called Adobe Lightroom.

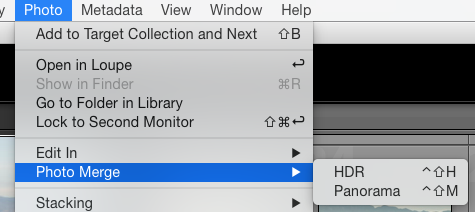
After the upgrade you will see that Lightroom works as it did before. But new functions have been added. Under “Photo” you can now, after selecting two or more photos, select Panorama or HDR (high dynamic range). Try!

And more importantly, in the grid view you see a new face symbol as one of the following views. Bottom right:
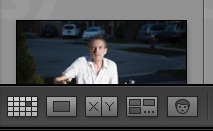
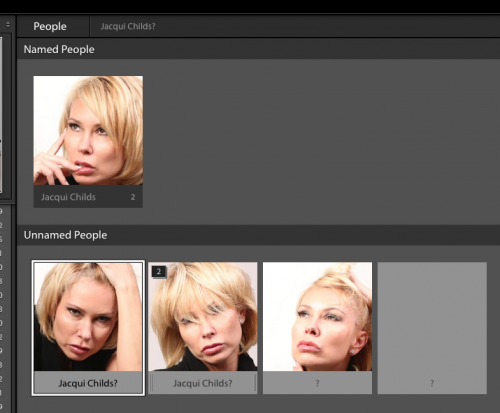
When you click that, you will see the faces Lightroom recognizes. Give them names. Over time, Lightroom gets better and better at naming faces. After you name them, you see:
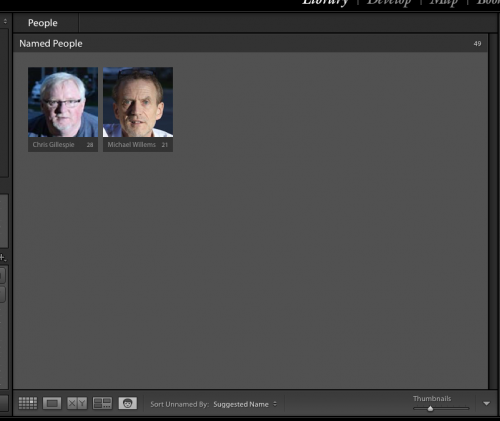
Initially, of course, all faces are unnamed.

You can turn face recognition indexing off (paused) or on by clicking on the Lightroom Logo on the very top left of your screen. You see:
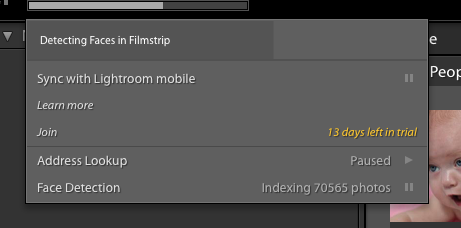
During this time, the application may be slow, not just when you are looking at the grid view, but also when exporting a picture, printing one, and so on. Allow plenty of time for the indexing to finish, and you can pause the indexing when you need speed. You can index per shoot, or per year, or all at once (though I would not recommend that when you have a large catalog, like mine).

I am still discovering new things, so there will be more blog posts about Lightroom 6. For now, though: recommended!

___

I also coach privately: bring me your laptop and I will not just teach you, but we will set up your own Lightroom installation in the optimal way. See http://learning.photography.





White Balance Discrepancy

A Facebook friend asked me this:

I shoot in Kelvin and there is something I don’t understand when I open my raw files up in LR. For example: I have a shot I took and I had the kelvin set to 6500 in camera but when I look at the temperature setting in LR it says the temperature is 5850. Why is this? I’ve verified that no presets are changing the temperature upon upload in to LR.

Good question, and let me explain.

First, the WB setting *is* stored in the EXIF file. Posts on the ‘net that suggest not are simply wrong.

here’s EXIF data from my RAW file:

And here, from my resulting JPG file:

The WB setting is stored, true. But what Lightroom tries to show is the actual look of the file. The WB number has to be interpreted, in other words. And Adobe does this by giving us its best guess as to what the image actually looks like. Don’t forget, colour rendition is complex (it involves colour temperature as well as tint, for a start).

So the phenomenon my friend describes is not a problem; it’s a feature. You can manually set it back to the exact setting your camera was set to, but this would not result in better photos; on the contrary, the quality would be slightly less, assuming you shot correctly.


Lightroom 6

Yesss… Lightroom 6 is out. And that is a reason to rejoice.

After a complicated upgrade (I had real trouble finding the “buy it as an app” option: Adobe really wants the extra revenue of the Creative Cloud, so it pushes you there), and after a subsequent day of converting catalogs (my one catalog contains a quarter of a million photos) I am playing with it now.

Cool.

First, the feature you do not see: speed. Reports talk of a significant speed increase. I have not seen a giant difference, but based on reports, I am sure I will. It sure is not slower. Faster is good.

Second, the one feature that was cool in iPhoto (now: photos): face recognition. It has now been added to Lightroom, and it works well.

The feature is intuitive: I have not had to read any sort of manual, so far. Lightroom recognizes where faces are in your pictures, and it guesses who they are with an amazing degree of accuracy. You start it; it identifies faces; you conform its guesses or correct it and name the people, and you are done. I did 2015, and am now am doing the preceding years. It will take me a while, but it’ll be well worth it.

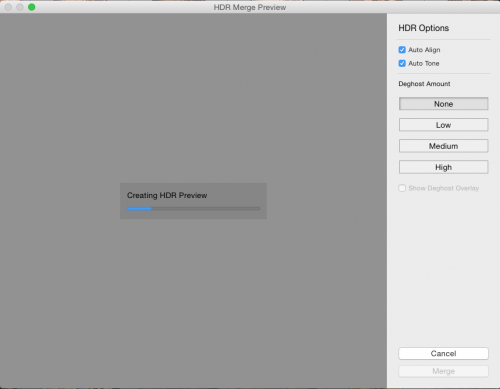
Another new feature: HDR, “high dynamic range”. You are now able to take a photo multiple times (2, 3, 10, whatever) with varying exposure, and pull them together into one HDR image. Gone are the days that dynamic range was something to worry about. Select the various photos, do some settings, like deghosting (see below), and you are done.  Lightroom creates a new images named …-HDR.dng: a full DNG. Finally, a good use for the DNG format. And much better than creating a JPG.

Next: Panoramas. You can stitch together pictures that lie beside each other into one wide panorama. Another feature that until now needed additional software. Both Panoramas and HDR appear in a new PHOTO option:

So now you choose “Panorama” and wait as it is built in front of your eyes. You even have an “Auto crop” option: marvellous. And again, a huge, excellent file is built in front of your eyes, as it were. And again, it is a .DNG file, a huge advantage over other software, that creates JPG files. And look what I just created: the city of Las Vegas at this size:

Yes: 25,000 x 3412 pixels. That is, an 85 Megapixel DNG file. Wow!

Here is a small version, “just” 5,000 pixels wide, that I deliberately saved with a logo and at that “small” size and with high compression, i.e. low image quality (it is, after all, a copyrighted image). It still shows the point very well though when you view it at full size. Go ahead and view at full size:

Fantastic, no? I will be doing this all the time now.

I see all sorts of other advantages and incremental improvements in version 6.

Let me give you just one cool little timesaver. To use the entire dynamic range of your image, take a grey, low contrast image, where the bottom end of the histogram does not reach “0” (the left end) and the top end does not reach 255 (the right end) (i.e. the blacks are not black and the whites are not white).

Now, in DEVELOP, in the BASIC module, shift-doubleclick on the words “Whites” and “Blacks”. Lightroom automatically drags blacks down and whites up until you are using the full dynamic range from 0 to 255. Cool, or what!

In the next little while I will document some more of these advantages and tricks, but for now, let this be enough reason already to upgrade. Enough reason by far. Have fun!


Lost in…

….translation.

“Lost they get, things in translation”,

as Yoda might have said, in a galaxy long, long ago and far, far away where they all had human-type vocal cords and all spoke English. And all breathed the same oxygen/nitrogen mix.

So… to your camera. Assume that you shoot in RAW or JPG format—which is the case for almost all cameras today. Let’s assume RAW.

When you translate that original file to what you see on the screen, you are doing exactly that: interpreting and translating that RAW file. And translations and interpretations always bring inaccuracies. They will rarely if ever improve your file; they may decrease the quality (and often do). When I say never improve, I mean that you cannot get extra information out of a file by interpreting it. You can’t pluck a bald chicken, as the Dutch saying goes.

When you import into Lightroom, you can change the translation. In the DEVELOP module, bottom right, you get CAMERA CALIBRATION options like these, for example:

All those are just different ways of interpreting the RAW data. “Portrait” is a little less sharp with more emphasis on skin tones; “landscape” sharper, with more greens. And according to Adobe’s best reverse engineering of what Canon or Nikon do, when you select thatsetting on your camera.

Now let’s get to the point.  Some people say “Adobe’s DNG format rocks: it is the standard”. Lightroom offers you the option to automatically change the original file into a .DNG upon import.

Here’s the problem with that, in my view: by doing this, you are throwing out the original data (this goes squarely against the face of non-destructive editing) and trusting Adobe’s interpretation of it; what’s more, you are trusting Adobe’s interpretation of it more than you are trusting your camera’s maker.

And then when exporting, you will in most cases once again make a translation, this time from DNG to JPG or perhaps TIFF, or directly to your printer driver via the printer profile, if you print directly from Lightroom.

And each translation brings with it the danger of misinterpretation. Like that game where you whisper into the ear of the person next to you, who does the same with the person next to them, etc, and by the time it comes back to you, “my mother is wearing a red coat” has turned into “why are the ancient Greeks developing antiserum in the library?”

It is nice that DNG is a standard, but it’s not a generally accepted one yet, and the advantage of that move to standard is not worth throwing away the original data that your camera produces. So until cameras themselves produce DNG files (as indeed some already do), my advice is: no, do not convert your files to DNG upon import. Leave them in your camera’s RAW format.


Manual power

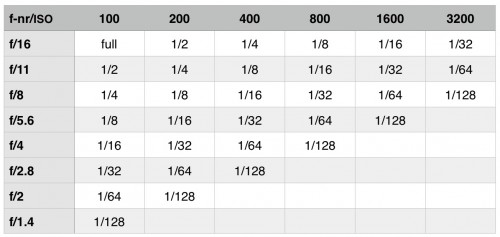
The nice thing about setting flash power manually is that it responds to very simple math. Like the inverse square law. Andthat the common shutter speed, aperture and ISO numbers we know are all a stop apart. They lead to tables like this:

SB910/900 or 600/580EX flash. Zoom set to 35mm. Flash held at 2m (6.5’) from subject. Flash not modified.

So if you have a high-end Canon or Nikon flash and you set the Zoom setting to 35mm, when you set your camera to f/16 and ISO value to 100, you get a well exposed picture at about 2 metres (6.5 ft) distance.

A modifier like an umbrella generally takes around 2 stops, so the same table will hold at one metre (half the distance is 4x more light, i.e. two stops more, which would cancel the umbrella’s 2 stops less).

Simple math. And the rest follows simple math, too: increase ISO and you need less power, and open the aperture and you also need less power. As per the table above. A table that can save you a lot of time.


Full frame or crop?

You will have heard talk of “crop cameras” and “full frame cameras”. But perhaps the fine points are not exactly clear to you. Let me try to illuminate the subject a little.

First, the definitions. A “full-frame camera” is a camera whose sensor is the same size as a 35mm negative used to be. A “crop camera” is a camera whose sensor is smaller (usually 1.5x, 1.6x or 2x smaller).

Full frame cameras are generally more expensive: they include such cameras as the Nikon D800, Nikon D4, Canon 6D, and Canon 5D Mark III. Generally speaking, “bigger is better”: full frame cameras have some major advantages over “crop” cameras—but the reverse can also be true.

Available Sensor Sizes

  • Lower-end (and many higher-end!) point-and-shoot cameras usually have very small sensors. These do not make it easy to get blurry backgrounds, and they generate a lot of noise at relatively low ISOs.
  • Next, there is the “Micro four thirds” format—these sensors are almost as big as a crop camera’s sensor. Micro four third cameras are twice as small as a negative.
  • The next step up is the “APS-C” crop sensor – 1.6 times smaller than a negative for Canon; 1.5 times for a Nikon. Most DSLRs have this size sensor. Some quality small cameras also do (like my Fuji X100).
  • Next, there is a Canon-only size that is 1.3 smaller than a negative—this is the format used by the 1D (not 1Ds or 1Dx).
  • And finally, there is the full-frame sensor—it is exactly the size of a 35mm negative.

Should you save up for a full-frame camera? Maybe. Maybe not. As so often, it depends.

Pros and Cons of “Full frame” and “Crop”.

Full-frame sensors have several advantages over smaller sensors:

  • Full frame sensors generate lower noise (i.e. produce better quality photos) than crop sensors of the same generation and with the same number of megapixels (Mp). This means that, again given equally old cameras with the same number of megapixels, they are better at high ISO values, where noise can become a problem, than crop sensors.
  • The viewfinder on a full frame camera is larger and brighter than that on a crop camera.
  • In the same conditions, you can achieve blurrier backgrounds than with a crop camera.
  • Wide-angle lenses actually work as wide-angle lenses on a full-frame camera (as opposed to on a crop camera, where each lens works as though it were longer, compared to using the same lens on a full frame camera).
  • The entire lens is used. Crop cameras use only a smaller portion of the lens, so imperfections in the glass can, at least in theory, become more significant.

That’s a nice list, and it explains why most pros use full frame cameras, but there are also advantages to using slightly smaller sensors:

  • They cost less.
  • They are smaller, so cameras with a crop sensor can be slightly smaller.
  • They can use special lenses (DX lenses for Nikon, EF-S lenses for Canon, etc) that were made especially for smaller crop sensors; these lenses are therefore smaller too, so they cost less and weigh less.
  • And last but not least, a big one: lenses “appear to be longer” by the crop factor compared to the same lenses used on full frame cameras. This is an enormous advantage if you need a long lens, such as when shooting lions in Africa: your 200mm lens will now work like a 300mm (Nikon) or 320mm (Canon) lens. And if you have looked at the price of long, fast lenses recently, you will know how big this advantage can be.

Drawback of special “crop only” lenses (DX on Nikon / EF-S on Canon) : if you upgrade to full-frame, you need to replace these lenses. My strategy is to only buy “normal” lenses, those that can be used on any camera (i.e. “EF” lenses, in the Canon world).

Misconceptions

I have heard and read many misconceptions. Misconceptions such as “full frame cameras have better colour”, or “full frame images can be edited more”. Those ideas are wrong. True, many crop cameras produce more noise at a given ISO than a full frame camera, but that does not mean that “full frame colours are better”. Also, age matters (any new camera is better than any old camera), and pixels matter (an 18 Megapixel crop camera probably produces less noise at a given ISO than an equally old 33Mp full frame camera). So a blanket statement like “full frame images can be edited more” is a half truth at best.

Effect on Apparent Lens Length

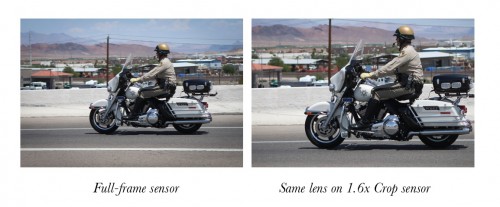
As said, crop cameras “appear to lengthen a lens”. That is, a 35mm lens works like a 50mm lens when used on a crop camera; a 50mm lens works like an 80mm lens when used on a crop camera; a 200mm lens works like a 300mm lens when used on a crop camera, and so on. (All numbers approximate). The same lens, for instance, mounted on two cameras with the same number of megapixels, one with a full-frame sensor and one with a crop sensor, might give these two images:

In this example, on the 1.6x crop sensor (the sensor that is 1.6x smaller than full frame), the same objects in the resulting image would be 1.6x larger. An advantage when you want telephoto behaviour; a drawback when you want wide angles.

“What type of camera should you buy?” The choice is up to you. Both full- frame and crop cameras have advantages and drawbacks. If you were to summarise it in just a few words, you might say “full frame usually gives better quality; crop usually gives better value”. I usually prefer full frame cameras because of the better high-ISO performance at the same pixel count and because of the blurrier backgrounds; but I own a crop camera as well, because i like the fact that without buying more lenses, I now have more focal lengths available. After all, depending on the camera it is on, each lens now has two focal lengths, effectively.

Only you can decide whether quality is most important to you, for instance, or money. “What camera should I buy” is like asking “What car should I drive”. A tough question for anyone but yourself to answer.

Either way, any modern DSLR will provide quality beyond that of good professional cameras even just a few years ago. This is a great time to be a photographer.


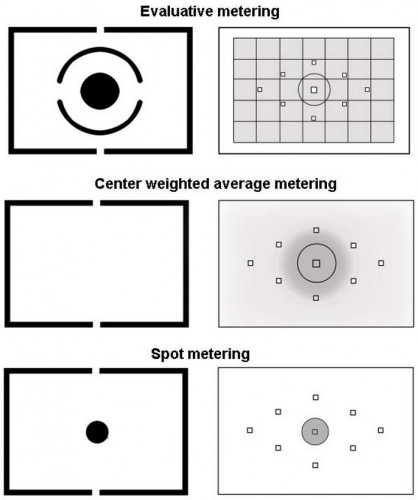
See spot run!

Your camera behaves in one of several possible ways when spot metering; and it behaves in one of several ways when using evaluative metering.

When spot metering (at the bottom in the graphic):

  • The camera only meters what is happening at the centre spot
  • OR the camera only meters what is happening at the focus spot you have selected.

It is easy to determine what it is on your camera. Shoot a scene with dark and light areas. Taking care not to move the camera at all between shots, shoot with the spot aimed at a light part of the shot; then shoot with the spot aimed at a dark part of the shot. If the exposure varies, your camera meters at the focus spot; if not, it meters at the centre spot.

When doing evaluative/matrix metering (a the top):

  • The camera evaluates the entire picture, and chooses the best exposure to suit the entire photo.
  • OR the camera evaluates the entire picture, and chooses the best exposure to suit the entire photo, biased to the selected focus point.

Again, it is easy enough to determine which one it is, using the same test.

My Canon 7D, for example, does the first option (centre point only) when spot metering, and the second option (bias to chosen AF point) when set to evaluative metering; while my 1Dx can be set to do either (using a custom function named “Spot meter. linked to AF pt”). The 7D, therefore, might seem to only do spot metering when it is not set to spot metering. Can you see how this can be confusing?

Did you know which it is, on your camera, before testing? If not, this will explain a lot of the “incorrect exposures” you have been seeing over the years. Yes, you need to know this stuff!

I remember a hardcover book. Pastel coloured pictures. “See Dick. See Jane. See Spot Run. Run Spot Run”. My memory is visual.