Outside flash

As a result of yesterday’s shoot, reader Franklin asked:

Michael, I often use my flash for outdoor portraits.  Since I don’t have anywhere to bounce the flash, I often point it straight at my subject.  In many cases, I end up having to deal with the oily, overexposed skin highlights mentioned in your previous post.  Any tips you could offer to create soft, natural looking skin tone would be greatly appreciated.

Great question. Yes, outdoors flash can be challenging, so here are my tips.

  • First, outdoors you can sometimes bounce. A wall, for instance, can provide a wonderful soft ounce area. If possible, try that first. (A Gary Fong Lightsphere may make this easier if there are some small things that light could bounce off. Like people, trees, a car, a fridge, you name it. The Fong Lightsphere throws light everywhere so it sometimes works.)
  • Second: next, try to soften the light. I often use a Honl Photo Traveller 8 softbox for this. Sometimes a Honl bounce card.
  • Third: the direction of the light is important. One reason outdoor flash can look unnatural is that the flash is shooting from where the camera is. If you can take it off the camera, using an off-camera flash cord like the ones of Flashzebra.com, you will get much more natural light. Shoot with the light coming from above (even a foot), and at an angle.
  • Fourth: I often add some colour, like a quarter CTO or half CTO filter, to warm up the flash. This removes much of the objective (see yesterday’s picture).
  • Finally: it is allowed, even a good thing, to shoot with direct flash outside. And Photoshop or Lightroom can help remove the nasty skin highlights. Sometimes this is just the price you pay!

I hope that helps!

Setting sun

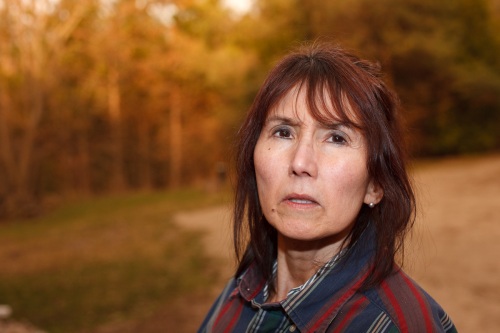
Look at this photo I shot of Yasmin Tajik, Sunday in Nelson, outside Las Vegas, NV:

Yasmin in Nelson, NV, photo by Michael Willems

Yasmin in Nelson, NV

Nice late afternoon light, and lit by the late afternoon sun.

Except it wasn’t. Yes, it was late afternoon, but Yasmin was not lit by sunlight. She was lit by my flash.

  • The flash was on camera, since I was traveling without light stands. I would normally take it off camera. But when you can’t, as long as you are mixing light, it is OK to shoot with the flash on camera. Outdoors, therefore, straight into your subject’s face is OK, if you have to.
  • Since both I and the subject were moving constantly, I used TTL rather than manual flash.
  • The nice late afternoon colour on Yasmin? Glad you asked. A 1/2 CTO Honl Photo gel on the flash’s Speed Strap, and the camera’s White Balance set to “Flash”.
  • I ensured that the shutter speed would stay below the camera’s sync speed of 1/300th of a second, in order to give the flash maximum range (“Fast Flash/FP Flash” would decrease available power drastically, which at this distance is not a good thing). Doable late afternoon, when the light is not as bright.

As you see, even very simple means can lead to well-lit pictures.

Flash tip

When your flash is grossly overexposing your pictures…

  • The flash is not seated correctly, or the contacts are dirty
  • The flash is set to MAN (manual), instead of TTL
  • You are using + Flash Exposure Compensation (or on a Nikon, also Exposure Compensation).
  • You are simply too close.

Those are four obvious starting points.

Here is me, pictured by David Honl in Las Vegas the other evening. Using a Leica X1 with off camera flash equipped with CTO gel and Honl Photo Traveller 8 softbox.

Michael Willems, shot by photographer David Honl

Michael Willems, shot by David Honl using a Leica and flash

Fun with gels

Look at these images, and see why you need gels.

A gel is a piece of sturdy plastic that you put in front of your flash. (At least if you use something like the Honl Photo system it is sturdy; the ones that come with your SB-900 flash are very fragile and will melt quickly).

So assume you have some good, easy-to-use gels. Look at what just two gels and a bit of knowledge of my camera can do. And this takes mere seconds to set up!

Case One: Warm Face, Neutral background. Flash equipped with a CTO (“Color Temperature Orange”) Gel, white balance set to “flash”:

Case Two: Neutral Face, Cold Background. Flash equipped with a CTO Gel, White Balance set to”Tungsten”:

Case Three: Neutral Face, Warm Background. Flash equipped with a CTB (“Color Temperature Blue”) Gel, white balance set to “Shade”.

I mean – is that fun, or is that fun?

Note that the effect may not be totally right in camera – gels do not exactly correspond with white balance settings, which in any case vary per camera – but that is unimportant: you can fine-adjust later in Lightroom. The essence is that you throw different light onto the subject than onto the background.

Now do you understand why photographers are always going on about gels? Secret weapon – but now you know the secret, too.