Outstanding

One question you need to ask yourself is “how do I draw attention to my subject”.

One way to do that is to use colour, like in this image:

Red and green are opposing colours and add interest, but it is of course the yellow flower that draws our eye immediately. And notice how it is in the “rule of thirds” position?

Here’s another example. Can you see both the similarities and the differences?

So as a photographer, it helps if you can keep an eye open to colours.

The slope is slippery

…but not slippery enough to prevent me from getting through airport security. I am in the lounge waiting. Tethered, since Air Canada lounges now want $10 for Internet access.

Airport security is now very tough indeed in Toronto.  Before even entering, every piece of hand baggage (one only) has to be fitted into the little metal frame. Mine does not (many cameras, lenses, etc) but amazingly, the person checking missed the bag on my shoulder.

Also, all passengers now get scanned by the full body scanner. You can refuse this – so I did, as a matter of principle.  If I have done nothing wrong I refuse to be strip-searched, “virtual” or not.

But it is clear that this “right of refusal” is discouraged. The full body pat-down is extensive and pretty unpleasant, in front of everyone. This is going to be routine very soon, Militaristic commands, undressing, virtual stripsearches: any right of privacy and of respectful treatment has disappeared: we have given it up without a fight, it seems to me.

But at least I and my cameras and lenses and speedlites are now on our way to Phoenix.

Off to Phoenix

Again, off to Phoenix today. I timed it well: 70s in Phoenix, and freezing here.

I am looking forward to the workshop in which I will be joined by David Honl, who is flying in from LA with an assistant. Participants can look forward to some really cool flash training!

Packing is a challenge. My “Classified” bag is full of gear, but I am not bringing some items I really would have liked: the 70-200 lens and the 100mm macro. I am bringing:

  • 1D Mark IV
  • 7D
  • Three speedlites
  • Three pocketwizards
  • 24-70 2.8L
  • 16-35 2.8L
  • 35mm f/1.4
  • 50mm f/1.4
  • Laptop
  • Power Supplies fro both cameras
  • Spare batteries
  • Spare memory cards
  • Cables
  • Flash modifiers (Honl speedstraps, gobos, gels, snoots, grids, etc)

This is par for the course, but with the new restrictions we will see how this plays out. I would hate to have to check $20,000 worth of equipment. CATSA have confirmed I should be fine – we’ll see.

Tip: bring a vest and worst case, put lots of stuff into the vest.

Does TTL work when bouncing?

Does the fancy automatic “TTL” flash mode work when you bounce your light off the wall behind you?

Yes, and that is exactly the point of TTL (“eTTL in Canon terms; iTTL for Nikon).

You press the shutter button: Click.

But it is not one click! In the milliseconds after you press the shutter, your camera does all the following:

  1. Fires a low power test flash
  2. Measures light returned
  3. Calculates power needed
  4. Raises mirror
  5. Open shutter
  6. Flashes with power setting calculated  in step 3
  7. Closes shutter
  8. Drops mirror.

Steps 2 and 3 are crucial: that’s why it works wherever you are pointing the flash.

And that is also why you see the flash through the viewfinder: you are seeing the pre-flash. Try it: look through your viewfinder and shoot. If you see a flash, that cannot the be real flash – after all, the mirror is up when that goes. It is the preflash that you (and your camera’s light meter, near the pentaprism) are seeing!

Crop

One tip that may help you make better pictures: crop in the camera.

We always look at the image in the centre (or roughly in the centre) on our viewfinder. But next time you take a picture, look at the edges. Ask yourself: “is everything I see on the edges really necessary?”and remove everything that is not necessary, by:

  • Moving,
  • Zooming in,
  • Focusing selectively,
  • Repositioning yourself, or
  • Aiming your camera differently.

For example, like this:

Do this simple thing and your pictures will be simpler, and better.

Phoenix Mon/Tue

I shall be teaching Travel and Advanced Nikon Use at the new School of Imaging location in downtown Toronto tomorrow.

Then Sunday, I am off to Studio Moirae in Phoenix:

….for two days of teaching Advanced Flash.

And some excellent news: I will be joined on Monday by David Honl, too, who is flying in from LA with an assistant to be there (this is a great opportunity: if you are anywhere near Phoenix: There are still a few spaces available, but be quick).

Now, off to bed. Take lots of pictures

Metering

Your camera has two, or more usually three, types of light meter built in:

  1. Evaluative/3D Color Matrix meter. You normally use this. This is “smart” metering, where the camera meters areas of the sensor separately. It can handle many types of light situations and is a real improvement on other, older metering types.
  2. Centre Weighted Average meter. You use this when the subject is in the centre and the outsides are dark or light. Backlight portraits are a good example of where this is useful.
  3. Spot Meter. You use this when you have great contrast: simply aim the spot at a subject that is neither very dark nor very light and lock your exposure. This is useful when shooting something in a dark room or in a bright snowscape.

Note also that ambient and flash light are metered separately.

My advice: try all three metering modes and get familiar with them, then learn when to use which one.

Reader question

“Why are you in Manual exposure mode when shooting flash indoors?”, asks a reader. I thought that would make an excellent blog question.

So why?

Well, when I shoot flash indoors I have options. These include:

  • S/Tv mode, which is fine because I set the shutter to any value I like, but this has the big drawback that the lens will quite probably not have the aperture value needed to expose well – and also, aperture is the one thing I want to control.

So then next, there’s Aperture mode or Program mode. This works differently on the main brands:

Canon:

  • P: flash speed will not go below 1/60th. This simple engineering decision makes sense, but it can give me dark, “cold” backgrounds. When using a wide lens I want to be able to go slower, like 1/30th, to let in more ambient light.
  • Av: now shutter speed can go as low as it needs to in order to light ambient normally. The big drawback: in a dark room this could lead to very slow shutter speeds – even seconds, which would lead to totally blurred images.

Nikon:

  • A or P: flash speed will not go below 1/60th. This simple engineering decision makes sense, but it can give me dark, “cold” backgrounds. When using a wide lens I want to be able to go slower, like 1/30th, to let in more ambient light.
  • A or P with “slow flash” enabled: now shutter speed can go as low as it needs to in order to light ambient normally. The big drawback: in a dark room this could lead to very slow shutter speeds – even seconds, which would lead to totally blurred images.

So none of those seem quite ideal, do they?

Then there is manual (“M”). In manual exposure mode,

  • I can simply set the aperture and shutter speed that I want. The background will be lit accordingly.
  • But as long as my flash is set to TTL (Canon calls this eTTL; Nikon calls it iTTL), it is still fully metered and automatic, and the camera varies the flash power to light the flash portion of the photo properly. So “manual” is not manual flash – it is just manual background light.

So for that background light, my starting point is to set manual aperture/shutter speed to give me an exposure two stops below ambient. That means the meter points to minus two when I aim at a representative part of the room. That way I get these advantages:

  • Ambient light becomes “fill light”, which is usually 2 stops below the key light.
  • If I aim at a brighter part of the room, is it not likely to be two stops brighter, so it will not be overexposed.
  • If I aim at a darker part of the room, it is still likely to be light enough to be seen.

So try it next time?

Camera on manual and set time and aperture to a value that gives you -2 stops on the meter. Then bounce off a wall and you get well lit images. Like this one, of two very nice young people at the event I was a forum member at, tonight at UofT’s Mississauga campus:
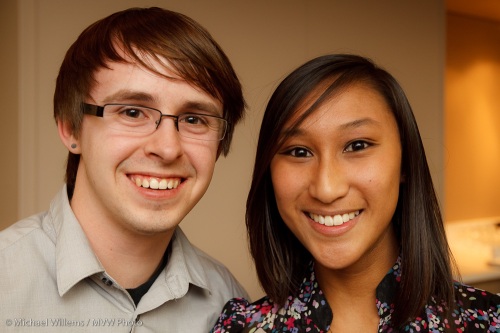
This also shows that I have taken over 10,000 images with my new 1D Mark IV already. And that I always carry a camera, even when I am a speaker, not a shooter.