Hyper real

With today’s fast cameras, big sensors, and great noise reduction technology, like that in Lightroom 3 tha I described earlier (magic), we can see better with our cameras than we can in real life. It is fun to experiment with that.

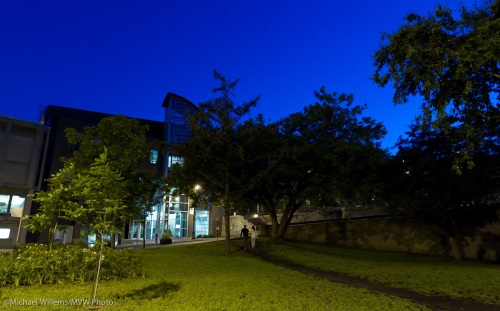
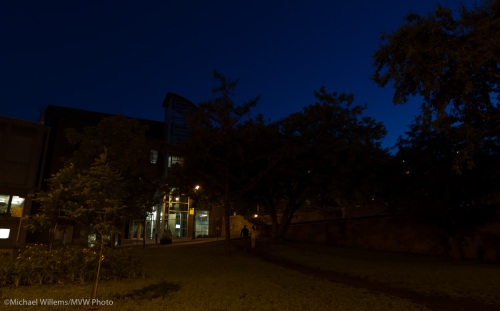
Like in Montreal the other day. Here’s a street the way it looked to me:

McGill College in the dark, photographed by Michael Willems

McGill College in the dark

But with my camera (a Canon 1D Mark IV) set to auto ISO, and at 3,000 ISO, I got this:

McGill College in the dark, photographed by Michael Willems

McGill College in the dark, at 3000 ISO

And by white balancing this RAW imaging to correct the yellow Sodium light, we get this:

McGill College in the dark, photographed by Michael Willems

McGill College in the dark

I can actually see better with my cameras than I can see in real life.

And I suggest you all try this. Go out and use auto ISO or a very high manual ISO. Apply noise reduction (in the camera if you shoot JPG, or in Lightroom so you get more control). See what happens!

Choices…

A fellow photographer friend and blog reader asks:

Have you any thoughts about the Leica D-LUX 4 in comparison to the Canon G11 Which would be the better buy? Thanks

I do have thoughts, yes. And of course am happy to share them.

Although both feature full SLR controls (eg Av and Tv modes, etc), and both have good sensors without too many megapixels, these cameras are aimed at a different audience.

The Leica is really a typical “little point and shoot”. Few buttons and much hidden in menus. It’s really a Panasonic of course. I teach this type of camera often, and see the drawbacks well:

  • Convoluted menus.
  • Much needs to be done through those menus.
  • Slower operation.
  • Easy to hit the wrong button, even with the few buttons it has.

The benefits: the Leica badge, the lens, and “light and small and inconspicuous”.

Now the G11. I recently updated the Henrys G10/G11 course. I love the G11 because it feels much more like an SLR. The G11’s build quality is excellent.

It has easy to use buttons for things like exposure compensation, ISO, etc. Although it too has a few “compact-type” (i.e. slow to operate, confusing, and easy to accidentally hit) controls and menus (I’ve never understood why you need two different menus; now you have three), at least there are fewer such.

The G11 has an articulated LCD. It also has a viewfinder. It is a lousy little almost-unusable viewfinder, but that is the key: “almost”. It works and the Leica needs a flash-shoe mounted viewfinder add-on. Call me crazy,  but I consider a viewfinder a necessity.

As an SLR shooter, control is important to me. And since I consider the G11 the next best thing to an SLR, I would wholeheartedly recommend that as my choice.

My verdict: Unless the small size or the Leica name are essential to you, go with the G11 if you know anything about cameras.

Positioning

When you shoot people, do not tell them how to pose, or that you are posing them. Tell them you are positioning them, or ask them to position themselves in a certain way.

You get more natural poses that way!

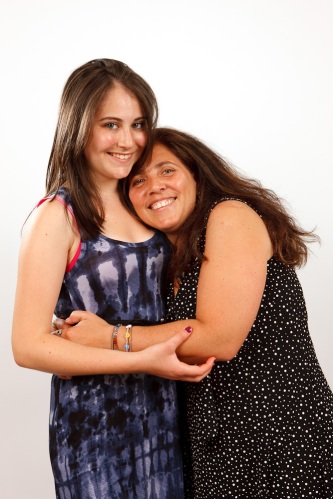
Bat Mitzvah Girl's Big Sister and Mom, by Michael Willems

Bat Mitzvah Girl's big Sister and Mom

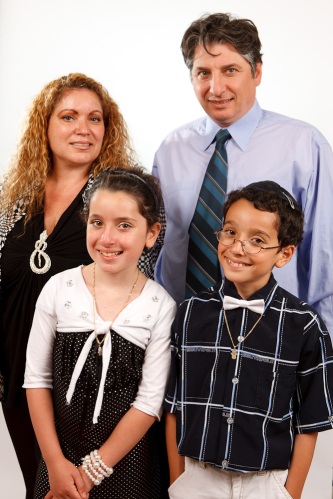
A family, close shot by MIchael Willems

A family

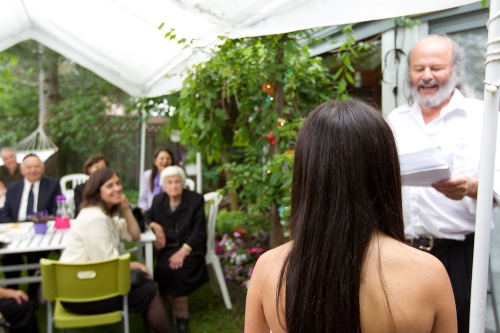
And if the pose is more traditional, you can rotate, and even show the background, to add some life:

Bat Mitzvah Girl and friends, by Michael Willems

Bat Mitzvah Girl and friends

Piecing it together

Sunday, I shot a Bat Mitzvah party. Great fun, and wonderful people: this is why I love photography. Happy people celebrating a life event, and I get to shoot it: a privilege, and I get to do it for a living. What’s not to like?

I shot both formal portraits (using a backdrop and two strobes with umbrellas plus two speedlites for hair light and background light) and photojournalistic party shots.

For the latter, I have a few tips.

  • Use a wide or somewhat wide lens. fast if possible. (I used a 16-35 f/2.8 zoom on a 1D MkIV, so that means I get a 22-46mm range).
  • “If it smiles, shoot it”!
  • Compose well. Use off-centre composition. Tilt if necessary or whenever you like (though not, please, in every picture). Do the “close-far” thing (search for it here if you do not know what this means).
  • Camera on manual indoors and A/Av outdoors, and bounce your flash.
  • Shoot detail, too.
  • Often what you do not see tells the story.

The last points are worth belabouring. Like in a good Haiku, not telling the whole story is what makes it interesting. Implying, rather than saying.

Here, for instance, we do not see the girl, and her dad and family are blurred too:

Dad holds a speech for his Bat Mitzvah daughter. Photograph by Michael Willems

Dad holds a speech for his Bat Mitzvah daughter.

But you see the smiles, and you can imagine what is going on. The picture tells a story.

And below, who wrote this? Little sister? The picture asks as many questions as it answers:

Little sister wrote on Bat Mitzvah girl's blackboard, photographed by Michael Willems

Little sister wrote on Bat Mitzvah girl's blackboard

And in the next image, one of my favourite party shots, the drink says fun: the blurred face emphasizes the fun and again, tells a story without telling too much:

Cheers! Girl raises juice glass, photographed by Michael Willems

Cheers! Girl raises juice glass

Another detail shot to not miss: the food.

Fruit, photographed by Michael Willems

Fruit

Here, during speeches, dad looks at his amused Bat Mitzvah daughter. We do not see who is speaking, even that anyone is speaking, but we can piece it together. Piecing it together is what makes a picture interesting to a viewer.

Speech at Bat Mitzvah, photographed by Michael Willems

Speech at Bat Mitzvah

Of course even in the photojournalistic phase you do some set up shots, like the very last shot I took at the event: mum and daughter.

Bat Mitzvah and mom, photographed by Michael Willems

Bat Mitzvah and mom

—-

(Incidentally, if you want to learn theory and practice of creative use of light, there are still spots available on the advanced lighting course Joseph Marranca and I are putting on on June 26. Click here for the link. )

Le Chat, etc: Montréal ce soir

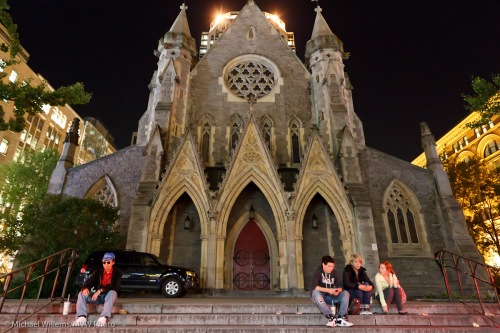
A quick walk through Montréal. 32-12800 ISO and Lightroom noise reduction.. Wow. Wow. And wow. Both Montreal and the low noise performance:

Montreal church, by Michael Willems

Montreal church, by Michael Willems

Montreal Wall, by Michael Willems

Montreal Wall, by Michael Willems

Montreal, by Michael Willems

Montreal

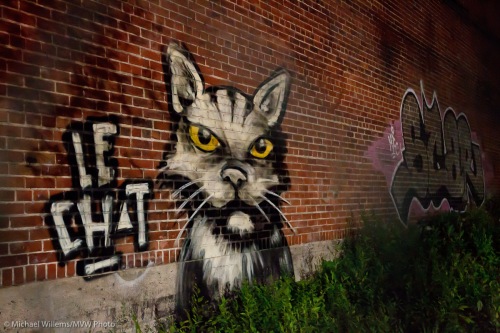
And my favourite:

Le Chat, photographed by Michael Willems

Le Chat (en Montréal)

All this shot handheld with a 1D Mark IV and a 16-35 f/2.8 lens. At ISOs up to 12,800, and with Lightroom 3 noise reduction applied.

Please release me…

..not the song, but it is model releases I am referring to. When do you need a model release?

First of all, I am not a lawyer, so I cannot give legal advice. Go to a lawyer if you need that.

I can, however, tell you best photo practices as I understand them. And these are as follows.

First, let’s talk about taking photos. In much of the world, including North America (but not Quebec, where permission must be forthcoming), you can take any photo you like, within reason, if you are on public property. Yes there are exceptions (so put away those thoughts of a long lens aimed into the neighbour’s bathroom as she steps naked out of the shower) but generally, you can shoot what you like. Shoot, not necessarily use.

Of course whether you want to shoot is another subject: you may choose to be nice, and not do it if anyone objects, or you may want to not do it for fear of being arrested, sometimes, like when the officer looks straight at you as he is beating up a subject.

Now about using your images. That is where releases may come in. A release is a form where the model tells you that “for valuable consideration received” (i.e. you paid, or gave something else in return) you are allowed to use the photo; you have the rights to it as set out in the release.

When do you not need that, first of all? When the photo is news, or art. You can shoot for art and you can shoot news, whether the holder of the rights (the person, or the owner of the car or building or trade mark) likes it or not. Yes that is right, there are building releases too.

But when do you need one? When you are going to use an image commercially. SO if you intend to use the street person oin an ad for your local chairty, get a release. If you want to use yothe girl in the street for a fashion ad, get a release. If you want to put the image on a product box, get a release.

A release can be hard to get (try in Africa), but it can also work for you. “Sign this release and I can send you a copy of your picture” is a good strategy.

So I always carry a little mini release. The full release is a page long, but the mini release just says a short version, see below, and I can fit three on a letter-sized page. That way I have something to ask people to quickly sign. I advise you do the same, carry some.

—————————————————————————————–

RELEASE

For valuable consideration received of ______________, I hereby grant to ____________________ (“Photographer”) and his/her legal representatives and assigns, the irrevocable and unrestricted right to use and publish photographs of me, or in which I may be included, for editorial, trade, advertising and any other purpose and in any manner and medium; to alter the same without restriction; and to copyright the same. I hereby release Photographer and his/her legal representatives and assigns from all claims and liability relating to said photographs.

Name (Print)__________________________________ Date _________________________
Signature ____________________________________ Phone _________________________
Address ____________________________________________________________________
If Minor, Name/Signature of Parent/Guardian __________________________________________

Snapshot rules

Even when you take a simple snapshot, as a photographer you should think about how to do it. Almost subconsciously, I apply the same rules and the same thinking to a snapshot that I do to a photo I am paid for.

So I thought it might be worthwhile to discuss some of that thinking. In that context, here is a snapshot I took the other day of a friend:

Michael's friend Ninon, shot with a wide angle lens

Michael's friend Ninon, shot with a wide angle lens

In the second or two before I take that snap, what is some of my thinking, and what are some of the decisions I make?

  • Subject: What is this a photo of? (it is a happy snap, so “camera-aware” and a smile are just great). Check.
  • Light: Where is the light coming from? In this case it is from her front, indirect reflected light, i.e. nice flattering light. Check.
  • Lens choice: I want to use a wide angle lens here because this is a situational portrait, a city woman in her city. Wide angle lenses put a subject in context. I want a wide angle lens also because it creates those nice diagonals that converge on the subject, can you see them? Finally, I also want wide angle to show depth in the photo (a technique knows as “close-far”).
  • Depth of field: I want to draw attention to my subject by blurring the background, so I use Aperture mode (A/Av) with an aperture of f/2.8. Wide angle lenses are sharp all over, but by using a fast one (f/2.8) and by getting close I can still blur the background dramatically.
  • Composition: I am using the rule of thirds. “Uncle Fred” puts the subject in all his images smack bang in the middle: I use off-centre composition. In this case the centre of attention (her face) is one third from the right, one third from the top. And she is looking into the picture, not out of it.
  • Moment: you need to capture the right moment. I shot four times and by photo number four, her smile was best. Shoot a lot, even in a portrait. so you capture just the right moment. I also thought the right moment included the “suits” in the background. After all, King and Wellington, downtown Toronto, means suits out for (if not out to) lunch. So I was delighted to see them approach and took the four shots just as they passed behind her.

That is, in a nutshell, what I thought in the seconds leading up to this picture.

That is my thinking. Yours may have been different, and that is of course perfectly OK. There is not one good picture: there are 100 billion. The essence here is not what my conclusions were, but the fact that I was thinking at all, instead of just blindly snapping.

Light, moment and composition/subject, that is what makes up a picture. So think of those every time you take one, and your pictures will get better.

1600 is the new 200

I am now using Lightroom 3, having upgraded from 2.6. Strongly recommended. Very strongly: worth every penny of the $99 upgrade fee.

If you do not yet know about Lightroom: you need it (or if you use a Mac, Aperture, the other option. For PC, Lightroom is the only option). The apps organize, keyword, rate and find your files, or rather allow you to do so; and they allow you to do 99% of the editing you’ll ever need, non-destructively and quickly. Much more quickly and conveniently than in Photoshop, which in spite of its name is aimed at illustrators.

Lighroom 3, which I will review in more depth soon, is superb. The major function is the noise reduction. 1600 ISO is the new 200. It is magic.

Look at this image of a student at the Henry’s imaging show recently (and I know you are reading this!). Shot at 1600 ISO with the Canon 1D Mark IV. Click on the image to see it larger:

An image shot with off-camera flash at 1600 ISO

An image shot at 1600 ISO

Superb quality!

But the original was more noisy, especially since I had to push it half a stop (yes, it was a dark room).

Here is a piece of that image. When you click it, you see it at its original size.

An image shot with off-camera flash at 1600 ISO, before Lightroom noise reduction

before noise reduction

Now look what happens when I apply some noise reduction:

An image shot with off-camera flash at 1600 ISO, after Lightroom noise reduction

After Lightroom noise reduction

And that is just after dragging the slider,. I could play with the parameters to make it even better.

Magic, pure magic. I shall be shooting tomorrow’s Bat Mitzvah party muchly at 1600 ISO, I imagine.

Five-and-a-half feet.

Yes, five and a half feet. Above the ground. That is the distance from which Uncle Fred takes every single picture.

Like this:

A street in Oakville shot from 5.5 feet above ground level by Michael Willems

A street shot from 5.5 feet above ground level

Now instead, why not get close to the ground? Like this. And look at the difference that makes:

A street in Oakville shot from 12" above ground level by Michael Willems

A street, shot from 12" above ground level

Much more intimate and dramatic.

…or perhaps even tilt it, using a mis-named “Dutch Angle”?

A street in Oakville shot from 6" above ground level by Michael Willems

A street shot from 6" above ground level

Now it’s like we are crawling on the ground.

Try to get interesting angles. Avoid the ubiquitous Uncle Fred straight-and-level 5.5′ AGL position when you can do better.

Berlin Wall

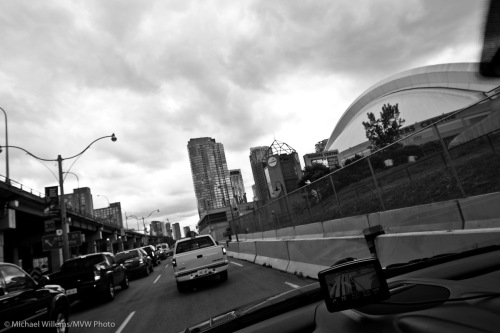
Toronto, for the next weeks, has a Berlin Wall, designed to keep any protesters and citizens (a.k.a. “threats”) away from the visiting G20 dignitaries, who must not see any of this.

I took a few snaps yesterday, from the car:

Toronto's G20 Security Fence, shot by Michael Willems

Toronto's G20 Security Fence

Toronto's G20 Security Fence, shot by Michael Willems

Toronto's G20 Security Fence

Toronto's G20 Security Fence, shot by Michael Willems

Toronto's G20 Security Fence

Army presence in the street, riot police, many extra Big Brother cameras, constant ID and security checks, roads closed when VIP convoys arrive, a large part of downtown that will be completely shut off for two days, cell phones that will be jammed when Mr Obama is around, and a $1bn bill for the taxpayer: very third world, and I thought that was probably worth a few dramatic black and white pictures.

Am I being ever so slightly manipulative, by using contrasty black and white?

Perhaps, and in news photography I would not of course use any contrast enhancement, or even go to mood-setting black and white. But in this type of documentary shots, on my blog, it is exactly what is called for. I believe the Berlin wall thing is hideous and that must be shown: outrage is suitable.

That said, you should be aware of the fact that just like a writer, a photojournalist can also tell the story he wants. A protest with only forty protesters? Shoot diagonally from above and it’ll look like hundreds. Black and white creates drama. When looking at news pictures, see them in this context, and ask “what was the journalist doing to put across his point of view?”