The Eyes Have It

Look:

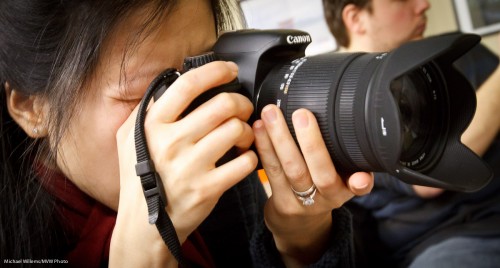
This photographer is doing what I do – she, like me, is left-eyed.

Did you know we are all left- or right eyed, and left- or right-eared, just like we are left- or right-handed?

For photographers this means we either have to close our left eye, if we use our right eye to look through the viewfinder, or we use our left eye in which case the right eye is behind the camera (and our nose is against the LCD screen).

It’s not a big deal, but it pays to realize what we are. Next time you pick up your camera and your phone, observe which eye (and ear) is dominant.


Environment

I like people in their environment, and I like to picture them in it. A short word about that, today.

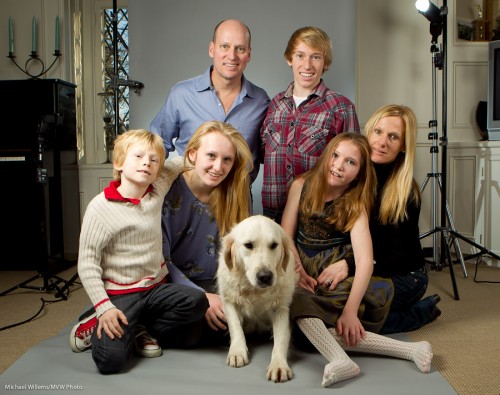
Last night, I made kid and family portraits of a very nice family. Mostly straight four-light portraits against a backdrop, like this:

But at the end, I did some family photos. For which I chose a more “real” backdrop.

No, I do not mean a “bursting through the reality envelope” setting like this (although in a strange way I do like it):

Family photo (Photo: Michael Willems)

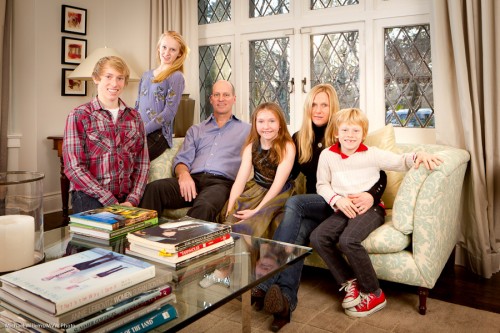
But I mean this: a shot of the family in their home, with real items that make it home (the books, the window):

Family photo (Photo: Michael Willems)

I would call this a semi-environmental image. It is environmental in the sense that this is their home, and that I am balancing available light with flash light from my strobes. It is, however, also a studio shot, in the sense that it is posed, and this is the living room (which is never used in most home – a decorative room), and that I set it up and used it as a studio. I used lots of studio techniques – like strobes, and I flashed small speedlites at the ceiling in order to create the catchlights in the subjects’ eyes.

This image also needed a small amount of post work:

  • A little vignetting around the group
  • A part of one of my umbrellas showed as a reflection.
  • I increased exposure a little, also.

In a shoot like this, it is perfectly OK to do such post-work in Photoshop or Lightroom or in what software you choose to use. Don’t sweat it: shoot a competetnt image, then finish it in post.


What does Exposure Compensation do?

I get the following question a lot:

What exactly does exposure compensation do? Can I do the same myself in manual mode, or does it do some magic using amplification or something?

Good question.

Exposure Compensation (the “plus/minus button” on your camera) simply lets the camera do its usual thing – it sets whatever it is setting – except more (or less) so.

As you know, if you are in Aperture Priority mode (A/Av), the camera sets the shutter. In Shutter Priority mode (S/Tv), the camera sets the aperture. In Program Mode (P), it sets both.

An example. Assume that you are, say, in aperture mode and the camera decides on 1/125th second for a given shot, after metering. If you now set exposure compensation to -1 (minus one), the camera chooses 1/250th sec instead. Selecting +1 (plus one) would make it choose 1/60th. And so on.

Similarly, in Shutter Priority mode the camera would change to a different aperture, and in program mode, it can choose to alter either, according to its exposure program algorithms.

And to make it more complex – exposure compensation can even change the ISO if you are in auto ISO.  This too is up to the camera’s logic algorithms.

So in you are in manual mode, YOU are the exposure compensation. If 1/125th second shows your meter at “zero”, then setting the speed to 1/250th would show the meter at -1 stop. You have set “exposure compensation” of -1 stop, i.e. you exposed to a meter reading of -1 stop below what the camera thinks is normal.

So.. no magic. The camera is just doing what you can perfectly well do yourself too, if you use Manual exposure mode.

Solved?


Gift season upon you? Want a cool gift? Consider giving a private coaching voucher (for a session in person or via Skype) with Michael by return. Order now and an individualized PDF certificate will be emailed to you! Contact Michael for ordering and information.

Tip of the day: Events

When shooting “camera-aware” pictures at events, here’s a tip:

Shoot every picture twice.

You should tell your subjects “we’ll do it twice”, and then do two shots.

Why?

  • People blink. But not twice.
  • You may get focus wrong in one shot – but not in both.
  • One or both subjects may relax after shot 1 – or stiffen.

Either way – there is a very good chance that one image will be markedly better than the other. And the better image is the only one you show.

That’s why you do this: it makes you a more successful photographer. Pros cannot fail!


Manual, again

Another skill you may want to practice when using flash is to set the flash power to manual (instead of TTL), and see how you do. Push the “Mode” button on the back of the flash to “M”, and try various power levels.

Of course in a studio you always do this. But in an event shoot it is not usually practical. TTL is better. But still, knowing what kind of power level would work for you is a great skill, since it helps you know the possibilities.

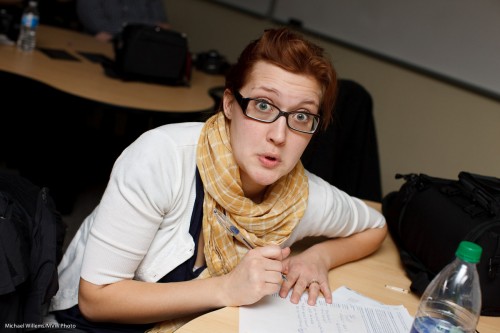
And it is fun when you get it right. The other day during a class at Sheridan College, I guessed that 1/4 power would be the right level when bouncing the flash behind me, for this image of the class’s star student:

Star Student, shot with manual flash (Photo: Michael Willems)

Pretty much aced that huh? So having an idea is good… it’s like being at the supermarket, where you need to have some idea of whether the bill will be $7, $70, or $700. Makes you a better shopper.


Mano a mano!

I am often confronted by students who assume that automatic functions are easier to use than “manual”.

This is a misconception. You should only use auto functions after you have learned to do it manually! That way you know:

  • What the camera is doing (mystery is never good) and why.
  • What the alternatives are.
  • When the camera gets it wrong.
  • What you’re getting – manual is predictable.

So my advice:

  • Always choose your own focus spot.
  • Now try manual exposure – ISO, aperture and shutter speed – before you use aperture mode, shutter mode or program mode.
  • Once you have mastered these, try to use manual flash mode.
  • Manual focus (as opposed to focus spot selection) can be good in macro, video, and so on, so it’s worth practicing that too.

You will be amazed at how quickly you grasp the technical aspects of photography, once you start te be in charge of them!


Filters

Long-time reader Laura W. asks:

Can you expand a bit more on ND filters.  I have never used any type of filter, and I know you are not a big advocate of them.  But I have read so much mixed information on them, just wondering what your take is?  Ever in Studio?  I would think not but, I have heard some arguments for.

Sure, good question.

I avoid using filters unless necessary. But sometimes it is necessary. Here’s a few examples of when that might be:

  • A protection filter (“clear”, “UV”, “skylight”), when there’s rain, sand or snow flying about. Else, I leave them off – they can increase flare and reflections.
  • A polarizer (“C-pol”, “Circular Polarizer”) when you want to enhance contrast in blue skies, and reduce reflections, eg on water. Turn. Take it off when not using it. Buy good filters – thin, if you are using wide angle lenses.
  • An ND filter (Neutral Density Filter) to cut light. Imagine this – you want a 1/30th sec exposure for panning during the day at f/2.8. Even at 100 ISO, there is no way you will get this. Or a waterfall pic, 2 seconds. Or a daytime or early evening lightning shot – the shutter should be open for maybe 10 seconds. There is no way you can do these shots – even at 100 ISO there is too light. So an ND filter cuts that light – problem solved. Or in a studio if your lights are too powerful even at the lowest setting. All good reasons to own a few ND filters that cut, say, 2 or 4 or even more stops.

Does that help?

Michael


So wrong

The UK, in my experience, is one of the worst places in the world for photography. Photography on Trafalger Square? forbidden if it is “professional”.

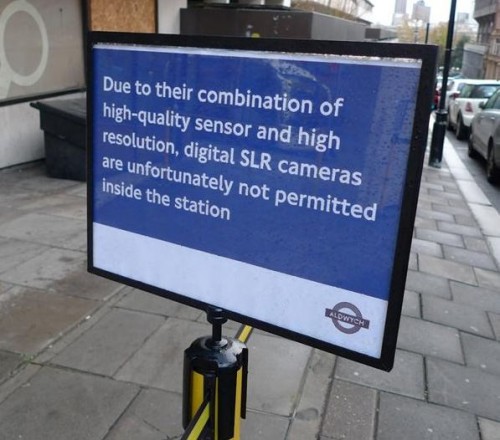
And now this, Aldwych Station, London, UK:

Of course this shows the UK’s obsession with controlling, and the UK’s diametrically-opposed-to-freedom views. It is no suprise that George Irwell was British. And see “Children of Men” for a great dystopia. China is more free than Britain, and this is a sad statement.

So what do you do?

  • Know the laws and try to stay within them.
  • But be vocal when you are within your rights.
  • Smile a lot.
  • Use a smaller camera and a smaller lens.
  • Use a wide angle lens and get the action on the side.
  • Or use  long lens and try not to be noticed.
  • Avoid being male and having a beard.
  • Be Quick!

These tips should get you by the worst fo the restrictions. Practice at home when it is not important yet.

(And I always carry a Fuji x100, which has a full APS-C sensor and many megapixels, but the silly people who make the rules do not know this).

Print for Christmas

Reader Robert G asks:

How does one prepare ones files in Lightroom to get them ready for Printing at a lab? I know a lot of people are doing photo books, calendars for Christmas gifts and it would be helpful. I still can not wrap my head around the whole sRGB, Adobe RGB, Pro Photo  colour space thing….

Good question.

First, though, the size. Typically for printing, the more pixels the better. But you can ask your printer – if you know the printer’s DPI and the size of the image, just multiply those. (a 10 inch long image printed at 300 dpi would need 300 x 10 = 3000 pixels).

Then the quality – assuming I am making a JPG, for print output I always set this to the highest quality (the lowest compression).

Now, the colour space for printing.

If you print from Lightroom yourself, it’s simple: no choice is needed since Lightroom and your PC use your printer drivers and profiles. But if you send out your image, the answer is simple if not helpful: it depends.

It depends on the printer used by the company that does your printing. Mostly, sRBG is what the print company expects. In some cases, it needs to be AdobeRGB – but usually you would be told if that were the case.

So produce a large high quality JPG in the sRGB colour space, unless your print company is able to handle one of the other colour spaces.

Which company, Robert also asked. I have recently used Vistaprint, and have been (and almost a year and a half later, remain) very impressed with quality, price, and speed.