It looks like light at the end of the tunnel. Day 79 of the mall being closed, but it is re-opening at the end of this week. You can read all about it on this page. And: I look forward to seeing some of you in the store for your continued photo restoration, passport photos, prints, portraits, and more.
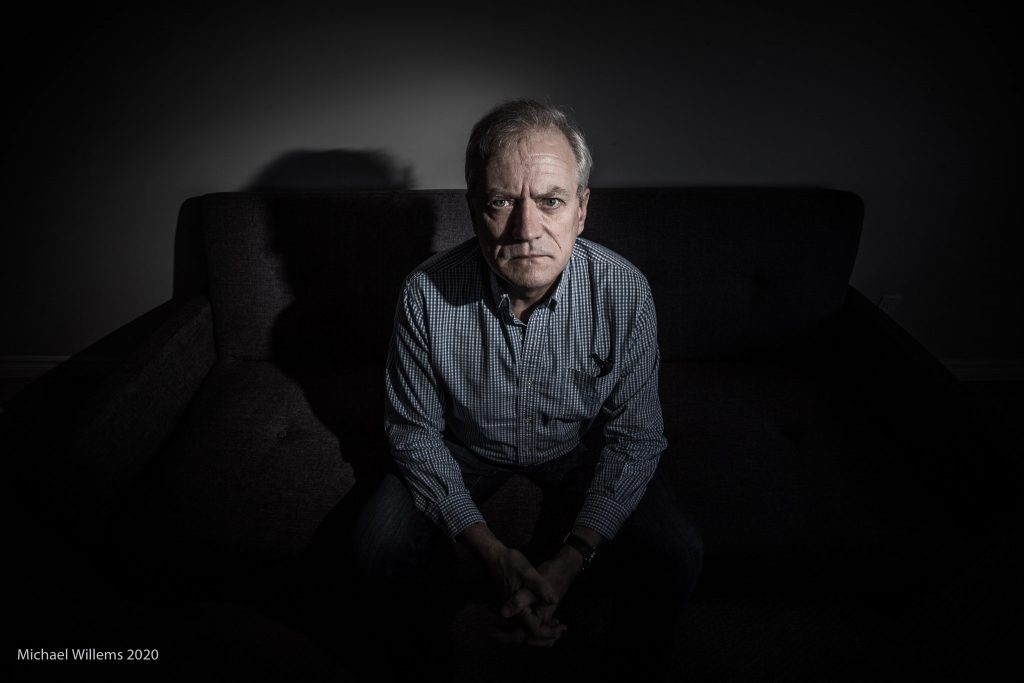
And today, another photo in my series of COVID-19 self portraits. Here it is, this morning:
Covid Day 9: The Photographer, 31 Mar 2020
So how did I make this photo? Here’s how.
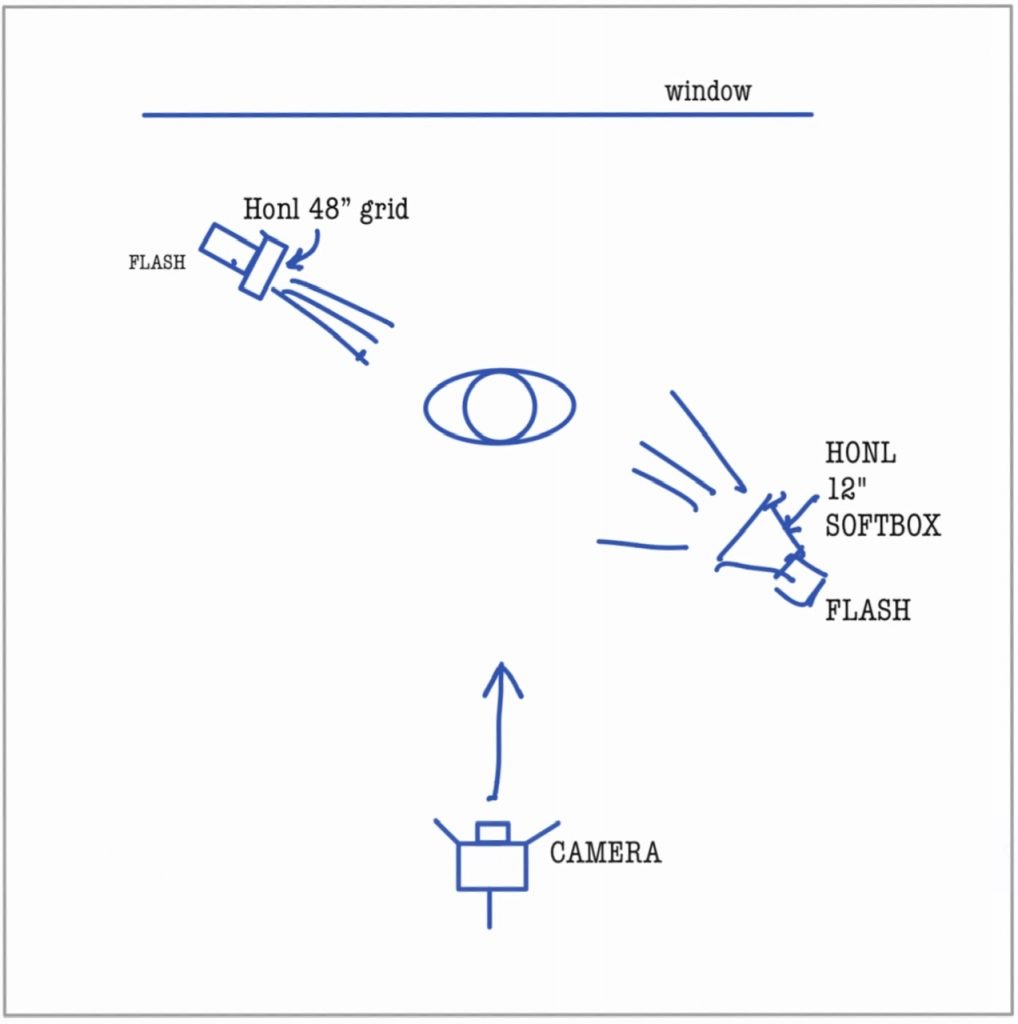
I used a camera on a tripod and two small flashes (speedlights) on light stands. One flash had a grid on it, one had a small Honlphoto softbox, like this:
Oops, that’s 1/8” grid.
The flashes each have a Pocketwizard connected, as does the camera.
Camera settings are 100 ISO, f/8, 1/200 sec, in manual mode.
Flashes also in manual mode, 1/4 power.
The camera is using the 10 second timer.
Note that the camera focuses with “Back button focus”. That way, I can pre-focus at the right distance, and the camera won’t retry when it takes the picture.
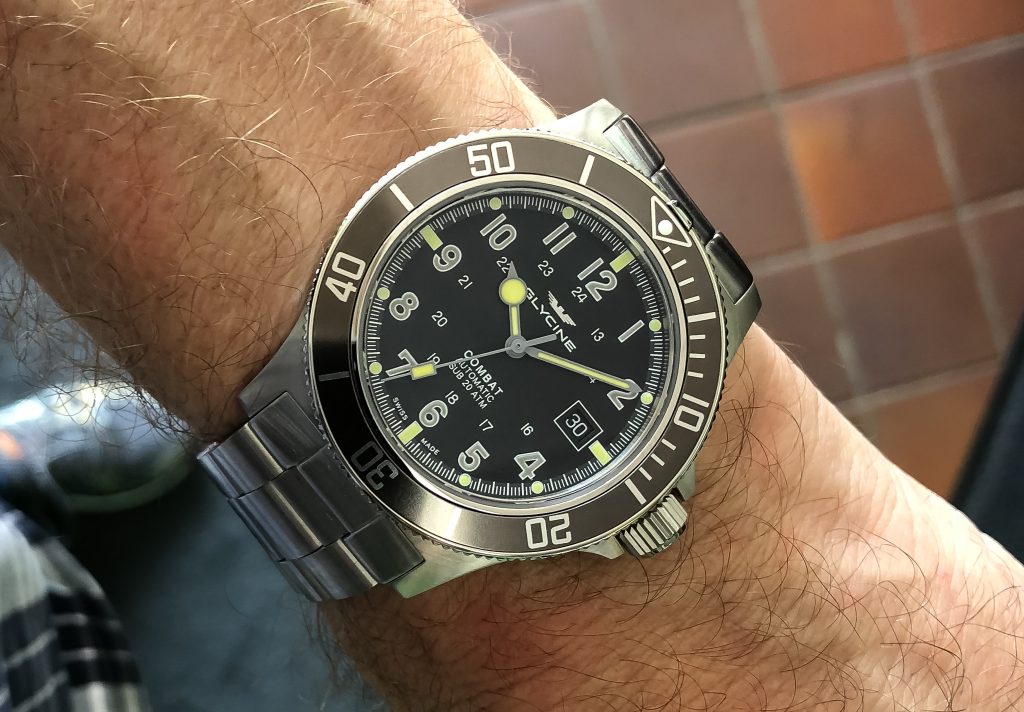
Someone recently asked me “how do I take good photos of my wristwatch?”
Good question. A lot of people have hobbies that they can practice while quarantined at home. And two of those are (a) nurturing a wristwatch collection, and (b) photography. So the combination of the two is a logical thing to engage in.
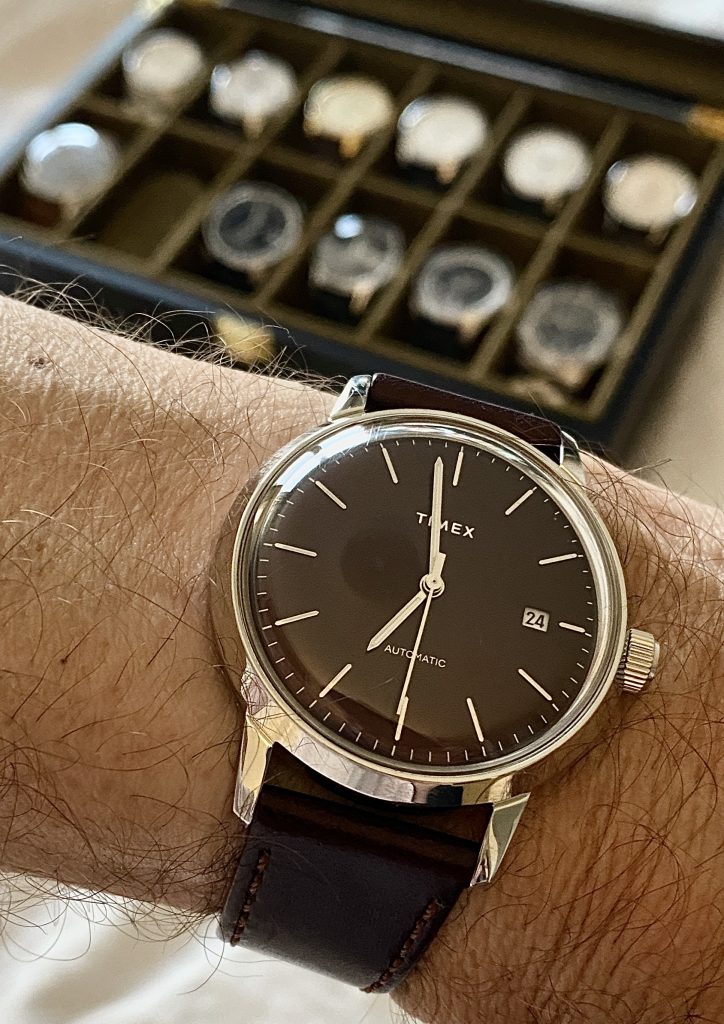
Here, for the record, is what I am wearing on my wrist today:
So how do you do it? As so often, there’s not one answer: there are a few. Here are some of my quick recommendations. I will give you technical tips for SLR as well as for cell phone cameras; a few composition tips; and a few words about post-production.
Technical: SLR
If you are using an SLR or other sophisticated camera, especially using flash, these are my technical recommendations.
Use a macro lens if you can, so you can get closer. But not too close, because that will give you limited depth of field and image distortion.
Use an aperture of at least f/8; when using a macro lens, start around f/16 if you can.
If you are not using flash, especially if using a macro lens, you must use a tripod.
Using available light? Make sure there is lots of good diffuse light, e.g. from a north-facing window (no direct sunlight).
Use an ISO value as high as you need: when using flash, 200-400 is fine; when not using flash, you may need to go up to as much as 1600 ISO or more if not using a tripod.
Using flashes: Use off-camera flash, modified by softboxes or umbrellas; or use an on-camera flash by bouncing it off a white ceiling/wall behind you. Use manual exposure mode. 1/125 sec.
if using a tripod, focus manually (using live view preview).
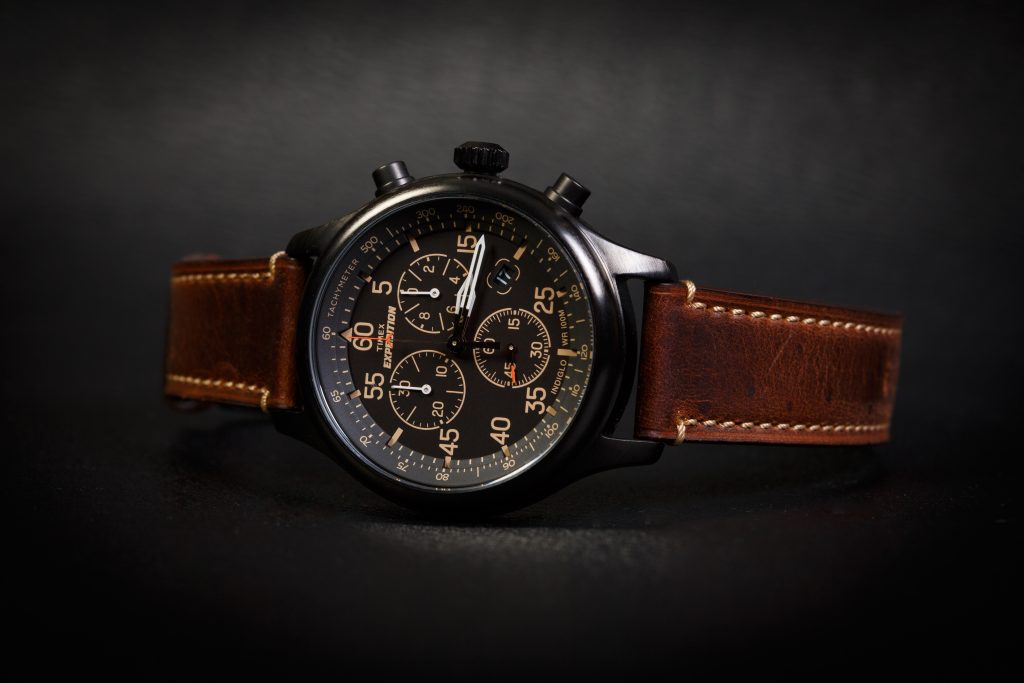
An example, lit with two flashes equipped with softboxes, both 45º above the watch:
Technical: Cell Phone
It is perfectly possible to use a hand-held cell phone, as long as you do the following:
Light, light, light! There’s no such thing as too much light. The brighter your room, the better your picture. Why? Because when it is bright, the resulting faster shutter speeds result in less motion blur, lower ISO results in higher quality, and smaller apertures result in more depth of field).
Avoid direct sunlight, though.
Shoot from a little distance away and crop later. This gives you easier focus with less error, and greater depth of field. If you are close, focus is unreliable and depth of field is usually too shallow.
But sometimes you will want to be close in order to get a blurred background; see the compositional tips below.
Focus on the watch, if necessary by tapping it on the phone screen to tell the phone “focus on this”
Hold the phone – and the watch! – very still while you do all this.
Compositional:
Composing a good picture is the most important thing you can do after the technical requirements are met. Some tips:
A good picture is a simple picture.
Did I mention: A good picture is a simple picture. “Simple” means everything in your photo is there to tell the story – or else it should not be in there. “Simplifying” is the most important difference between a snapshot and a “professional” photo. Crop off anything that should not be in the photo. You’ll see the difference!
Consider using the “rule of thirds” (look it up) – although watch photos can also have the subject in the centre. make it look good.
10:09:31 is the prettiest time for a watch. All watch adverts have the watch set to this “aesthetically most pleasing” time. Just saying.
Turn the watch, turn yourself, reposition everything to minimize the refections in the crystal. Especially with watches without anti-reflective coating, this is important. Find a simple dark background, like a neutral dar wall, if the watch reflects it.
Have background objects help you “tell the story”. Your car, your suit, your hand.
Consider blurring out the background. You can do that without portrait mode, by being close to the watch, perhaps in slightly subdues light. (Yes, that flies in the face of the prior advice: yup, life is complicated and you have to decide what is more important for you!)
For example;
Post-processing
It is very important to post-process your image. This includes cropping and exposure, but also white balance (colour temperature), definition, and sharpness. Your phone can edit photos very nicely: especially recent iPhones do a truly excellent job.
It really is not difficult to make good photos of your watches, jewellery, or other small objects. Follow the tips below and go have some fun. I am looking forward to seeing your results!
Michael is an experienced photographer and educator, who teaches photography courses that are now available live, interactively, online. Check them out and learn more about Michael, his books, and his courses at www.michaelwillemsphoto.com
To emphasize what I wrote yesterday, look here. My grandparents, in 1928 in Tilburg, the Netherlands. In other words: just before they were to set sail to the Dutch East Indies, or “Ons Indië”, as they called it at the time: “Our India”.
They were headed to the city of Batavia, where they settled down, both teachers, and had a family, namely my father and his two younger sisters.
Batavia is now called Jakarta, and the entire family has long since passed away. None of them made it to a very old age, all dying in their 60s or early 70s, probably at least in part due to their experiences for a number of years in several of Batavia’s Japanese concentration camps, including the infamous Camp Tjideng “hell on earth”. The entire family survived, which was not all that common, but they were marked. They never talked about it much: the little I know, I heard from my father’s younger sister Chris.
Willems, G.B.H.
7
7
336
43, 13, 11, 9
3853
In the photo, they were of course unaware of what was to transpire. The line above shows their record in concentration camp Tjideng in April 1944: mother and three children. (A couple of months later, at age 14, my father was transported alone to the “men’s camp”.)
After the war, they were held in the camp by the British for “security purposes” – my father always resented this, almost as much as he resented the Japanese and in particular Emperor Hirohito, in whose name all this was carried out. Not being one to listen to authority, he escaped and walked back to Tjideng–not a very safe thing to do at the time. Shortly after they were eventually released, they were all put on a ship to The Netherlands (which my father had never seen, of course) and handed 25 Dutch guilders and told, basically, to get lost.
In any case, the photo.
First, of course old photos are an invaluable way to travel back in time, and they should be valued as such. Priceless. And they should be preserved (the above version is my restored version of the original, where I fixed scratches, fading, sun discolouration, and so on. If you have old photos, have me restore them.
Second, the actual portrait. A fabulous professional work. Perfectly lit (the technical terms are “Rembrandt Lighting” and “Broad Lighting”. Great expressions. And they are not standing there posed military style, smiling at the camera. They are looking out, to we know not what—their future in the East, perhaps? Or are they looking back at the first half of their lives? She seems more apprehensive than he, pensive, perhaps a little sad, even. He is more “bring it on”, but is holding back somewhat at the same time.
This is what a great portrait should do. So while I understand the liking for “stand there and smile”, it is also a great idea to consider some more artistic portraits, that bring out the subject’s personality. Posterity will be very grateful.
See www.michaelwillemsphoto.com for information about the store/school/studio in Orléans, Ottawa. See you there!
Taking flash photos of events, like family get-togethers, is easy. Here’s how.
Use a speedlight, i.e. a flash on top of the camera (not the pop-up). Put that flash on your camera. Aim it backwards, behind you, 45º up.
Now set your camera to manual mode, 400-40-4: 400 ISO, 1/40 sec, f/4.
(Adjust your exposure, if needed, until the meter shows about minus two stops. That way the ambient light is not too dark, not too light: just right. Goldilocks. Use aperture or ISO to achieve that (or, if it’s too bright, you can use shutter speed instead)).
Now the meter reads -2, And you are bouncing your flash against a wall or ceiling behind you. Then you get this:
……for family pictures. The studio (www.michaelwillemsphoto.com) in Ottawa has been incredibly busy, as everyone wants a photo of their loved ones, if not always themselves. And a lot of these images are fun, as is taking them. A few samples, just of the last days:
This is all enormous fun. Pictures should go on walls, not just on Facebook walls.
Of course I still find time for watches:
…and for art:
Come to the studio to have yours done too, or to buy courses for a loved one, and I’ll teach them how to do all this!
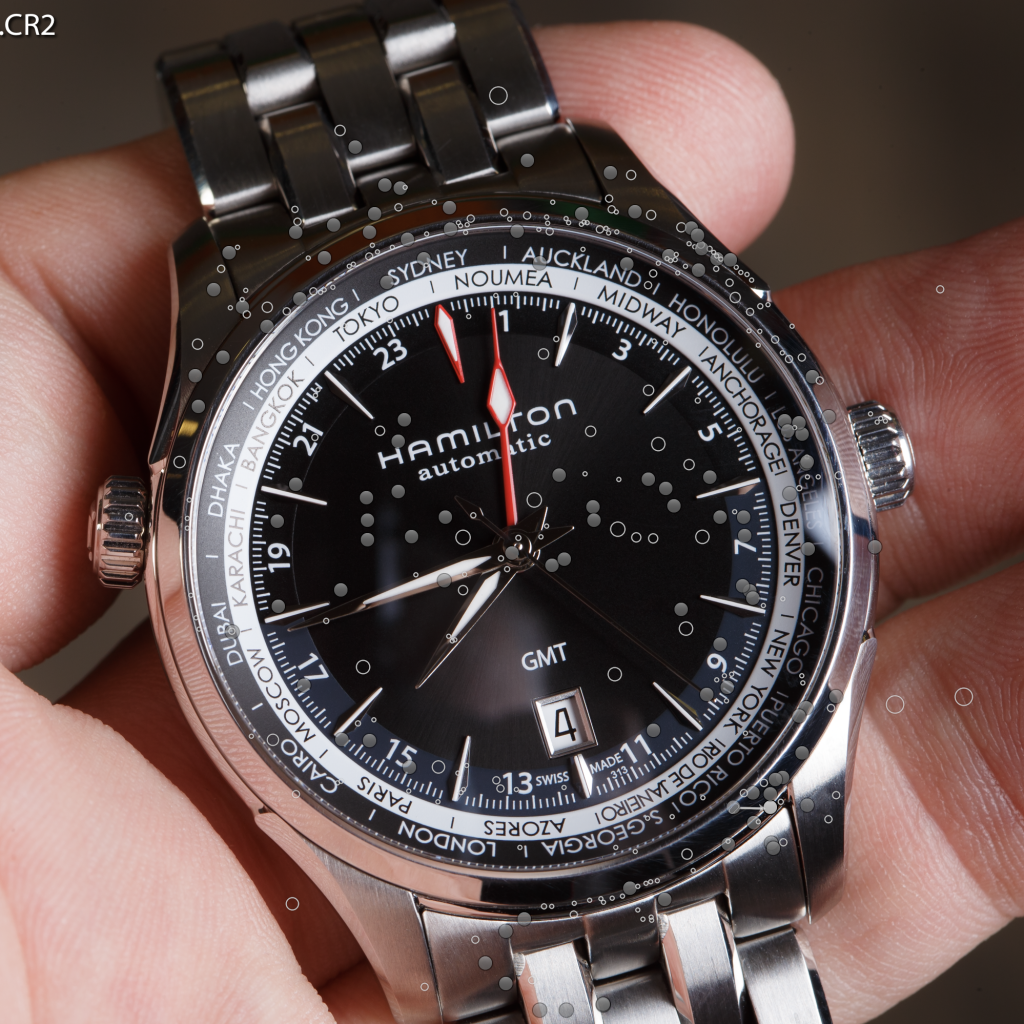
Here’s another picture of my Hamilton Jazzmaster GMT:
The photo didn’t take long to make. But the post-production work, taking out the little specks of dust, would take all day – literally, all day – if I did it fully. The way watch adverts look. All I did was the minimum… which is this:
See the little circles, each of which represents an area where I took out a speck of dust?
The first, completed, picture isn’t bad, but it’s not completely done. It would not be good enough for an advertisement, for example. Click on the image above, and you will see many more imperfections that I would remove if this was an advert.
Just saying: Love a photo editor (and a photographer) today!
And yes, I did all this work in Adobe Lightroom. If you have Lightroom, try this. Edit a photo; select the Spot Removal tool, and click on “Visualize Spots” on the bottom left. Now you can see them clearly! That feature alone – among hundreds more – makes Lightroom actually (I hate to say!) worth the fee and the annoying licensing, where you pay monthly for the rest of your life. There’s no good alternative. Yet!