Filters!

David Honl, whose modifiers as you know I use, and love, just posted a helpful post on his blog. I will show you Part of it right here, namely the corrections you need to make to your flash when using a gel:

image

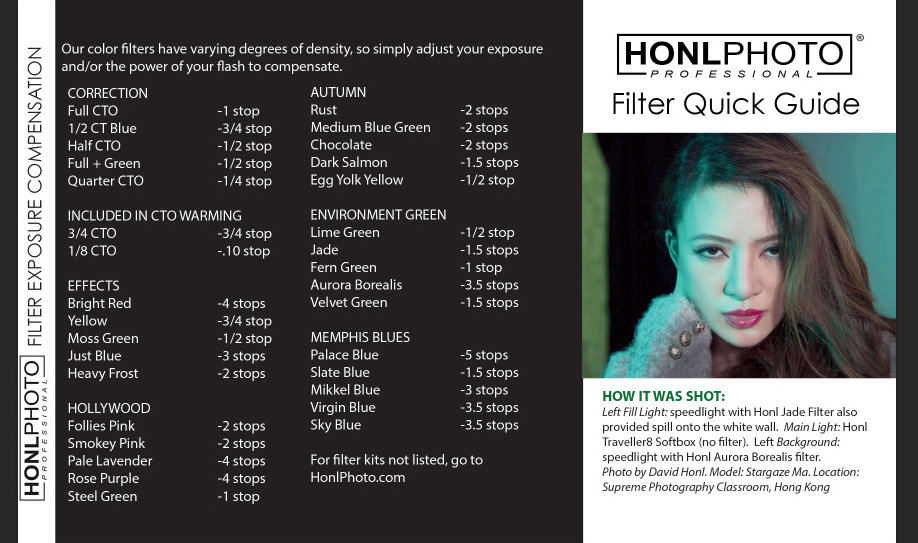
Those are useful Numbers, these will save you a lot of effort when you’re using the gels yourself. Which as you know I’m a big advocate of. This  will save you a lot of effort when you’re using the gels yourself. Which as you know I’m a big advocate of.

There is one thing I want to point out in addition to this though. Namely:

To turn a background into colorful, it first has to be dark.

It does not matter if the background is in reality gray, light gray, white, or even black; what is important is that to the camera ot has to look almost black. Then, and only then, can you add your gelled flashes. Then, and only then, can you add your gelled flashes.

If you do not do this, and if the background is, say, white, then adding color will add nothing except perhaps a slight tint   LIgor is not like paint: you cannot cover a color by putting another color on top.

For many people this is the biggest revelation when they start using color gels… So now you know. I just saved you a bunch of time. As did Dave with his table.

To  buy,  click on the advertising link on the right, and when checking out use code word “Willems” for an additional 10% discount. You’re welcome. 


Another Booth!

I did a few more booths yesterday. Fun as before.

But not simple! This one took 45 minutes to set up, in a restaurant. Setup includes things like computer, printers, USB hubs, connected camera, backdrop, props, pro flashes, and much more:

20160730-MW5D9269-2-1024

Here’s the picture I produced and printed on the spot for everyone, except of course this sample is with my pictures, not my clients’:

photo

Additional to that, my clients get the electronic files, as well. And a web site to look at them on. And I brought an assistant, who is a talented photographer himself.

Why this note? Because I realize how this is now an entirely new photography market. It’s got critical mass now. And it’s fun.

But before you take it on yourself, remember that it’s a) a lot of work, and I mean a lot, and b) complicated technically, and that c) it needs real photography- and especially people-skills. Maybe easier just to hire me: I am available for booths!


Rockwood

Today, Rockwood conservation area in Guelph, a field workshop I taught for www.digitalphotoacademy.com:

20160716-MW5D8996 20160716-MW5D9000 20160716-MW5D8930 20160716-MW5D8933 20160716-MW5D8943 20160716-MW5D8962 20160716-MW5D8968 20160716-MW5D8939 20160716-MW5D8975 20160716-MW5D8987

This type of walkaround course is very good at helping you put theory into practice. If you want to learn, really learn, consider coming on one of my get out and shoot courses!


Booth fun.

Two studio strobes. Computer, with special software. Long tether cable. Two,printers in a pool. USB hub and other tech goodies. Graphic design. Fun props.

That’s how you do a photo booth, so that’s what I did for last night’s wedding, in a reception hall, outside the ballroom. Lots of fun was had, and lots of prints were handed out:

image

image

image

image

image

image

If you’re having some kind of event, check me out. It’s not costly (around $300 for a two hour booth, say, including a pro photographer, travel, all euiopment use, custom template design, and professionally made “made on the spot” 4×6 glossy prints.  Going home with a fun picture makes the evening’s memories so much more “real” for the guests, and having a booth like this encourages people to have fun.


ISO guideline

FROM SEVEN YEARS AGO: What ISO setting to use? High is good for shooting without blur or shooting in the dark but gives you noise (“grain”). What is optimal?

The following may help.

If you do not use AUTO ISO, my rule of thumb for starting points is:

  • Outdoors, or when you are using a tripod: 200 ISO
  • Indoors: 400 ISO (whether or not you are using flash)
  • Problem light, such as museums or hockey arenas: 800 ISO

You can vary from there of course, but you will not be far off.

Here’s an 800 ISO handheld image (200mm, non-stabilized lens). It won me a media award:

TODAY: so what has changed? Only that you can now shoot, on a modern camera, at higher ISOs before you start no notice grainy noise. What worked then works now—but you can now go higher, sometimes much higher,  without noticeable noise. Life is good.

There we go again.

On the BBC news front page recently:image

You will notice the flash warning. Lobbying in England by an epilepsy group has resulted in this warning being displayed in all media whenever there is flash.

Because a few people react to flash. Only a few, and only when they do not take their meds, and only if the flashing is repeated at a rate of around 25 Hz, of course; but that’s beside the point, apparently.

It is a shame that there is no regard for reasonableness in these knee-jerk reactions. I can see the day that flash is illegal anywhere in a British public space… preposterous. Now if they said “we prohibit repeated strong stroboscopic flash at a rate of 25 Hz, deliberately aimed at large audiences”, it would perhaps be a different matter. Perhaps.

But superstition rules. Flash in news. Cell phones at gas stations. WiFi and Peanut butter in schools. Vaccinations. All of these  represent either some danger or some possible but unproven danger or no danger, just superstition. But when there is danger, the question is “how much? ” And it is there that policy makers fail. Obviously we accept danger in life, otherwise we would all live in tents in open fields, ride bicycles limited to 2 km/h, and wear helmets 24/7, and have police officers assigned to every family 24/7. We would not have airplanes either, or electricity or cars. Clearly, that is nonsensical: we accept risk. And the risk involved in flash photography is extremely minimal. So carry on flashing, speedlighters: no fear.


A reader asks

A reader asks:

I need your device on buying a secondary speed light . I currently have the canon 430 Ex 3 RT  speedlite. I wish to purchase a second speedlite.  Should  I purchase the Canon flagship or should I buy a secondary 430 ? Are the 430’s more than enough for off camera work? Does it make sense to purchase a speedlite with more power? Any advice would be helpful ?

Well. “It depends”.

If your camera cannot use its pop-up flash to drive other flashes, then buy a 580/600, the flash that can be a “master”. The 430 can only be a “slave”.

Also, the 580/600 are more powerful. And they can rotate a full 360º, which is important when bouncing.

Or… you could do it all in manual mode with all remote flashes. using radio triggers like Pocketwizards. In that case, buy cheap flashes, like 430s or the even cheaper Yongnuo clones.

The choice is yours.

____

The Pro Flash Manual gives you more information: see http://learning.photography

Workshop and then some

So tonight I did a great workshop in North Toronto. Great because the six participants were very enthusiastic and they really, really got it.  That’s how it goes when you:

  1. Hear it a second or third time
  2. Practice it yourself rather than just listen.

And that is what tonight was about.

You can have a lot of fun with one flash. In this case, one flash with a grid. Off-camera and fired with Pocketwizards.

20160505-1DX_8142-1024

Two flashes, one with an umbrella on me, and one with a chocolate Honlphoto gel on the background, gives us yours sincerely:20160505-1DX_8145-1024

You like that? Then learn some flash techniques from me, any time. It’s all just technique, as Peter West once told me. True say!


Truth—a beginner’s tip

Theories are best tested. Like the theory of exposure. Which, as it turns out, actually works. Let me show you.

Think: You are filling a bucket. Your aperture is like a faucet. Your shutter speed is “how long do you told the bucket under the tap”. Together, the time and the stream of water fill the bucket.

So here’s f/22 at 1/4 second. A triple of water, so filling the bucket is a slow process:

20160223-1DX_6957-1024

That should be equivalent to:

  • f/16 at 1/8. We open the faucet, but reduce the time.
  • f/11 at 1/15. We open the faucet more, but reduce the time more as well.
  • f/8 at 1/30… and so on:
  • f/5.6 at 1/60
  • f/4 at 1/125
  • f/2.8 at 1/250
  • f/2 at 1/500
  • f/1.4 at 1/1000

And indeed it is. Here’s f/1.4 at 1/1000:

20160223-1DX_6967-1024

You should be trying this stuff, not just reading this. We lean by doing. Muscle memory!

Bonus points:

How do I know the first one is f/22? Look at the star from the lamp top right. Star means small aperture (high f-number).

Why is the other lamp green in the fast shutter picture? Because it is a fluorescent light. It goes on and off, and changes colour, 60 times a second or more. A fast shutter speed will catch that. Your shots are all going to be a different colour/brightness.


Tip: Get my books at http://learning.photography. Amazing books which will have you actually understanding your camera and what to do with it, in record time.