Taking A Cat Snap

As seen in the previous post: Mau, just now:

20161012-mw5d1272-1200

So what are the salient technical points of this photo?

  1. I have two flashes aiming toward the camera and toward Mau Mau from the back, providing back- and rim lighting.
  2. Back- and rim lighting provide “3-D” modelling and drama, and light the whiskers well.
  3. But the white bedsheets (and I!) reflect enough back so there is some forward lighting also.
  4. Camera: manual mode, 100 ISO, 1/200 sec, and f/22:
  5. So that is the “darkest” possible ISO, the “darkest” possible shutter speed (“sync speed”), and the “darkest” possible aperture this lens offers; alll this to completely kill the bright ambient light (and at this close distance the flashes are super bright, so that’s not a problem).
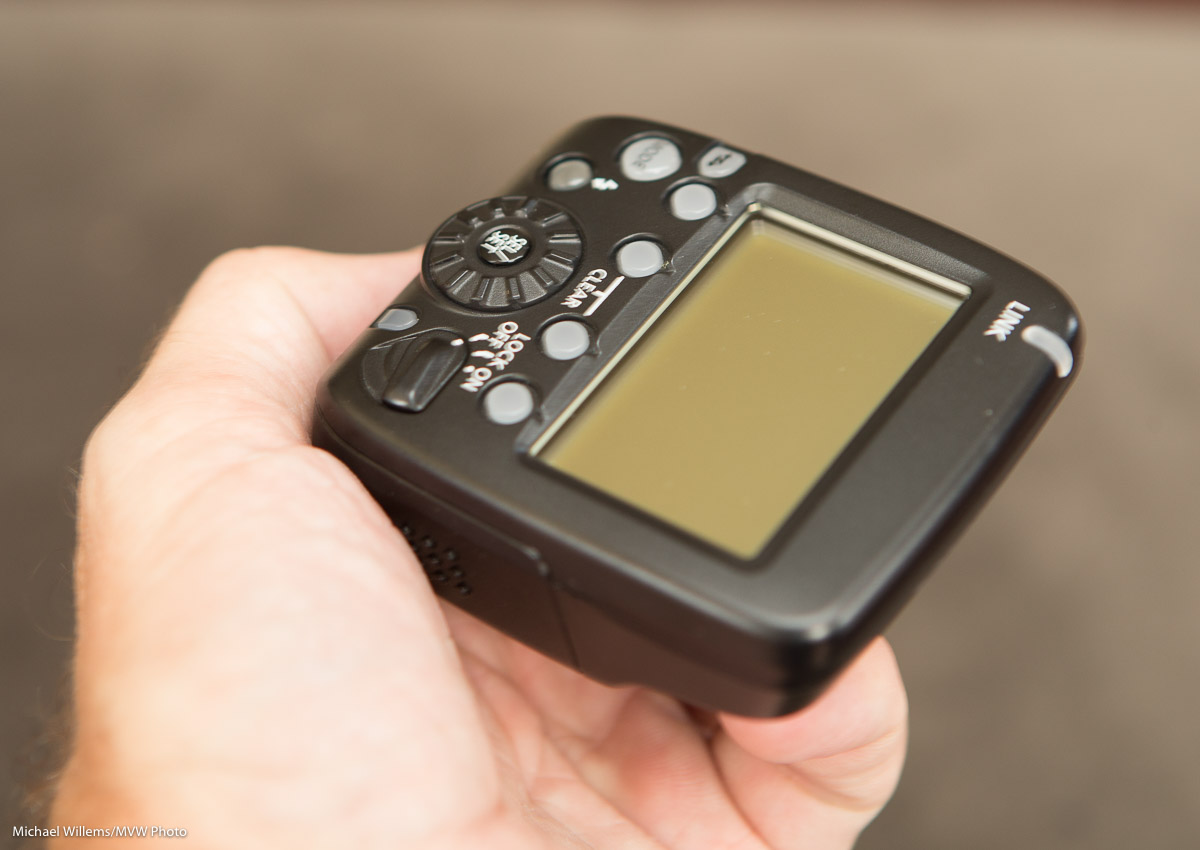
  6. I used a Yongnuo YN622C-TX wireless controller on the camera, and a YN622C connected to each one of the flashes.
  7. These flashes have to be 430EX MkII or 580EX or 600EX, or equivalent: the old 430EX with the switch does not work here. Much as I like the switch, this is a situation where electronically setting the wireless mode is a must have.
  8. Although this setup supports TTL, I used manual power setting for the flashes, 1/16 power worked fine in this case (trial and error). Manual power setting is the way to go, if you have any control over the environment.
  9. You should lose any filters you may have on the lens: they will often increase flare to an unacceptable level. They certainly will not make the picture better.
  10. The lit eye is in sharp focus; of course at f/22 there is quite a lot in focus. Eye and whiskers are essential.

As you see, beyond the obvious, rather a lot of thinking can go into a simple picture. And few of these are “the only way to do it”. That is why photography is such a cool artistic endeavour.

So if few of those are “must do this way” points, why list them?

Because it is more important that you think about all these things than what you think about them. In other words, an analytical approach to photography helps you create repeatable art, where a photo works a certain way because you want it to, rather than “by accident”.


Mistakes are how we learn…

….and I can make them too. Today is an example.

I just bought a used Canon ST-E3-RT wireless flash control transmitter. A great piece of engineering. And also a good piece of business, for Canon. And also a mistake, for me.
20161011-1dx_1235-1200 20161011-1dx_1236-1200 20161011-1dx_1237-1200

Because as I told the seller, “This one does radio as well as IR, IIRC”.

If I had only looked that up instead of relying on my recollection! Because no, it does not do light/infrared control. It only does radio control. Meaning I can control 600EX flashes, but not the six 580EX and 430EX flashes that I own. My only 600EX is faulty and needs an expensive repair or replacement.

So I have a controller that is a marvellous piece of engineering, but it only controls 600EX flashes that I do not own. Review some time when I do own 600EX flashes!

And careful when you rely on recollection. “IIRC” (if I recall correctly) implies that you might be wrong. Which I was.

Why is this flash, as I put it, a great business move? Because it forces photographers like me to buy only new 600EX flashes, and yo discard their 430EX and 580EX flashes. Which would be fine if it was one flash… but I have six of them!

Moral of the story? Check things before you trust your recollection; every time you say “IIRC”, realize you could be wrong.

(PS: Anyone looking for an ST-E3-RT? 🙂 )


How can you be sure?

“How can you be sure you used a flash?”, asked a student. She meant in this image:

20161007-mw5d1126-1024

Several ways:

  1. I remember.
  2. The wheel would be dark without a flash.

But most of all: just look. Zoom in. and you see:

screen-shot-2016-10-09-at-03-44-19

Et voila! See the photographer? C’est moi. Avec un… quick, what’s a flash in French?


Little things.

I taught a 2-hour presentation in London, Ontario on Thursday night. The London Camera Club made me feel welcome, and was very receptive to my message about flash photography. Lots of members bought my e-books, and several signed up for my flash courses on 16 and 23 October.

(Both courses are now full: if you wanted to take part, send me an email: I will repeat the workshop again in the next weeks, if there’s demand).

Nows for tonight’s tech tip. Look at this image from today, when I was shooting a horse farm in Adjala, Ontario:

20161007-mw5d1126-1024

I shot against the sun, so I used a flash to light up the Camaro—else, the wheel would be dark.

Consider the star-shaped reflection in the bumper. And there’s the star shaped sun rays. Why the star shape?

The answer is simple:

If you want a distinct star shape in your hot spots, stop down to a small aperture (high f-number).  So this was shot at f/16.  And one more tip: shooting against a light source like this, leave off your “protective” lens filters. Otherwise you will not get this: all you will get instead is flare. 


Oh vanitas vanitatum, omnia vanitas.

An ancient Latin saying. Obviously ancient if it’s Latin.

And a self portrait, obviously not ancient, unless perhaps my age puts me into that category.

Michael Willems

Oh vanity of vanities, all is vanity.  Manual focus on an object that is sitting where I will be. Then use the timer shutter release. Camera on a tripod. or on a table.

So is this a “vanity” photo?

No, it is more of a storytelling photo. Photos can be more interesting if they imply that there is clearly a story behind the photo, and it is not a straightforward one like “happy clown”.

If you are on my course: much more coming. If not: get the books, come back here, and keep reading. Enjoy!


All sorts of everything.

I am shooting a three day event, a conference, at Niagara Falls, while my son house-sits back home. So I shoot lots of speakers and so on,
20160915-mw5d0313-1024

And I love this kind of shooting because if done well, it leads to so many “oh wow” reactions.

But only if done well, and it is complicated:

  • I am using a long lens (70-200) without flash, and on another camera, a wide angle lens (16-35mm on a full frame camera) with a flash, so all settings are totally different from shot to shot.
  • Many, many different environments. A large ballroom. Hallways. Smaller rooms. Restaurants (several). Easy bounce, Then, no bounce. Then, difficult bounce. Coloured walls. Every shot is an engineering challenge!
  • Speakers who will not stop talking, or stand still, or even turn the same way, for a millisecond.
  • Dead batteries all the time.
  • Heavy cameras, two of them. And the arthritis in my hands doesn’t make this any easier.
  • The need to minimize post-production work. Hundreds of times “just a moment or two” means many moments, and that means “hours and hours”..
  • Tough environments including “dark inside with bright outside also visible in the shot”, like this:

20160916-1dx_0435-1024

But it does not end there…

  • TTL does not always work well when there’s reflections, so I have to use Manual flash setting for a lot of the work. And that is sensitive to changing the distance to the flashed object (“inverse square law”).
  • Impossible white balance.
  • Bouncing means direction, and you need to think about that direction: “Where is the light coming from?”

So I really have to work for my pay. Fortunately, I love my work. And there are ways to make it easier: start with good starting points, like the Willems 400-40-4 rule (look it up) as your basis, and adjust from that basis. When you take my courses or buy my e-books, you will learn these starting points.

And then you can shoot quickly and get great colour, and with a modern camera this applies even at high ISO. Here, for example, is beauty:

20160916-1dx_0494-1024

No, I did not mean the girls. Well, yes, they are very beautiful, too, but I really meant the venue and the colours. This is why I love flash.

In the next few days, some more about this shoot. It is 1:15 AM and now, finally after a 16-hour non-stop day, I get a rest. But only until 7AM.

And then back to Black Betty, who is waiting patiently in the garage for me:

20160916-mw5d0486-1024

And then tomorrow evening, I run a photo booth, 80km away. No rest for the wicked!


Shutter speed isn’t all there is to shutter speed.

“Shutter speed” isn’t all there is to shutter speed.

Uh oh. Michael is The Oracle. What on earth does he mean by that confusing statement?

Well, let’s have a look. Let’s set up a couple of gelled and gridded speedlights (using Honlphoto grids and gels) and get a talented life model. Which is exactly what I did in August 2012 at Brock University, during the 5-day flash course I was teaching for the Niagara School of Imaging.

But wait. Because I want to show you the setup, let’s allow in some ambient light. To achieve this we use a really slow shutter speed, of 0.6 sec. More than half a second, in other words. That lets in some ambient. Not a lot, but enough to see the classroom, some of the equipment, and so on.

The picture, showing the setup with the two flashes, below. Look at the two little gelled speedlights, can you spot them? Purple gel on the left and yellow gel on the right:

tumblr_m94klicvuq1qfts2ko1_1280

OK. Great. Blurry as heck, of course: 0.6 seconds is ridiculously slow. Impossible to hold still. Right?

But wait. Lots of blur, yes, all over the picture, but look carefully. Click on the image to see it full size, and now look carefully at the model. What do you see?

She is sharp. No blur on her: she is tack sharp. There’s blur all over, but not much on the actual subject. A little “ghosting”, but she is substantially sharp.

But that’s impossible: the shutter speed was 0.6 seconds. So she must be blurry! Right?

So that’s where I say “‘Shutter speed’ isn’t all there is to shutter speed”. The shutter speed may be 0.6 seconds, but the model is lit primarily (almost exclusively) by the flashes. And the flashes flash at 1/1000 second or faster. At 1/4 power, they flash for just 1/4000 second. So while the shutter speed may be 0.6 seconds, as long as the subject is lit only by the flashes, our effective shutter speed is 1/4000 second!

And that is why you see a sharp model: there is very little ambient light on her, so the effective shutter speed is determined almost exclusively by the flash speed. Which is very rapid.

So now let’s do a normal shutter speed, of 1/125 sec, so the ambient light is cut out. And here is the finished product:

tumblr_m94knozSgL1qfts2ko1_1280

So anyway. This is a studio shot. So I want no ambient light: the second picture, in other words.  But when I shoot an event, like a wedding reception, I want to let in some ambient light to avoid those cold, black backgrounds. Instead, I want a nice warm background. To achieve that, I am happy to shoot with shutter speed as slow as 1/15 or 1/30 second. And now you know why I can get away with that.


Yaay! Natural!

You have all heard about the grassroots campaign against dihydrogen monoxide?

This chemical, which if ingested in large quantities can be deadly, is present in most manufactured foods. It is even in our water supply.

Which is not strange, considering the fact that “dihydrogen monoxide” is just another way of saying “H2O”, i.e. water.

The reason this joke works is that people have been conditioned to like “natural”, eat “natural”, and to resist anything artificial. As though Ebola, disease-carrying mosquitos and bone cancer aren’t “natural”!

And we see the same in photography. Oh so often do I hear people proudly proclaim that they use “natural light”.

That is fine, nothing against that. I use available light quite often. But to be proud of it? To me, that’s like proudly saying “I am walking to Rome!”. Personally, I’d rather be carried there on a luxury yacht, or in a Saudi royal’s personal 747 with golden faucets. And similarly in photography I use the tools that suit my needs. Whether they are “natural” or not. I am as happy using flashes as I am using sunlight. Except flashes give me more options in more conditions.

So I’d say, use what works for you. Whether it is “natural” or not. And learn all types so you have the option when needed.


Flow, or moment?

As every photographer knows, you use shutter speed to either blur, or freeze, motion. That is what the shutter is for, creatively speaking.

A slow shutter speed, like 1/10 second, gives you blurred motion, as in this photo I took at a country music event the other day:

20160820-MW5D9704-1024

While a fast shutter speed, like 1/800 second, freezes motion:

20160820-MW5D9702-1024

See the difference?

Incidentally:

Q: If picture 2 was taken at 1/800 sec, why is it not darker than the first picture, which was taken at 1/10 sec? Over six stops darker?

A: Because at the same time as selecting a faster shutter speed, I selected a larger aperture: f/1.4 for the second picture, as opposed to the f/22 I used for picture 1.

Anyway. Here’s the core question I get quite often from students:

What drives the decision “do we blur or freeze?”

First, a flow looks better blurred, while something that happens as a moment in time looks better frozen. So generally speaking, for a fountain like this I would use a slow shutter speed.

What constitutes “slow”? See this excerpt from my Book 7, Pro Photography Checklists: 100 checklists, summaries, and Best Practices.

Screen Shot 2016-08-13 at 17.04.29

What is slow, and what is fast? 

So, OK, slow or fast determines motion: blur or freeze. But there are other considerations. Like “do I want a blurred background” (which would mean a low f-number, which in turn would mean a fast shutter)? And like aesthetic considerations: the frozen fountain looks kind of cool, in this particular case.

And so it is with many photography decisions: you have a rule of thumb, a starting point; but then you interpret that creatively. That goes from everything from motion to colour to the rule of thirds. You are the creative driver, not the book or the camera or social pressure.

So if you have a reason to not use some established rule or starting point, then by all means do what you want. (In the absence of such a reason, though, go with the recommended Best Practice or Rule of Thumb.)


The beauty of a prime lens

Why do we like prime (non-zoom) lenses? Like the 35mm f/1.4 Canon lens I used for today’s snaps of the granddaughter, who is almost two? Because they rock, that’s why. 

20160828-MW5D9762-1024

With a prime lens you get:

  • Sharpness. Typically, prime lenses are very sharp.
  • Consistency: unlike with a zoom lens, every shot in a shoot is the same in its tolerance for motion, in its depth of field, in its look-and-feel, and in its showing of perspective.
  • Large aperture (low “f-number”).
  • …meaning blurry backgrounds when you want them, like in the snaps above.
  • …and meaning fast shutter speeds (over 1/1000th sec in these shots, at 200 ISO).
  • The ability to shoot indoors without a flash.
  • Low weight.
  • Less to worry about.

Today’s shots? Simple snaps. Taken in Aperture Priority mode because I had less than a second to shoot. Although I generally shoot in manual exposure mode, there’s always the exception, and this was it.

20160828-MW5D9763-1024

I was in “One Shot” AF mode (“AF-S”, in Nikon terms), which works fine if you are quick, even with a moving baby. Yes. I could have used “AI Servo” (“AF-C” for Nikon users), but again, there was no time. Seize the moment!

What is important is that I focused (with the focus button on the back of the camera, rather than the shutter button) really quickly. Using one focus point, aimed at, you guessed it, the child’s eyes.

The sequence: Aim at eye—Focus on eye—Recompose—Shoot. And all this within a tenth of a second, because almost-two-year-olds do not sit or stand still. Sounds difficult? It is, but with a little practice you can do it.

So at f/1.4 I got two big advantages. First, the large aperture results in a nice fast shutter speed, so there is no motion blur, and there is no need to raise ISO, so I get great quality. Second, the large aperture gives me a super blurry background, which is great, because since this was in a living room rather than a studio, the background was messy. Blur it out and it doesn’t matter; and the subject stands out from the background too. A win-win-win.

20160828-MW5D9765-1024

Just remember: focus quickly, and make sure the eyes are sharp. The rest is optional, pretty much.

And then you can concentrate on what is important. The baby. Not the f-numbers, the focus points, the lens’s bokeh quality, or other technical properties of your equipment. Those are just tools. The child and the moment are what it’s all about.


Depict your life. You have just one, and it’s great if you can make a record of the things you do and see.  Years from now, my granddaughter will be happy to have good pictures of herself as a young child.