Softly, softly

“What is a softbox used for?”, I often hear. “To soften light”, I respond. But it occurs to me that showing you is probably worth a lot more than telling you.

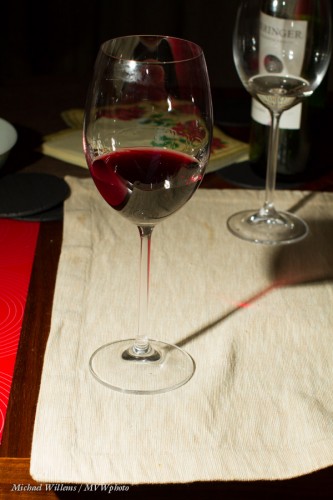
Here’s a picture of a wine glass, taken last night to demonstrate exactly this point:

As you see, I used off-camera flash, so it’s not too bad – but look at the shadows from the glasses’ stems. They are well delineated and sharp and clear. We call that “hard” shadow, caused by “hard” light.

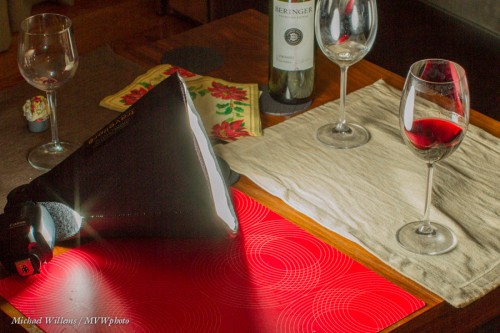
Now let me put a little softbox on the flash:

I used a Honl photo Traveller 8 softbox – one that folds up to basically a flash nothing, and is light and sturdy. A very useful tool, and I always carry one or two.

What does it do? It modifies the light (a “modifier” is anything that changes the direction, size, or colour of the light) by making it bigger. A large light with respect to the subject avoids sharp shadows: the larger the light, the fuzzier (“softer”) the shadows become. Now look at the shadows coming from the glass:

What shadows? They are almost gone now! And that is what a softbox does. Even a small softbox, if close to the subject.

Why “close to the subject”? because what matters is how large the light source is with respoect to the subject, or, if you prefer, “as seen by the subject”. Small gives hard light; large gives soft light. Take the sun: it may be large, but as seen by us, because of its distance from us, it looks small, so it gives hard light. This 8″ softbox, on the other hand, may be only 8 inches across, but because it was close to the subject it looks large. Hence, soft light.

The softbox is better than an umbrella in the sense that it does not throw light all across the room. That is why the softbox is my favourite light softener, and that is why I usually carry a number of them, large and small, when I shoot.

___

My new e-book “Pro Flash Manual” discusses this and all sorts of other modifiers in detail, of course, as well as teaching you the rest of flash, all in once go. It’s a PDF; just $19.95, contains 123 unprotected (i.e. easy to read and copy) pages, and you can get it here now.


Gel trick

One thing I sometimes use gels (like my favourite Honl Photo gels) for is to allow me to do background shifting – later.

Let me explain.

Say I take an image of myself like this, with a light blue gel on the flash that lights up the background:

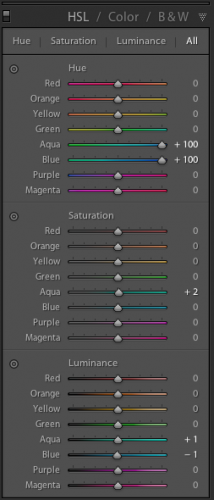
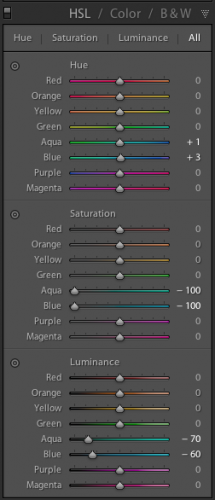
If I do not like that colour – provided it’s a different colour from whatever I am wearing and from my skin – then I can easily change it. In Lightroom, I find the image; then I go to the DEVELOP module; then I select the HSL pane; and in it, change the Hue of the colour (which I select with the pick tool, the little red circle on the left):

And that turns the Aqua and Blue to Purple:

Instead of the hue, I can also change the saturation:

If I drag it down to zero, as in this example, then the colour disappears!

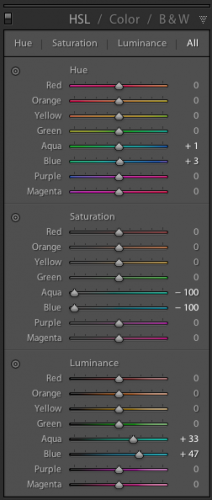
Now, I can change the luminance (brightness) of the area that was originally coloured:

And dragging it down makes the area darker:

So just because I used a specific colour, I can do “studio work” after the fact! Of course I keep these adjustments to a minimum: major changes would not be a good idea (you can get funny edges and noise). But the fact that it is possible, and easy, is often very helpfu;l during real-life edits. Personally, I like my last picture best.

___

LEARN WITH ME – NOW!

  • Who is coming to Oakville this Sunday, noon-4pm, for a Flash course?
  • Who is spending five days in my course at Brock University this August (the Niagara School of Imaging)? There’s still space: my “demystifying digital flash” course is indeed on, so book now! Here’s a video about this course: [click here]


Reader Question

Today, reader Rita asks:

I was wondering if you might have some insight into this issue I’m having.

Shooting with Nikon D800. Off camera speed lights  – SB900 and SB800. Using Pocket Wizard – TT5s on the speedlights, TT1 on the camera, along with AC3 to control light coming out of speedlights. (zone controller).

The issue that I’m having (even on full batteries) is the delay. When I press the shutter, the shutter doesn’t actually release until well after my finger has stopped pressing the shutter. It’s worse than a point and shoot!

I was with Sal Cincotta on a workshop and he was shocked! He shoots Canon, and didn’t have a solution. Have you heard of this? Am I doing something wrong?

Rita followed up by saying she wanted the non-TTL Pocketwizards, but they were not available; and she is using second-curtain shutter sync.

Good question. OK, let’s start at the beginning. No, I doubt very much that you are doing anything wrong.

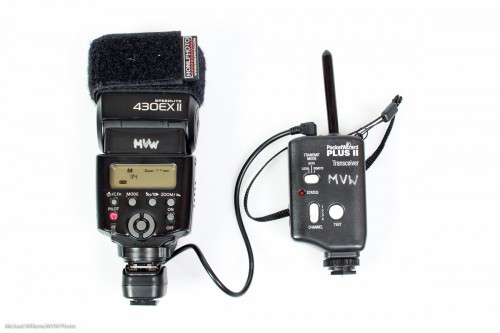
A "Manual Only" Pocketwizard connected to a Canon flash via a flashzebra.com cable

Yes, Pocketwizards need time to send all those pesky TTL signals back and forth (“group one: fire preflash. Now, group 2: fire preflash. Now the real flashes” – etc). Hence, there is extra delay.

When you are using multiple group TTL (group A, group B, etc), this is even more noticeable; and second-curtain sync, especially if you are using a slower shutter speed, will make it even worse. And Nikon is noticeably slower than Canon – even using normal light-driven TTL, on a Nikon most people can see two flashes, while on a Canon, you perceive the two flashes as one since they are very close together.

I have not tried the Nikon version of the TTL Pocketwizards, so I cannot say – but I am not surprised to hear you say this, alas.

Here’s my take on it.

First, I think these TTL Pocketwizards are too ambitious. The engineers who make them have to reverse-engineer the secret Canon and Nikon commands: not a recipe for great technology. Which is why the Canon version took several years to become reliable. And the Nikon version followed the Canon version, i.e. is less mature.

Second: I will never consider any device that uses “special” batteries, if there is an alternative. One of the biggest selling points about the regular PWs is that they use regular AA batteries, not special AAA123 batteries or whatever they are called, that cost $10 and are impossible to find anywhere. End of story, for me.

Third: when I do complex off camera flash, I prefer to use manual flash power settings anyway, meaning I do not need TT1/TT5 Pocketwizards and can now buy the $99 simple model.

So – Rita, while it is possible there is an issue of some sort, I fear that this may just be the inherent drawbacks in your system. But here is what I would check:

  1. Have you ensured that both your camera and the PW’s have the most recent firmware?
  2. Try without rear curtain sync, and with a fast enough shutter speed -what was it, in your case?
  3. Make sure there is a good path from transmitter to receiver and they are close together (for the test, anyway)
  4. Ensure that you have fresh batteries in everything, flashes and PW’s and camera.
  5. Set the PWs to the old channels. This might well help.
  6. Try using manual focus, just in case.
  7. Ensure you have a fresh, formatted memory card, and if necessary, reset your camera to defaults, to eliminate anything else.


Does that make any difference? If not – ask PW support for specs (what is normal?), and if that is too slow, as I fear it may be, then sell the TT1/TT5s and buy some of the new $99 ones. Extra benefit: You will then be able to use any flash (Canon, Nikon, Minolta) that has manual power settings!

___

LEARN WITH ME – NOW!

  • Who is coming to Oakville this Sunday, noon-4pm, for a Flash course?
  • Who is spending five days in my course at Brock University this August (the Niagara School of Imaging)? There’s still space and my “demystifying digital flash” course is on, so book now! Here’s a video about this course: [click here]


Travel Trick

A travel trick I have mentioned here before, several times.

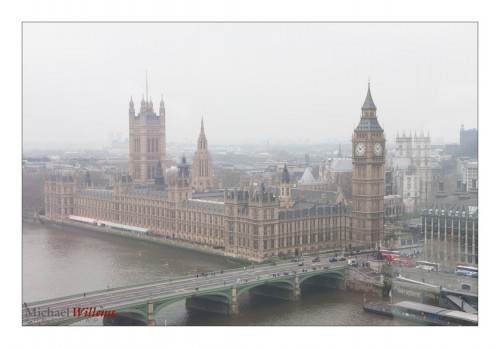
Say you have this.

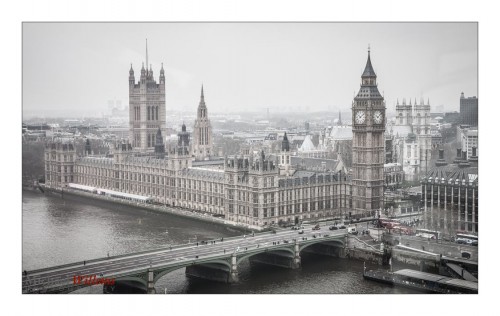
One solution is to electronically increase contrast:

But you can also put a sharp object in front of the hazy background. Like this:

This gives you the effect of 3D “depth” (the “Close-Far” technique), as well as what I would call “excusable haze”. meaning, the haze has an excuse; no-one will blame you for it. In fact it can help make your foreground object look even sharper.

Those images were from April 2008, by the way.


I will lern u, k?

That is, of course, not English. I know.

So let’s talk about teaching and learning for a moment, can we?  I teach, as you all know (see www.cameratraining.ca), and many of you are filled with a burning, and healthy, desire to learn photography. So let me talk for a minute about how to learn.

Teaching is a real skill, but so is learning. There are “ok”, good, and better ways to do both. I specialize in this, so I have given it some thought, as regular readers know. Let me share some of my thoughts.

Recent Timmins Workshop (Photo: Michael Willems)

To learn well, you should consider the following ten tips. Most of them are mine – but guess what: some are based on a class I took on “learning to learn”. This class was taught by my old Latin teacher: I was 13, she was 2,000 years old. or 60. To a 13-year old, those are identical. But she had some useful advice.

And guess what: what worked 2,000 years ago still works today. Our brains have not changed.

  1. Find a good teacher. If your teacher is not good, or it doesn’t click – forget it. A good teacher is someone who can communicate,  not just someone who knows the subject. Einstein was a genius, but by all accounts, he was a lousy teacher. Check references.
  2. Listen. The person teacher is taking you somewhere. Just for a minute, forget your own ideas, your own preconceived notions, go with the flow, and listen to where your teacher is taking you. He or she is doing that step by step, in a logical fashion. Listen. Follows the steps. There is time for your questions: if after you listen carefully you still have your question, ask it, but first listen and follow the logic. The teacher has put a lot of thought into this, and you can be assured that if you listen, you will learn. Give the teacher a chance, and listen and follow the logic.
  3. Ask! If you do not understand a step in the teacher’s logic, ask. There are no stupid questions. So many people are too scared to ask – they will not learn ass well as those who do. You are intelligent, You are not stupid: You must ask if it’s not clear. And if you need more time, or you need to hear it again: ASK.
  4. Avoid “BUTBUTBUT” until you have listened. You are intelligent, and you have thought of 12 objections already. The thing is – so has your teacher. What’s more, he has taught this class 100 times before, and he knows you – so he knows what you are going to say or ask about a minute before you do. Really. It’s worth just relaxing and going with the flow. I have often noticed that the people who constantly do the “butbutbut” thing often do not learn as quickly as those who go with the flow. “But…” shows you are thinking, and that you are intelligent, but when taken to extremes, it can get in the way of learning.
  5. Pay attention. Do not spend more than 10% of your time taking notes. Notes are good, writing helps you remember – but if the notes are at the expense of listening: waste of time. Instead, photograph slides (assuming the teacher allows – ask!) and write them into longhand after the class. This “writing” thing is extremely useful.
  6. Understand rather than memorize Give your self a break: a class need not be remembered immediately, It needs to be understood. Big difference. If you understand, then you will remember soon enough – with some practice.
  7. Practice. We have muscle memory. Everything you learn must be practised after the class. it is only after extensive practice that you will memorize.
  8. Read. Read books to complement your class learning. The combination is what really, really allows you to learn new skills in depth.
  9. Repeat. Repeat. Repeat. Repetition of reading, practicing, going over notes: even taking entire classes a second time, is extremely useful. It’s OK to get only 10% of what you are reading. Next time. you’ll get 20%.. and so on.
  10. Take live classes. The reason they work so well is that you can interact – it’s two way communications, not one-way being talked to.
  11. Join others. For instance, you can join all sorts of forums of people who have the same interests and are taking the same classes.
  12. Take a break or ten. I often learn in 5- or 10-minute segments. Anything more, I get bored. So fine, five minutes, then I go do something else, then I get back to it when I feel like it.
  13. Ask for analogies. “Can you give me examples?” is a very powerful question for you to ask, or “can you explain in another way?”. And do not be afraid to ask.
  14. Learn the important stuff. Do not confuse a concept, technique, or technology with “the buttons you press to use it”. When I explain exposure compensation, say, I can see in a class of 20 people, there will be 5 or 6 who spend the next ten minutes on;y trying to find the buttons, and hence not listening. What’s important is “what is it and how does it work”, not “quick! help! what buttons do I press?”. From my experience, this is one of the biggest barriers to learning in older people, who worry about memory and buttons instead of understanding and concepts. Drop that barrier, and listen to what’s important. Once you understand the concept, the buttons are much easier.

If you follow the above advice, and see you and the teacher as a team with the same goal, you will learn quickly and effectively. Really – it works. Give it a go. You will learn at least five times more quickly.

If you have bought my lastest book, the Pro Flash Manual, you will see I spent a lot of time designing the logic. Yes, you design courses and books and even articles. Anyone who buys it, pay attention to that logic. It’s the quickest way to learn.


Forest

Yesterday, I was in a the woods near Susquehanna, Pennsylvania, shooting this:

An abandoned schoolbus, once used as a hunting lodge for locals now long forgotten.

No light except available. You can see what lens I used, yes? Wide angle – 16mm (On a full frame camera).

As for settings, how did I arrive at the right settings?

  1. I set the camera to Manual mode.
  2. I wanted f/4, so I set that first.
  3. Then I wanted a sufficiently fast shutter, say 1/40th sec or faster – at least 1/15th second when using a 16mm angle, to avoid camera shake. So I set that.
  4. So that led to the ISO setting – I set the ISO so my meter indicated “-1 stop” when I aimed the camera, zoomed out, at an “average” scene (why -1? Because it is dark. Why not -2? BEcause I am ever so slightly “exposing to the right”, and I do not want to lose the highlights.

So that gives you:

And sometimes, a little adjustment in post: pulling back the highlights in the RAW image, and perhaps increasing the shadows’ brightness, to avoid the inside being all back or the outside all blown out:

Shooting contrasty scenes like this is not easy. So a trick you can use: go to Program Mode, with auto ISO, and see what settings this mode uses, then disable Auto ISO and go back to Manual, and emulate those previous settings; then fine-tune and adjust to taste.


What goes into a shoot?

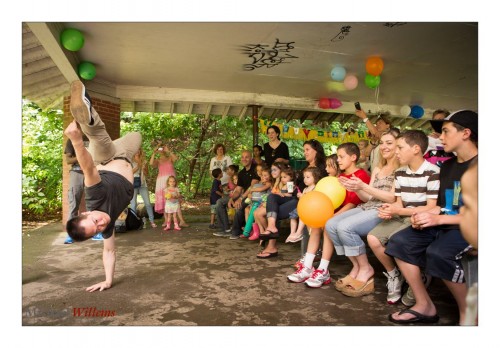
Today I photographed a birthday party, in a Toronto park, outdoors under cover. “Simple”, you might think; “everyone can do this, with a point-and-shoot”  – but not so. Simple results need real skills. That’s why you hire a pro. Let me explain.

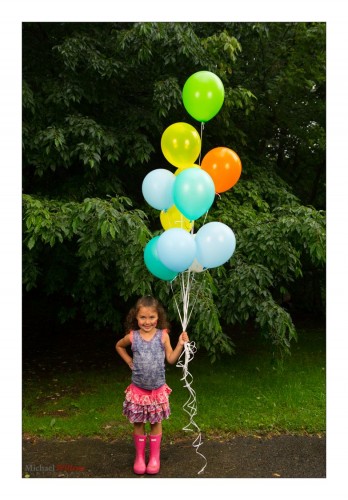
Take a picture like this, for instance:

That simple-looking snap needs considerable technical skills:

  • Choosing the right lens! 24mm on a full frame gives you this “wrap-around” 3D-type feeling. You need to know what lenses give you what results. I used a 24-70 zoom lens on a full frame camera (the Canon 1Dx) for best results, but I thought carefully about what lens focal length to use for any shot.
  • Then, to take care of the background exposure. The camera was on manual (M), and I chose f/4, at 1/40th second, using 640 ISO. That gave me a good, slightly dark background. f/4 gave me enough depth of field with that lens width. 1/40th froze enough motion with that angle.  (TIP: a good starting point for indoors is the Willems 400-40-4 rule: 400 ISO, 1/40th sec, f/4. Then adjust as needed).
  • Of course I was changing parameters all the time, since the sun went from totally gone (thunderstorms) to full bright – many stops difference between shots. Be ready for this!
  • I bounced the flash and knew exactly where to bounce it – an essential part of bouncing. I have eyes in the back of my head while bouncing, and you should develop the same. Where is the virtual umbrella?
  • I also knew how to set aperture and ISO to get enough available flash power!

It needs creative skills also:

  • I needed to see the bubbles and positioned myself accordingly. I also waited for the right arrangement of bubbles. I ensured my bounce angle lit enough of the bubbles.
  • I needed to get the right angle: I got down to child level.
  • The Rule of Thirds gave me a pleasing composition.
  • I did the necessary to get the child to look at me – not at all a given (and please parents, do not say “SMILE”).

Or take a shot like this:

All personality, with the same compositional and technical rules as before. In a shot like this, it is all about the moment, and the technical details should be a given. You snooze, you lose.

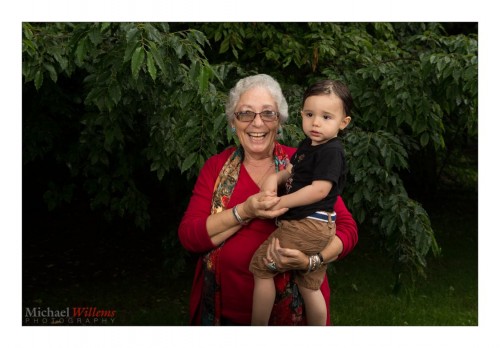
Then consider this:

Here, it’s the same tech skills and compositional skills, but we add storytelling as the necessary skill. Great photographers are great storytellers.

How about this?


Well, all the above is needed, but here there’s personality and communication mixed in. What’s the little girl thinking? Why the serious expression? Raising questions is an important part of artistic expression. And let’s face it, photography is an artistic endeavour.

The above shot is about the performance, a simple shot of record – but everything has to be perfect for it to work. You cannot miss!

Here it’s about using studio lights powered by a lead-acid battery pack to “nuke the sun” – you have read here about this technique many times (and if not, get the flash book and learn flash!). It’s also about that great proud smile. Really, isn’t that photo just “life in a nutshell”?

Another example of the same: how you can make direct sunlight go away and by using flash, override whatever bad light happens to be available, so that horrible direct sunshine can instead end up looking like this:

I hope these sames from a simple two-hour shoot show you that there is mileage in learning pro skills, or hiring a pro. It’s not at all “tech stuff for the sake of tech stuff”, or “pretentious art talk”. There really is an enormous benefit to these skills. Having great images of your event is time travel, is life committed to eternity. Cliché? I don’t think so – I prefer to think “truth”. I have only one image of myself as a child, and I wish I had many, and that they were all professional images.

OK… one more.

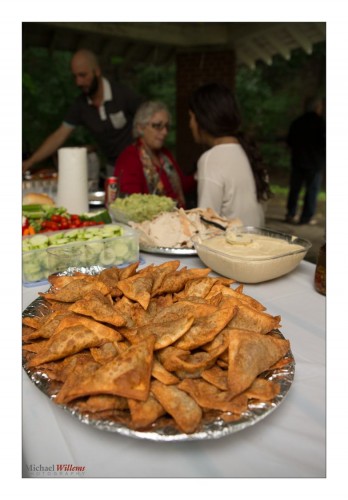
The family was incredibly hospitable and kind – as I find most people are! – and grandma made the fried snacks and the hummus, both pictured.  Please photograph the food, especially when it is made by the people you are working for – love and soul went into it, and the photos will make it last forever.

iPhone snaps just won’t do it. Please make a record of your life events. Hire a pro, or if you are one of my student readers, learn the pro skills. It costs money – yes, but not doing it wastes life!


Check!

When you hire a pro, you get certain benefits. Like the ones in this list.

And when you shoot, why not behave like a pro also? Life’s easier  when you do.

“After The Business Meeting, A beer” (June 2013)

For tomorrow’s shoot, an outdoors birthday party with family shots, I am beginning with a checklist. Here’s mine for tomorrow:

  1. Prepare the cameras  – at least two, since you must have a spare for everything you bring.
  2. Everything cleaned.
  3. Camera bag packed with all neede daccessories.
  4. Camera batteries charged.
  5. Flash batteries charged.
  6. Spare batteries packed.
  7. Strobe power pack charged,
  8. Large lights (studio strobes) packed.
  9. Light stands packed.
  10. Flash accessory bag checked and full. Including pocketwizards (with good batteries), modifiers, attachments, cables, and a light meter (including spare battery) . I have a separate checklist for that bag.
  11. Everything sitting by the door.
  12. Assistant arranged

Then I organize the shoot itself: I have a checklist for the shoot that ensures I know things like:

  1. Names, phone numbers
  2. Address of shoot
  3. Parking checked
  4. Car fuelled up prior to shoot
  5. Change, ID, etc packed
  6. Small items like comb, pens, note pad, etc packed
  7. Business cards packed

The small things make the difference. A shoot like tomnorrow’s, what do I bring in the way of lenses:

  1. Canon 1Dx with 24-70 f/2.8L
  2. Canon 7D with 70-200 f/2.8L

Then I bring a 35mm prime, a 50mm prime, and a 16-35mm f/2.8. Optionally, I bnring the 100mm macto and the 45mm f/2.8 tilt-shift lens.

The FIVE SUCCESS FACTORS for this type of shoot:

  1. Bring all sorts of stuff even if you do not expect to need it.
  2. Spares for everything.
  3. Checklists, on paper.
  4. Prepare the night before.
  5. Get there early.

Have fun!

Michael

PS those of you who say “but that’s a lot of work!” – yes, that is why you pay the pros for their work. It’s work, real work…!


The Creative Cloud

You may have read that Adobe products are now available as part of the “Creative Cloud”. That mainly means a rental price instead of a “buy once” (really, “license once”) model. Under this model, instead of paying $1,000 for Photoshop, you pay $50 per month. The software still resides on your computer, but it is updated regularly, and the computer checks regularly via the Internet to ensure you have been paying.

What do I think?

There are advantages to CC (namely the number of included apps; the constant updates; and the fact there is no capital outlay required), but on the whole, I am not a fan:

  1. Adobe is forcing this change on their clients. Photoshop is no longer available as a stand-alone app (mercifully, Lightroom still is – but for how long?). Adobe has a virtual monopoly, and monopolists should be held against a higher standard than smaller players. Adobe says “jump!”, we say “how high?”. We have no choice.
  2. For most, this will be a price hike. The $50 is an annual commitment (so the minimum is $600!) and it recurs month after month after month – forever. I still use Photoshop CS3 when I use photoshop, which is not often: I do 99% of my work in Lightroom. I do not need most apps.
  3. I have the feeling that when I buy an app, I buy that app, not the right to use it. I know, I know, it is licensing, but is sure feels like buying.
  4. Having to get permission to run my app. What if something goes wrong? or I am not online that once a month (e.g. I am traveling)? Software is mission critical to a photographer. Oh, nothing ever goes wrong? The other day, Facebook would not let me log in, giving me an “incorrect password” error. It was a facebook problem, and there is nothing I was able to do. The day after that, Netflix was down. Again, nothing I could do. Later that week, Tumblr was down for hours. And Adobe will somehow never malfunction? And I will always be online where Adobe can get through (e.g. in hotels, only browsing is allowed).

Of course, CC has already been pirated, so it will make little difference in practice. I do wish that the customer’s interest was paramount, though, not the need for corporations like Adobe to squeeze every penny out of that customer. I am glad Lightroom is still a paid app, and I hope it stays that way for a while.


Willems on Skeuomorphism

As you will have read, Apple’s internal political battles have recently led to the firing of Scott Forstall, the person behind most of the “skeuomorphic” design in the Apple operating systems and apps: i.e. making things on the computer of phone look like real-life equivalents; and the consequent promotion of Sir Jony Ive.

Skeuomorphic Apps include things like calendars with torn off paper, podcasts players that look like tape decks, wooden bookshelves, the desktop metaphor in the first place; and so on.
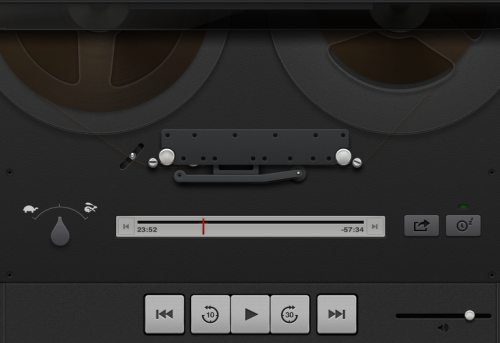
Apple has now dropped the skeumorphism that made it big. More than dropped: in a near Stalinist move, the good is now the bad: “we’ve run out of virtual felt”, “no virtual cows were harmed in the making of this calendar”, and so on, at the recent developer conference.

Way to go, dissing your clients, the clients that chose your OS and made it big precisely because of that design. Thanks, Apple, and for the record, I despise your recent examples of taste too, and will make fun of it in public whenever I like.

I loved that tape deck. It made me listen to podcasts; I have not listend since Apple killed the deck. Because the Apple Supreme Soviet, in its infallible knowledge of what is good for me, dropped it without even leaving it as an option.

The tape deck is a good example of why these interfaces can make sense:

  • It showed me that the podcast was actually playing. Near impossible today.
  • It shows me how much was done, and how much left (yes, the quantity of tape slowly moved from left reel to right reel). Not easy to see today.
  • It showed the speed of fast forwarding, etc. No way you can see this today.
  • It was the same for each podcast (now, you watch a company logo, or a portrait, or whatever graphic is embedded in the Podcast)
  • It was active (now, 90% of the screen is dead, static; most of the screen now doesn’t do anything).
  • Above all, it was fun.

In the 1980s I could never afford a proper tape deck; now I had one, for two weeks, until Apple killed it in favour of something technically inferior and bland and boring.

Skeumorphic design is a dead idea in today’s Apple and Microsoft world, but I think we ignore it at our peril. Was windows 8, which forgoes the desktop metaphor in favour of flat squares, a great success? I didn’t think so. Abject failure.

So why the criticism? Most of the thinking, it seems, is that the metaphors we use (desktops, paper waste baskets, reel-to-reel tape decks, legal paper pads, drop shadows) are for old fogies, like 50 year olds, who have no business thinking about interfaces (much of the criticism, of course, comes from 22 year olds who have never yet worked in an office).

The criticism is missing the point in many ways.

  • The metaphors are much easier to learn than bare “flat” interfaces. Even if you have never used a paper notepad or a reel-to-reel tape deck, it would not take you long to figure out the interface. The same cannot be said of  “flat” interfaces, whose user interface is up to the software writer, and for 1,000 software writers, you will get 1,000 interfaces.
  • We learn by touching – have you ever seen a baby learn? Have designers forgotten this? The metaphors have physical equivalents you can go and actually see and hold at Staples/Office Depot.
  • The skeuomorphic interfaces are often more functional than their flat equivalents. Like the tape deck above, or a desktop with hierarchical “folders within folders” and paper baskets, and so on.
  • They are often clearer, since their design idea in the first place was to make it clear. In the new “flat” world, clarity is not a design goal; coolness and scoring political points is.
  • The metaphors impose some kind of a standard.
  • They are fun.
  • They show that loving care was taken in the apps’ design.

So it seems to me that the current trend to dismiss them out of hand is not a great example of clear thinking.  It’s not gone; it’ll be here fore a while; you cannot ignore your clients because you are so cool, witness Windows 8.

I just downloaded a Yamaha audio recorder app onto my iPad:
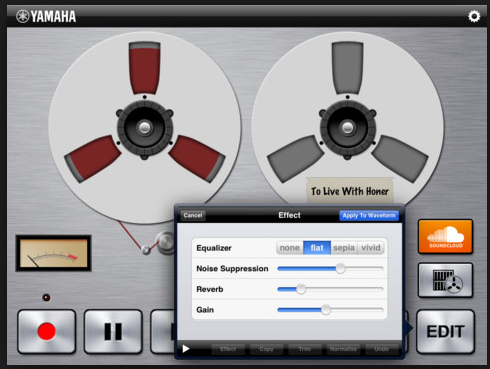
Not as good that the Apple player was, but not bad.

In the long run, however, the skeuomorphism pushed for by Steve Jobs is probably dead. But not all progress is good. We used to have Concord, now we have 737s. We used to eat ion individually owned restaurants; now we have McDonalds and other chains.  Welcome to tomorrow: get ready for a flat and humourless future and buy glasses to be able to see the illegibly thin Helvetica Neue font that will power all i-device icons.

Would you like fries with that?