Mistakes are how we learn…

….and I can make them too. Today is an example.

I just bought a used Canon ST-E3-RT wireless flash control transmitter. A great piece of engineering. And also a good piece of business, for Canon. And also a mistake, for me.
20161011-1dx_1235-1200 20161011-1dx_1236-1200 20161011-1dx_1237-1200

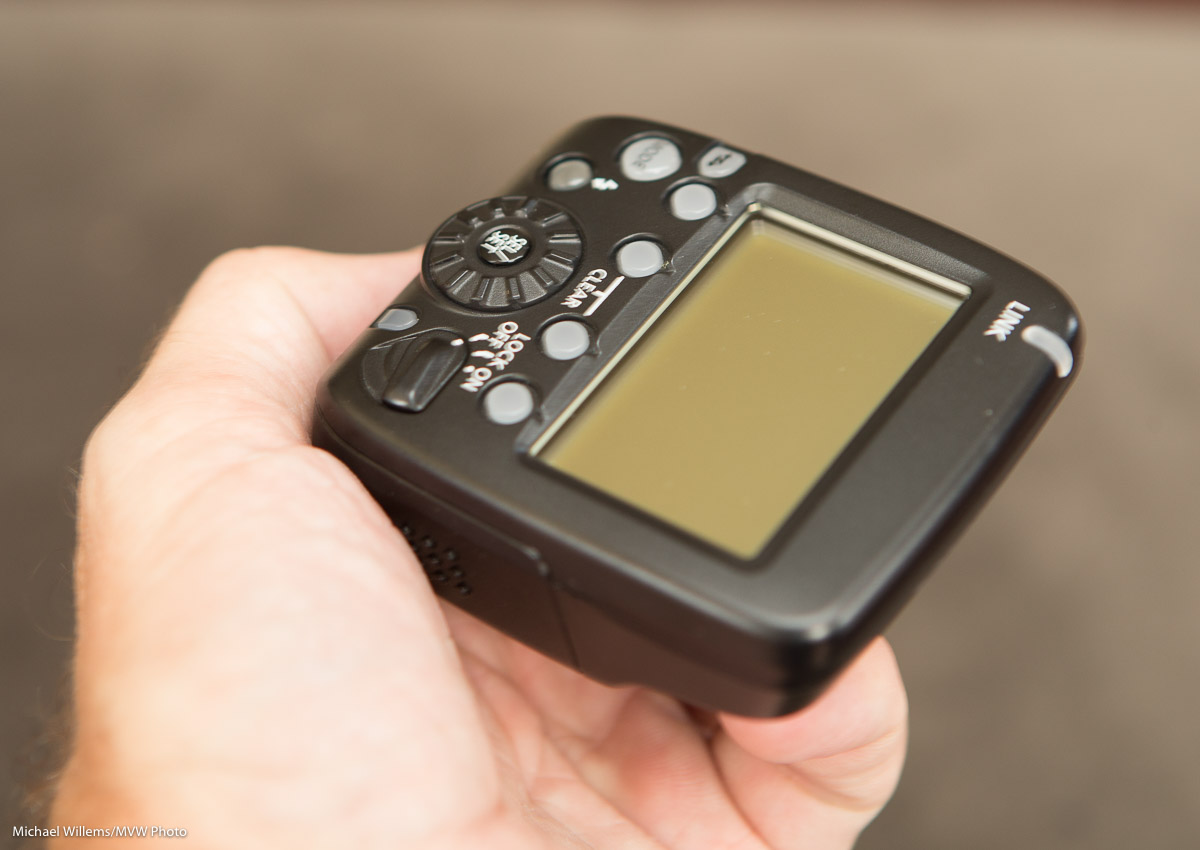
Because as I told the seller, “This one does radio as well as IR, IIRC”.

If I had only looked that up instead of relying on my recollection! Because no, it does not do light/infrared control. It only does radio control. Meaning I can control 600EX flashes, but not the six 580EX and 430EX flashes that I own. My only 600EX is faulty and needs an expensive repair or replacement.

So I have a controller that is a marvellous piece of engineering, but it only controls 600EX flashes that I do not own. Review some time when I do own 600EX flashes!

And careful when you rely on recollection. “IIRC” (if I recall correctly) implies that you might be wrong. Which I was.

Why is this flash, as I put it, a great business move? Because it forces photographers like me to buy only new 600EX flashes, and yo discard their 430EX and 580EX flashes. Which would be fine if it was one flash… but I have six of them!

Moral of the story? Check things before you trust your recollection; every time you say “IIRC”, realize you could be wrong.

(PS: Anyone looking for an ST-E3-RT? 🙂 )


Near London? Come see me 6 Oct 2016

Do you live west of Toronto? Anywhere near London, Ontario?

Then see www.londoncameraclub.ca – you can hear me talk about flash tomorrow night (or tonight, depending on when you read this), Thursday Oct 6, 2016. Come hear some advanced tips and tricks and come meet me. 7:30pm; $10 charge for non-members of the club.

Also keep in mind, 23 October, another small (5 people max, some spaces left) hands-on Flash workshop. See the meetup.com web site.

Now back to my presentation.No rest for the wicked. 

In Real Life

..In real life, you only have so much time when shooting an event. So you need to be quick, and you need to really master a bunch of little things.

Take this picture, taken with a wide angle 16-35mm lens at 800 ISO, 1/40 sec, f/4, with bounce flash aimed behind me. . Attentive readers may recognize the Willems 400/40/4 formula in that, modified slightly (800 ISO instead of 400) because it was so non-reflective.

20160916-1dx_0486-1024-2

Nice, but why are the verticals tilted inwards toward each other at the top?

Because the photographer was aiming the camera upward! That results in this tilt.

If the camera had been pointing downward, you would have seen this instead:

20160916-1dx_0486-1024-3

And it is only if the photographer aims the camera straight ahead, parallel to the horizon, that we get the proper picture:

20160916-1dx_0486-1024

And now a little secret: that one, the third, was in fact the actual photo taken by the photographer, Because the photographer, and that was me, knows to hold the camera parallel to the horizon. Check the verticals before you click!

So how did I create the other versions? Simple, by using TRANSFORM in Lightroom. And just like I can make a good picture bad, I can make a bad picture good.

So why not just shoot as you like and fix them all later? Mainly because this takes that most valuable of all commodities, time.

So. Last question. Flash you say. Really? How do I know this isn’t just ambient light?

Well, let’s take one with the flash OFF. Here we go:

20160916-1dx_0491-1024

Now, we could have used ambient like this but just increase the exposure by three stops. That is true (higher ISO, lower f-number, and/or slower shutter). But then two things would happen: a) you would notice the drawbacks of those actions (e.g. more motion blur, less depth of field, more grain), and b) the picture would lose its magic. You would get this:

20160916-1dx_0491-1024-2

Well, de gustibus non est disputandum, but I prefer mine:

20160916-1dx_0486-1024

Isn’t this “creative” stuff fun?


Want to learn from me in person? 5 hours in Brantford, Ontario, on Sunday Oct 2. With a maximum of 5 students. Sign up tonight and save big: 

HANDS-ON SESSION: Master On- and Off-Camera Flash, Manual & TTL

Sunday, Oct 2, 2016, 12:00 PM

Michael Willems Studio
48, Wilkes Street Brantford, ON

2 Emerging Photographers Attending

UNLEASH YOUR CREATIVITY, LIKE THE DUTCH MASTERS, AND BECOME A FLASH PRO!This unique small and intensive hands-on workshop, held in my fully equipped studio, will be both practice, for those who know a thing or two about flash, and a revelation, for those who do not.I took this picture  two days ago, on Friday. In a dark Niagara Falls restaurant …

Check out this Meetup →


Shutter speed isn’t all there is to shutter speed.

“Shutter speed” isn’t all there is to shutter speed.

Uh oh. Michael is The Oracle. What on earth does he mean by that confusing statement?

Well, let’s have a look. Let’s set up a couple of gelled and gridded speedlights (using Honlphoto grids and gels) and get a talented life model. Which is exactly what I did in August 2012 at Brock University, during the 5-day flash course I was teaching for the Niagara School of Imaging.

But wait. Because I want to show you the setup, let’s allow in some ambient light. To achieve this we use a really slow shutter speed, of 0.6 sec. More than half a second, in other words. That lets in some ambient. Not a lot, but enough to see the classroom, some of the equipment, and so on.

The picture, showing the setup with the two flashes, below. Look at the two little gelled speedlights, can you spot them? Purple gel on the left and yellow gel on the right:

tumblr_m94klicvuq1qfts2ko1_1280

OK. Great. Blurry as heck, of course: 0.6 seconds is ridiculously slow. Impossible to hold still. Right?

But wait. Lots of blur, yes, all over the picture, but look carefully. Click on the image to see it full size, and now look carefully at the model. What do you see?

She is sharp. No blur on her: she is tack sharp. There’s blur all over, but not much on the actual subject. A little “ghosting”, but she is substantially sharp.

But that’s impossible: the shutter speed was 0.6 seconds. So she must be blurry! Right?

So that’s where I say “‘Shutter speed’ isn’t all there is to shutter speed”. The shutter speed may be 0.6 seconds, but the model is lit primarily (almost exclusively) by the flashes. And the flashes flash at 1/1000 second or faster. At 1/4 power, they flash for just 1/4000 second. So while the shutter speed may be 0.6 seconds, as long as the subject is lit only by the flashes, our effective shutter speed is 1/4000 second!

And that is why you see a sharp model: there is very little ambient light on her, so the effective shutter speed is determined almost exclusively by the flash speed. Which is very rapid.

So now let’s do a normal shutter speed, of 1/125 sec, so the ambient light is cut out. And here is the finished product:

tumblr_m94knozSgL1qfts2ko1_1280

So anyway. This is a studio shot. So I want no ambient light: the second picture, in other words.  But when I shoot an event, like a wedding reception, I want to let in some ambient light to avoid those cold, black backgrounds. Instead, I want a nice warm background. To achieve that, I am happy to shoot with shutter speed as slow as 1/15 or 1/30 second. And now you know why I can get away with that.


Filters!

David Honl, whose modifiers as you know I use, and love, just posted a helpful post on his blog. I will show you Part of it right here, namely the corrections you need to make to your flash when using a gel:

image

Those are useful Numbers, these will save you a lot of effort when you’re using the gels yourself. Which as you know I’m a big advocate of. This  will save you a lot of effort when you’re using the gels yourself. Which as you know I’m a big advocate of.

There is one thing I want to point out in addition to this though. Namely:

To turn a background into colorful, it first has to be dark.

It does not matter if the background is in reality gray, light gray, white, or even black; what is important is that to the camera ot has to look almost black. Then, and only then, can you add your gelled flashes. Then, and only then, can you add your gelled flashes.

If you do not do this, and if the background is, say, white, then adding color will add nothing except perhaps a slight tint   LIgor is not like paint: you cannot cover a color by putting another color on top.

For many people this is the biggest revelation when they start using color gels… So now you know. I just saved you a bunch of time. As did Dave with his table.

To  buy,  click on the advertising link on the right, and when checking out use code word “Willems” for an additional 10% discount. You’re welcome. 


Drama.

On a bright cloudy day today, I looked like this:

20160521-_MG_4795-1024

Wait. A bright day?

Yes, and that is the point of dramatic flash photos. I taught a workshop today, a hands on workshop, on the three basic modes of flash: “party”, “studio” and “outdoors”. This takes time, and “doing it” is the only way to learn. Today’s two students really learned.

Yes, in a few hours you can master flash. You still, of course, have to practice and refine, but you will do that yourself after the course. Contact me if you are interested in a private “Dutch Masters” course. A few hours and you are master: see http://learning.photography for more details.

In the mean time: one tip to my readers. If you want to be extra dramatic as in the image above, and it is bright, you need a lot of flash to “nuke the sun”. To achieve that, remove the modifiers (e.g. the softbox or umbrella) and use direct flash.

Just one of  the things you learn from me, my books, and my courses.


Just now in Ajax.

So I just taught part three of a flash course in Ajax, Ontario.

In an excellent day, Ajax Photography Club creative Director Ron Pereux had arranged five of these:

20160514-1DX_8185-1200

Yup, brides!

And with very simple equipment we did some fun, creative shots using gels, snoots, softboxes (the excellent Honlphoto gear – use checkout code “Willems” for 10% off), umbrellas, and grids.

Some of the work needs some post-finishing when conditions are not right. Look at the backdrop:

20160514-1DX_8173-1024-2

And look at the finished product. Yup, a slightly more traditional photo:

20160514-1DX_8173-1024

And a more edgy photo, the type young brides are more likely to love, full of feeling:

20160514-1DX_8186-1024

Or even edgier:

20160514-1DX_8176-1024

Shooting brides is fun, and today I was able to help the Ajax club with a lot of very practical easy to put into practice tips and techniques. Flash photography is so easy once you know it, and so rewarding once you know how to do it well. Take a course – if not from me (http://learning.photography), then from someone else who knows his or her business!


Learning Flash: Two New Opportunities

A good knowledge of flash lighting is the key to artistic and other professional photography. Good news: I have two new opportunities for Flash learning!

image
Outdoors flash: essential for artistic photos
 

Both of these hands-on courses will be held in (or as the case may be, outside of) my Brantford studio.

Sunday May 1, 11AM: Studio Shooting

Sunday May 22, 11AM: Mastering Outdoors Flash

Both have limited availability: 4 and 7 students maximum, respectively. So sign up, and meet you in Brantford, 20 minutes west of Hamilton.

Flash…

…I ran a Flash workshop today. All seven participants had a good time, and more, they all learned how to make a professional headshot like this:

20160305-1DX_7001-1200

That’s a standard headshot. Join me in my studio any time to learn how to do this, and much more!

And after you learn a standard portrait, you do more. And that includes things like this:

20160228-DSC_3947-1200-2

A portrait does not always have to include the subject’s entire head.

Zoom in (click on the picture) and see how much more personal that looks. See?

And the desaturated sharp look? A modern look that goes well for men. My “checklists” book (see http://learning.photography) contains the details of this Lightroom preset.


Flash tip

Quick tips are often the best. So this one is quick.

When you are using TTL flash, and you want to know if you have enough power to do the shot, do this:

Put your flash into MANUAL mode (Press MODE until TTL is replaced by M) and ensure you are set to full power (100% or 1/1). Then take the photo. You should see an overexposed flash photo.

  • If so, go back to TTL and carry on.
  • But if not, you have to increase your ISO or decrease your aperture number. Then repeat.

And that’s all. Just one of those quick tips that can make all the difference over the holiday season.
TIP: A GREAT Christmas present: my checklists book, the printed version. Shipped worldwide, and there’s time before Christmas. Act now: http://learning.photography.