Bright pixels are…

…sharp pixels.

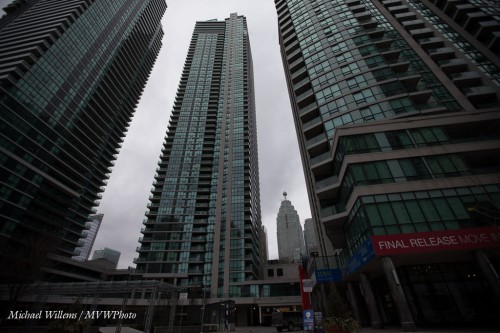
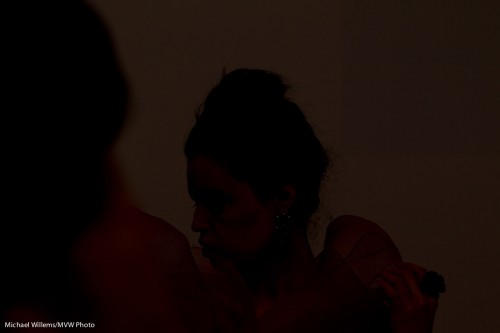
Look a this image:

Dark, but as you know, we can rescue dark images in Lightroom or Photoshop. Especially if, as here, we shot them in the RAW format – which you really always should do.

So, into Lightroom, notch the image’s exposure up a couple of stops, perhaps play with “Whites” and “Shadows” a little, and done! Right?

Yes. But.

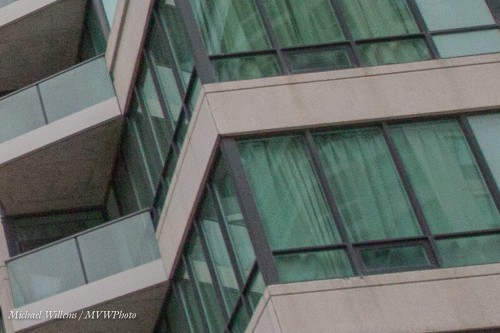
While we successfully increased the level of the dark parts of exposure, we also at the same time increased the noise (“grain”, if you will). Noise, after all, is like cockroaches: it hides mainly in the dark. Look at a small detail:

See? Grainy.

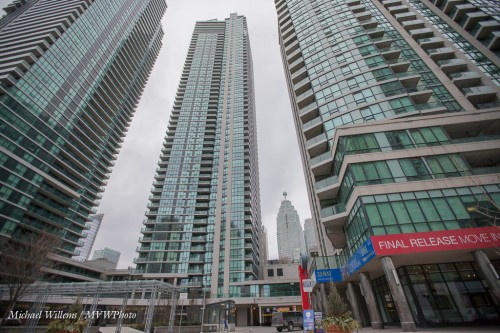
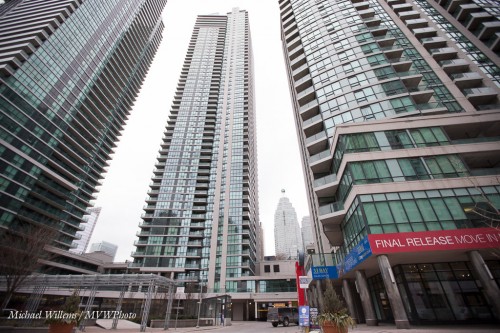
Compare that with the next image I shot, which at first looks just about the same, at least in terms of exposure – I shot this one at a slower shutter speed:

But this one I exposed well – I did not have to electronically increase the exposure, so I did not increase the noise. So a small section of this image looks like this:

If like me you were an engineer, you would say that it has a “higher signal to noise ratio” than the previous, electronically doctored, image.

So that is why we try to expose as correctly as we can, rather than relying on RAW to fix it for us later.

(You can even expose “to the right”, i.e. expose too brightly, as long s you do not lose detail in the bright areas. If you manage to do that successfully, you can pull the image down later, thus increasing the signal to noise ratio. I have written about this here before, look it up).


Make it RAW

If you are shooting with a digital camera, your camera may give you the option to shoot in JPG format or in RAW format. All SLRs have this option; many compact camera do, too. Check the menu.

Why shoot RAW? It has drawbacks!

  1. A RAW file is three times larger than a JPG, so fewer images will save on your card, and it will take longer to download them. And you will need more hard disk space.
  2. A RAW file is in a camera-maker’s proprietary format and you may need extra software installed to read it. You cannot take it into the camera store for a print unless you first convert it to JPG.

Yes, true.

But it also has advantages, which greatly outweigh the drawbacks.

First, a RAW file contains much more information about light than the JPG that you will eventually make from it. That is a key part of your understanding: eventually, a JPG file will be generated. If doing this in camera, this means that the image is processed a certain way by your camera. While if you do it later, on your computer, then if you have under- or over-exposed a RAW image, for instance, you can “fix” it before you make that JPG.

And second: When a JPG is made, many settings are applied. Settings like:

  • Should it be a colour or black and white image?
  • How much sharpening should be applied?
  • How much extra saturation should be applied?
  • How much extra contrast should be applied?
  • What white balance should be applied?
  • What colour space should the JPG be encoded in, sRGB or AdobeRGB?

Believe it or not, you have settings in your camera for all of the above, so whether you are aware of it or not, whenever you take a picture, you are always making all these decisions. And if you are making a JPG in the camera, all these settings are applied to the image. So they are final. While a RAW file also contains your settings, but only as suggestions, and all the original data is part of the file. So if you want to change your mind: no problem. One click in Lightroom, Aperture, Photoshop, or whatever software your camera maker gave you, and you can change any of these settings, without any loss of quality.

So if you set your camera to black and white and you create a JPG, not all the king’s horses, or all the king’s men can bring the colours together again. But if instaed you shot RAW, one click and bingo, colour is back.

That is why I only shoot RAW images, ever.

“But it’s extra work, Michael!”

No it isn’t! IF your exposure and all the above settings were all correct in the camera, your software will follow them and create the right JPG for you – correct first time. No extra work.

It’s only extra work if you choose to not set it all while shooting. I often don’t  worry about white balance while shooting, for instance, since it saves me time while shooting – one click later at home will set the white balance. So in choose to not spend time worrying unduly about white balance while shooting, so I can concentrate on composing. That’s a choice!

SO if you are not yet shooting RAW images: you should be. Unless all your camera settings are all correct whenever you shoot. In that case, hats off to you, and carry on with JPGs!


Why we shoot RAW.

What’s this RAW thing we keep hearing about? Should we shoot in that RAW format?

Um, yes.

And here’s why.

For two reasons.

  1. First, while JPG is like a Polaroid – all your settings are applied to the data – the RAW format is more like a negative – the settings are merely attached, so you can change stuff before you use it. White balance, colour space, and more. (Hands up, everyone who always gets every decision right? Yes, I thought so.)
  2. Second, there is more data – 14 bits versus 8 bits per colour channel. So you can fix under- or over-exposure more often.

What does that mean?

Let me give you an example. Say that I shoot Tara – but the flash does not fire. Result: a dark picture, totally unusable.

Tara - but no flash

Ah. But I shot RAW. So now I can do something wedding photographers do when a picture is unusable but they shot in RAW:

  1. Increase exposure in Lightroom by the maximum.
  2. Add fill light to the maximum.
  3. Convert to black and white.
  4. Increase luminance of red and orange (skin colours) to the maximum.
  5. Crop.
  6. Decrease noise.
  7. Add photo grain (looks great and moody).

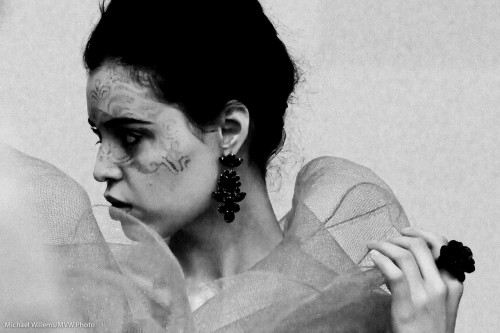
And that gives me:

Tara - but no flash (fixed)

Wow. Like I intended it to be all trendy and moody and old-fashioned black and white and stuff. And this is with a picture that is underexposed by six, seven stops!

Case closed. Yeah?

RAW or DNG?

A student asked a question (you know who you are, Alan), that I thought I would answer here.

But there is not much to answer, since Alan has masterly answered most of his question himself. Here is his question in its entirety (except I removed the name of a book):

I’m learning Lightroom – what a fascinating system. It’s going to take some time to get used to having it manage my photos, instead of doing it myself. But I can see the benefits. Thank you again for recommending it.

Now — what about the whole RAW vs. DNG thing? The book I purchased, “[Book Title]”, strongly and repeatedly recommends converting the CR2 files to DNG, and then discarding the CR2.

I understand that DNG is just another type of RAW file, but it makes me nervous:

1. CR2 is, well, really RAW. It’s the original file.

2. A “benefit” of DNG is that it doesn’t have the separate XMP sidecar files, but instead writes the sidecar-type metadata into the DNG file. That means that every time I edit a picture, I’m editing the DNG file. What if that leads to corruption? The constant modification of the DNG seems contrary to the philosophy of never altering the digital negative.

3. Since the DNG keeps changing, that means that my Time Machine backups will have to keep backing large DNG files. By contrast, the CR2 file is backed up once, and never touched again. The only thing that Time Machine has to backup is the very small XMP.

I have hundreds of CR2 raw files (I only keep the good ones, maybe 10-20 per shoot), and am really unsure what to do here. (I searched your blog, didn’t find this issue addressed.) Do you stick with the CR2 files, or convert to DNG?

I removed the name of the book because this way I feel free criticising its advice.

Alan is right. All his arguments are spot on.

And let’s expand the first one: a RAW file is the original negative, and a DNG file is an interpretation of that file. It is not a straighforward process. You have to interpret the CR2 file and make it into a DNG using your interpretation of what the bits mean.

Because of that and the other reasons Alan has worked out, my advice is to keep your original RAW files and not to convert them to DNG.

'Alo alo… an important 1D MkIV tip

For those of you lucky enough to have a 1D Mark IV, here as a follow-up to my review a few days ago is another tip.

Canon by default has the “Auto Light Optimizer” set to “ON”, and this is a custom function you may well miss.

If you shoot RAW (as you really ought to), go into custom functions II, function 4, and take that off zero (0=”standard” Auto Lighting Optimizer” setting) and turn that to custom setting 3 (“Disable”).

What does ALO do to your RAW image? Nothing. And you shoot RAW. So why does it matter? Here’s why.

If you set ALO to ON, your camera will, where necessary, apply “fill light” to the data that comes from the sensor, and use the result to make its little embedded JPG. That will make dark areas lighter.

And that little embedded JPG is what you see on the back of your camera.

So when you look, you will see a well-exposed picture. Happily, you shoot more. But in fact, unbeknownst to you, the actual data is darker. You may well be underexposing the dark areas of your picture!  And like me. you wonder why when you import your image into Lightroom (which does not honour that same “fill light” setting) it looks so much darker than on the camera. Or rather, you wonder why the histograms are so different (you should probably not judge exposure just by the image on the LCD).

So when you turn ALO off, the camera no longer shows you an “enhanced mini JPG”; instead, it shows something closer to the real RAW image. And if that is dark, you can fix it by adding light, not by tweaking bits (which can add noise).

UPDATE: Chuck Westfall agrees. See the comment below.