It's too bright outside. Quick! Hand me a flash!

We do not use flash “because it is too dark” – at least not just.  We very often use flash because it is too bright outside.

By using a bright flash, we can:

  1. Decrease the exposure of the background, thus making it less bright
  2. Then use the flash to increase the exposure of the foreground, to avoid darkening it as a result of step 1 (becasue this would otherwise happen).

Step 1 also

  • Increases the colour saturation.
  • Allows you to make your subject stand out against the background.

Step 2 also allows you:

  • To accent parts of your shot,
  • To “model” shapes,
  • To throw light where you want it.

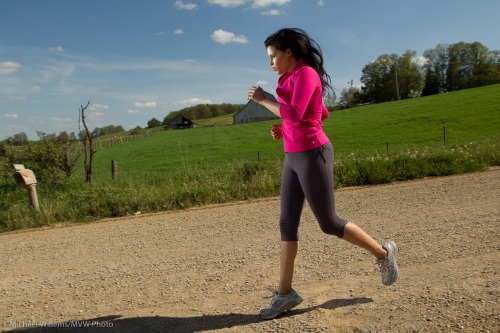
At yesterday’s all day Country Creative Lighting Workshop in Mono, Joseph Marranca and I used technique to do exactly that. So you turn a simple snap into this, instead:

A female runner

Female runner on a country road

For this, we used technique. Technique that included (apart from a talented model):

  • The use of two speedlites, set to manual, fired by Pocketwizards
  • A Honl Photo Traveller 8 portable softbox on one
  • Manual camera exposure settings

Two simple off-camera speedlites can create a shot like that? Yes they can. 430 EX speedlites can overpower the sun? Yes they can. Try it!

Another reader question

A reader asked me this:

I just wanted to follow up further and ask you how I could ‘get my foot in the door’ i.e. find a job as an assistant, or at a studio, etc. to learn about the business of photography?

That is a great question, and one that is on many people’s minds. Photography is a passion, and making your job out of a passion, if you can do it, is rewarding.

So the first piece of advice: go for it. The business is very tough, and is evolving, and few are making money so do not expect this to be easy. But if you want to do it, pursue it.  Most would say “Don’t. Keep your day job“; I say this instead: “Go for it, but do it slowly so you can eat in the mean time“.

So in that mean time, what do you do?

Start with the learning. Both informal (read all articles on this blog!) and formal (course-based) training. Henry’s school of Imaging does great beginners courses and in a few hours you learn so much, you’ll wonder “why didn’t I do this earlier”. Start there. You need to do this before you can be hired by anyone, so it’s where you start.

Shoot every day. Grow your skills by doing. Daily.

Network. Join a camera club. Hang out with other would-be pros. Get to know the pros. Talk to them. Have your work reviewed.

Participate in interactive web forums, such as photo.net and other forums where pros hang around.

Once you know some pros, offer them help. I often use emerging photographers to give me some help. When I have a shoot that does not warrant a paid assistant, I can get it done with an unpaid assistant, where I train the assistant. That way it is like a little practical course, and I offer value to the assistant that way in return forhis or her time. Everyone wins.

Build a portfolio. You need nice pictures to show: they take time to take, so start building.

Get to know people in your chosen niche. If you want to shoot for local papers, contact your local paper’s photo editors. All the papers, even Snap! who use volunteers.

Do some jobs for friends. Once you trust your skills, shoot some jobs for friends. For free or for little money. Not weddings (a wedding pro is the most skilled of photographers), but family portraits, parties (tough to shoot!), and so on.

Volunteer for organizations. Organizations that have no money to hire pros: like your church, or the Salvation Army, or Amnesty International, or any local charities. You weill build your skills, make people happy with your work, and build up experience and a portfolio.

It’s a business, so start business planning. As you start perfecting your skills, start planning the business. Begin to design a web site. As you learn, decide what types of photography you really want to specialize in. Print business cards. Do not overspend. Make a budget. Discuss with your accountant. In your plan, do not expect riches, expect to work 7 days a week, but do also monetize factors like being your own boss (“what is it worth to you, being able to get up when you like?”).

Once you start with all these, you will find that two things will happen:

  • As you learn, you will see more clearly what you like (even whether you like it – it is OK to change your mind).
  • Opportunities in your chosen direction will slowly start to present themselves.

And that is when you can decide whether to build a part-time business, a retirement business decades down the road, or a small business right now.

Flash consistency – a note

So you are surprised that your flash pictures always turn out differently and unpredictably, especially when using automatic (“TTL”) flash?

Then this may help:

A. First, worry about the background, ambient light:

  1. First, decide “should the background light do any work?”. If you are using an automatic or semi-automatic mode, like P, Av/A or Tv/S, the camera will try to light the background well. so it will not just be the flash doing the lighting.
  2. Realise that there are limits to the previous: on Canon always in P mode, and on Nikon in P and A when “Slow Flash” is disabled, the camera will limit shutter speed to avoid blur.
  3. So if you want total predictability of the background, use manual, and set your meter to the desired ambient lighting level (I recommend you start at -2 stops, i.e. the light meter points to “-2”). See a recipe below.

In a typical room, a starting point might be 1/30th second, f/2.8, 400 ISO, and the flash pointed behind you. Auto ISO is not recommended!

B. Then, concern yourself with the flash:

  1. The foreground is mainly lit by flash, not by your Av/Tv/ISO settings.
  2. Canon cameras in particular try to avoid overexposing part of the picture, so even a small reflective object in the flash picture can result in a dark, mainly underexposed photo.
  3. The flash exposure metering is, on most cameras, biased toward your focus points. So the camera looks mainly where you focus.
  4. If you take a picture of something bright (a bride in the snow) the camera will underexpose it to give you a grey bride. If you take a picture of a dark object (a groom in a coalmine) the camera will overexpose it to give you a grey groom.
  5. To fix this, you can turn the flash up and down using flash exposure compensation (“Flash Exp Comp”).
  6. Play with the light: aim your flash at walls or ceilings if you can. and create a “virtual umbrella”.

Try it and see if you get more consistent!

Here’s a typical recent flash picture, of a nice photographer I met recently:

Flash picture

A flash photo - yes really.

Doesn’t look like your usual “deer in the headlights” snap? That’s because I was following my own suggestions above. Note I also used a Honl Photo 1/2 CTO gel, to make the flash light look a bit more like the background Tungsten light. I like warm backgrounds, but I often make them a tiny bit less warm this way.

Canada's oligopoly running strong

So Rogers double-dip and want $35 extra for 5GB traffic for the iPad 3G, even for customers who already pay for data for their iPhone. No breaks.

So Bell have now announced their price. Surprise surprise: (drum roll): $35 for 5GB. The exact same that Rogers charge. They must know that even a $1 decrease would gain them customers – but no, they have an unspoken agreement to keep prices high. Cartel, anyone?

This sickening oligopoly, protected by our allegedly conservative government, is going to continue to rip off Canadians. Instead of an economically conservative, socially liberal government, which I think most Canadians want, we get a socially conservative, economically protective-of-their-friends government.

In other countries, cartels like our Telco cartel would come under scrutiny: here, they are mandated by our government.

Autofocus and how it works: the modes

A regular reader asks (and I take questions, you know that, right)?:

Can you possibly do a short blog entry on the focusing modes offered by Canon? You know the ONE SHOT – AI SERVO – AI FOCUS buttons?

Certainly!

These “focus modes” are not about where the camera focuses (the focus point selection is about that: select one point for accurate control). Instead, these modes are about how the camera focuses. There are two main modes and an in-between hybrid mode:

  1. One shot (Nikon calls this “AF-S”)
  2. AI Servo (Nikon calls this “AF-C”)
  3. AI Focus, where the camera tries to guess which of the above two you want.

“One Shot”/AF-S means: when you press the button, the selected focus point tries to achieve focus. Once it does, a few things happen, all at the same time:

  1. The camera beeps
  2. A green dot lights up steadily
  3. The focus locks, and until you remove your finger, it stays locked at the selected focus distance.

This One Shot/AF-S mode works well in most cases. But what if the subject you are shooting is moving rapidly towards you, or away from you? Then every picture will be blurred, because by the time you press, the object is no longer where you locked the focus.

So for those situations you have AI Servo/AF-C (AI Servo means “Artificial Intelligence Servo motor control”, while AF-C means “Autofocus -continuous”). The focus never locks, and the camera keeps buzzing away as the focus motor keeps turning and adjusting. Better, it even predicts where the object will be when the shutter opens (that is the “artificial intelligence” part). So you can try to use this mode when shooting “sports, birds, and kids”.  Not every shot will work out, but at least some will.

Finally, the hybrid mode (AI Focus) tries to guess which one of the two modes above you really want, and then switches to that. I am not a great fan, and expensive cameras like my 1-series models do not have this mode. I think you should probably decide whether you are shooting mainly stationary subjects (then choose One Shot), or moving objects (then select AI Servo).

A few flower tips.

Today, I shot some flowers, in anticipation of a photo club walkaround on Monday.

I’ll share a few here, to get you started.

If you have a macro lens, use it. If not, then consider a 50mm lens and get as close as you can: then crop in post-production. That’s why you have all those pixels. (If you use a “normal” lens, set it to a smaller f-number to get shallow depth of field).

And look for nice colour contrasts: purple and green is a great combination.

Here’s a shot taken in simple non-direct light (direct sunlight is not great), with a macro lens set to f/5.6. Normally, f/5,6 at close range gives you too narrow a depth of field, but in this case it works:

A flower

A flower, shot with a macro lens.

Red (or orange) and green is a great combination, also:

Poppies

Poppies, shot with a macro lens

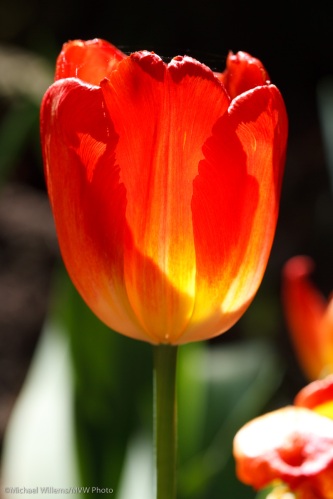
As said, if you can, avoid flash, and direct sunlight. Except translucent light, i.e. a flower lit by the sun from behind, can work very well:

Translucent tulip

Translucent tulip, lit from behind

Simple backgrounds are essential. Dark backgrounds are nice too, if you can get them.

A tulip

A tulip

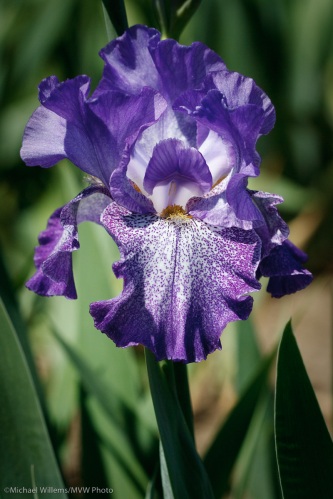
Can you see that the iris shot below does not have a simple enough background, and that the light is a bit harsh? If I had been able to, I might have used a black sheet of paper behind the flower.

An iris

An iris

Importantly: get your exposure right. Foliage is dark: your camera will try to over-expose it. You may well need to use exposure compensation, of perhaps -0.5 to -2 stops, to get the right exposure. I am sure I used that in most shots here.

(“I am sure” because I am not sure: it is so automatic that I am not even consciously aware!)

This, I hope, is a start: go try some flower pictures!

Spreading the word.

Tomorrow, I am teaching Nikon and Canon camera use at Henry’s in Mississauga; then Friday in Brantford, then Saturday in Oshawa, I am doing a Canon outdoors flash get-out-and-shoot.

And then on Sunday, Joseph Marranca and I teach an all-day country Creative Lighting workshop in Mono, Ontario (an hour north of Toronto): http://www.cameratraining.ca/Mono-Day.html (and yes, there are two spaces left: book now if you are interested).

Digital technology makes it so much easier than ever before; and you can do more; and you get instant feedback; and it is free. This is a great time for photographers.

Go wild.. and get creative

Creative lighting is all about what you do not light:

A chiaroscuro picture of a model, by Michael Willems

Recent chiaroscuro picture of a model

I used one bounced flash and a prime 35mm lens on a full-frame body.

The camera was on manual of course, and shutter, aperture, and ISO were set to make sure the background was dark, but with colour showing in the background.

Flash was on TTL.

I wanted to emphasise the girl’s striking eyes and hide her face, and emphasise her look, so I bounced off a black ceiling above her. Yes, even a black ceiling will reflect some light! And 1600 ISO and the lens wide open ensured that “some” light was “enough” light.

Not your typical party picture – precisely because I did not light all of the girl.

Truck rollover causes road closure

This will go on all night: a truck loaded with an uncertain acid rolls over, and a major road, Dorval Drive at the QEW, is closed.. and now until they pump it, road closures and police/fire activity.

Rolled-over truck on Dorval Drive in Oakville

Rolled-over truck on Dorval Drive in Oakville

Rolled-over truck on Dorval Drive in Oakville

Rolled-over truck on Dorval Drive in Oakville

Rolled-over truck on Dorval Drive in Oakville

Rolled-over truck on Dorval Drive in Oakville