Tell the story

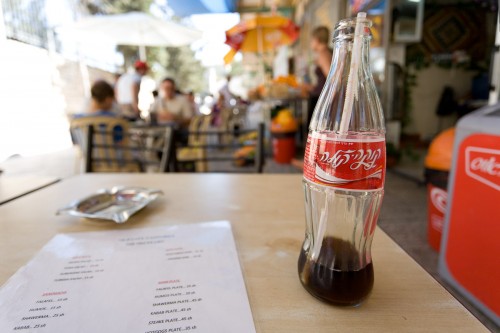
Here’s an image from a 2007 trip to Jerusalem:

Jerusalem 2007 (Photo: Michael Willems)

A typical “B-roll” picture – a picture that helps…

  1. …set the scene – where we are;
  2. Tell something about the environment;
  3. Make the viewer “work it out”;
  4. Provide a visually interesting image.

In this case, elements are: the blurred scene in the background (people eating and drinking, the waiter, the umbrellas); the Hebrew on the coke bottle; the menu including shoarma; the sunny background; and the three-dimensional feeling created by the “close-far” technique.

When you next travel, try to take lots of images like this. You’ll be amazed how much easier it is to tell the story.


Tip of the day

Thinking a little more about yesterday’s post: here’s a suggestion for you.

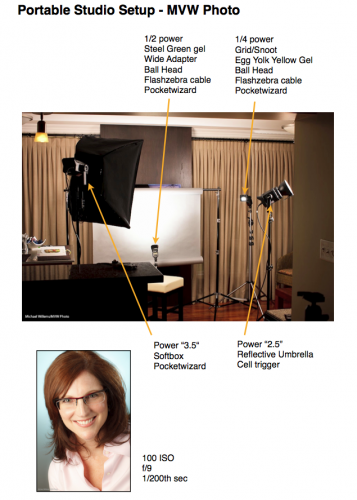
When you find a setup thart works, or when you pack your bag just the way you like – anything like that, make a one-page cheat sheet for yourself.

Like mine for the portable studio I showed you yesterday:

Click through to see it as a PDF:

HomeStudio-Small

And of course I have that cheat sheet PDF on my iPad also.

These “recipe” sheets help me or my assistant quickly set up a starting situation, in case I am in a hurry. (OK, I am always in a hurry.) This way, I ensure I do not forget something. I have one for my lighting bag (what goes where), for common lighting situations, and for common shoots.


A simple lighting setup?

What one person finds complicated, another finds simple.

And vice versa. A friend who visited the other night reminded me of this, when I talked about the simple four-flash light setup I was using for a headshot:
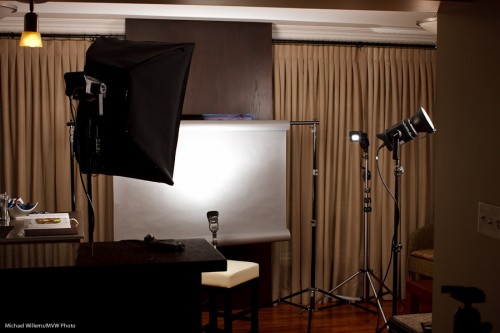
And as he said that, I realized that perhaps it’s not simple.

But if you want to take portraits, then it should be. In other words, without knowing how to do a “traditional” portrait setup, it is hard to do creative portraits. No, that does not mean you need to make all portraits traditional – you can do great stuff with one off-camera speedlight and a grid.

But you need to know how a traditional portrait is made. Which is with:

  1. A backdrop (paper roll, here).
  2. A main, or “key” light, in this case a Bowens strobe with a softbox.
  3. A fill light (Bowens strobe with umbrella, in this case).
  4. A hair light (speedlight with Honl Photo grid and egg yolk yellow gel).
  5. A background light (speedlight with Honl Photo blue-green gel).
  6. A way to drive them: Here, I used one strobe and two speedlights fired by pocketwizards; one strobe by the light-sensitive cell.
  7. Metering: I used light meter to arrive at f/9.0 at 100 ISO and 1/200th second.
  8. Ratios: I set the fill two stops darker than the key. And the hair and background light by trial and error (I got them right first time – done it before).

A note about those gels: colour makes a difference. I love the blue-green gel on the background, to contrast with the red hair – contrast is good. That’s why the butcher uses green plastic between the red meat – to make it look redder. (Oh wait – butcher? We buy meat at the supermarket now, in neat little packages. Dumb me.)

Anyhow – parsing makes things simpler. If you are faced with a complex situation, parse it, i.e. take it apart, one thing at a time. Analyse each layer until you understand it, then go on to the next layer. And before you know it, you will be saying “that’s simple”.

That’s what you learn when I teach you: how to make complex situations simple by understanding the elements, then building on those. Deductive learning, if you will.

And what does the setup above produce? Portraits like this:
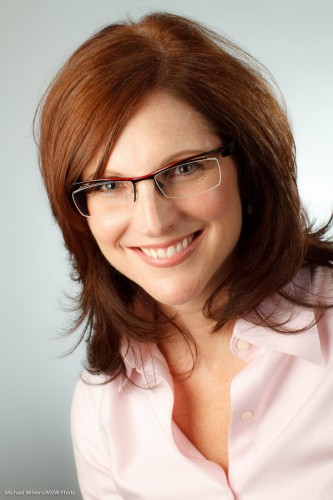
Headshot (Photo: Michael Willems)

(Canon 7D at f/9.0, 1/200th sec, 100 ISO)

A plug, if I may: if you, too, need an updated headshot, and live in the Greater Toronto Area, do call me. For Facebook, your resume, LinkedIn, or your web site: a good headshot helps, and Headshots Specials are on during the month of September!


Golden

I don’t have to tell any of you the best time to take photos, right? Mid-day on a sunny day.

Kidding. Of course what I meant is “the hour before sunset” – or the hour after sunrise, but then I tend to be asleep. The Golden Hour, as we call it.

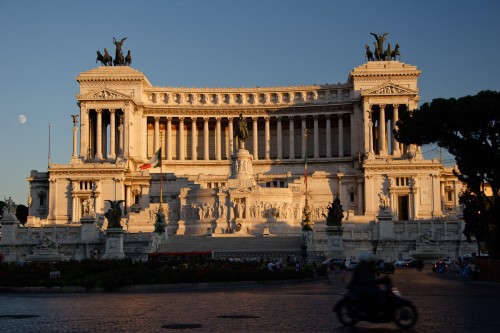
Piazza Venezia (Photo: Michael Willems)

Around sunset:

  • Light becomes more red since it passes through more atmosphere;
  • The sky gets darker, meaning more saturated (blue rather than blown out white);
  • Light becomes less harsh;
  • Shadows get longer and softer.

To benefit from this, ensure that your camera is set as follows:

  1. White balance – daylight (the sun symbol);
  2. Exposure – not too bright (maybe exposure compensation around -1 stop);
  3. If the shutter speed gets low, ensure you increase ISO or use a tripod.

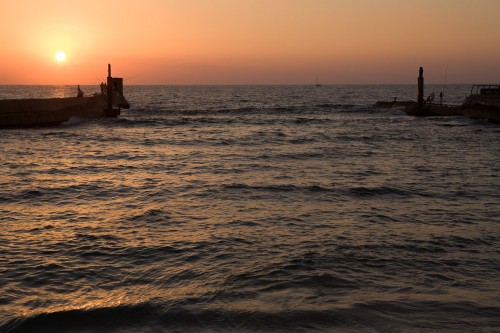
Simple. In Rome, as above, and in Tel Aviv, London and anywhere else you care to shoot. Sometimes it is just as simple as “be there at the right time” rather than “use lots of technique”.

Tel Aviv (Photo: Michael Willems)

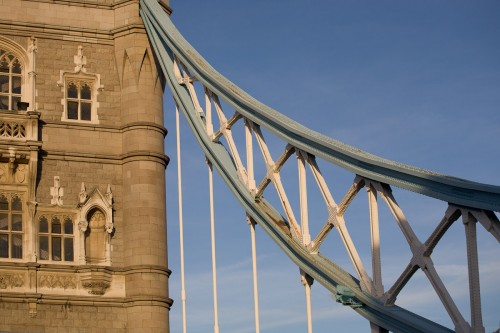
Tower Bridge (Photo: Michael Willems)

Of course as you all know, you can also shoot at mid-day – that’s when flash comes in. More about this in many future posts, I can assure you.


Of blinkies, histograms and the dress

In your camera menu, you can enable a view called something like “highlight alerts”. Either by enabling it, or by pressing “DISP” or “INFO” until you see it.

This means that when reviewing, you get to see black and white blinking areas where the image is overexposed. Where it blinks is where it’s over-exposed.

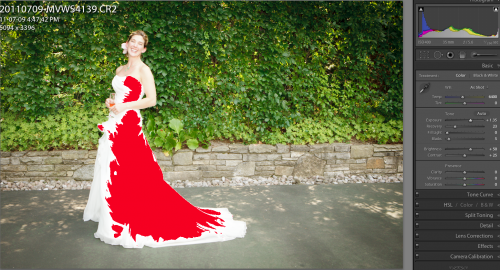
You can also see this in software like Adobe Lightroom (By clicking on the arrow on the right of the histogram, in Lightroom’s case):

Dress (Photo: Michael Willems)

This means the dress is overexposed. All detail is lost on the red area. Bride not happy.

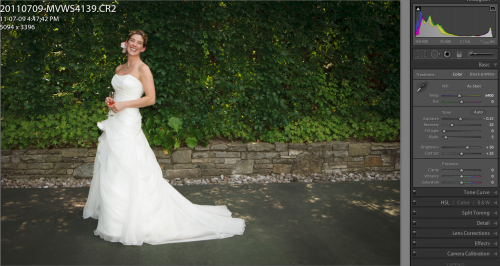
If you had left the camera to itself, it would have perhaps underexposed the dress, especially if it is large in the image:

Dress (Michael Willems)

Not bad, but bride still not happy, because a white dress should be pure, 100% white. Meaning it should edge against overexposing, but only just.

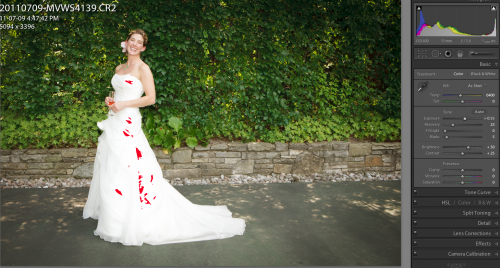
And that is where the blinkies come in. Enable the blinkies, and expose so that the dress is only blinking a little bit, and only just. In Lightroom, that looks like this:

Dress (Photo: Michael Willems)

And that is how you use the blinkies: expose so you see a tiny bit of blinking in the white areas – but only just.

The blinkies and the histogram represent a major contribution to photography – use them, and ace your exposures.


How far will my flash reach?

I hear this question often enough to devote a post to it.

“How far will my small on-camera mounted speedlight reach”?

So I thought perhaps I would try to answer that for you.

At full power, if your camera is set to 100 IS, your flash will reach:

Distance = Guide Number / Aperture

The flash’s guide number, in metres at 100 ISO, can be found in its manual. The Canon 580 EX has a guide number (GN) of 58, the 430 EX has a GN of 43.  So at f/5.6 the 580EX will reach 10 metres roughly, at full power.

Things to know:

  • Smaller f-number (larger lens aperture) = more range.
  • Each time I double the ISO, I get 40% more range (square root of 2)
  • You can zoom the flash head in more to get slightly more range; wide angles give you less range.
  • Modifiers reduce the range.
  • An advanced flash will tell you the range, but only if you aim it straight ahead.
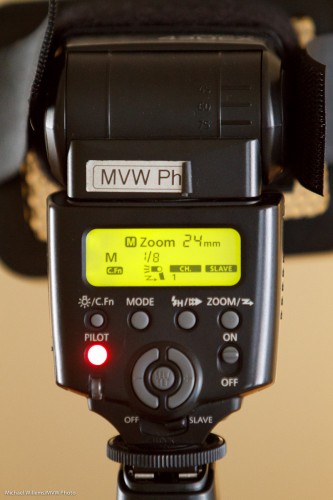
  • To test, set your flash to manual, full power.

Know your flash’s guide number at least for a rough idea!


Fashion flashin’

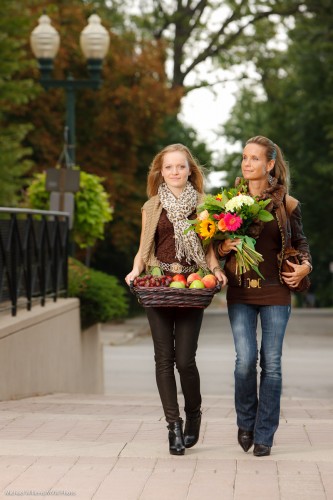
Sunday morning, around mid-day, in downtown Oakville I shot a fashion shot for a magazine front cover.

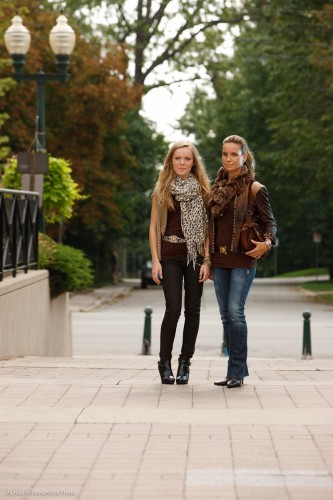
Outdoors fashion is, as always, a matter of many things coming together at once. One of those is light. Without light, even on a wonderful overcast day (wonderful in photo terms), the image lacks something. The mother and daughter models lack a certain je-ne-sais-quoi.

Actually I do know – they lack light:

Models in Oakville (Photo: Michael Willems)

So we add a flash. I used a Bowens 400 Ws strobe, although I could have used speedlights. The sequence is as follows:

  1. I set my camera to manual.
  2. I select 1/200th second and 100 ISO.
  3. That gave me, on this particular day, an aperture of f/5.6 for a nice saturated background. (To arrive at this, I can use my in-camera meter or my light meter set to ambient.)
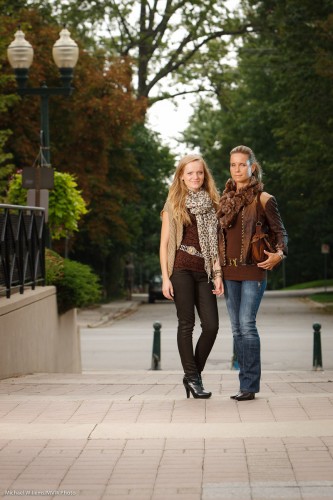
  4. I now add the strobe, set it to 80% power about 6ft away, and test this with the meter (now set to flash mode). Well have you ever:  the meter immediately indicates f/5.6! (This is just experience. If you are less experienced, no worries – just turn the light up and down until you do read f/5.6).

That gives me:

Models in Oakville (Photo: Michael Willems)

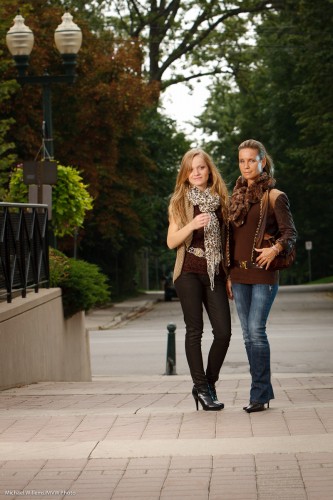
If I want the background a little darker I change the speed to 1/250th (still in my flash sync range):

Models in Oakville (Photo: Michael Willems)

Okay, we are set. If the sun comes out a little more,  I go to 1/250th, and if it gets a tad darker I go to 1/160th.

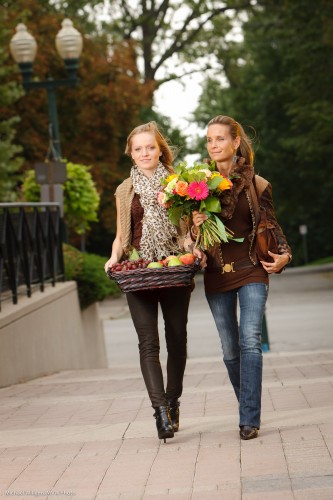
The idea of this shot is autumn – so we now bring out the props. Autumn flowers and fruits and vegetables now gives us this:

Models in Oakville (Photo: Michael Willems)

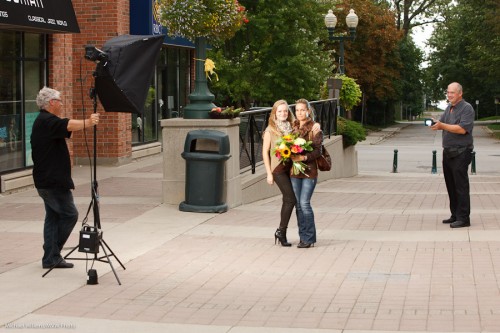
Notice the speedlight with a blue-green gel as accent/hair light on our right? The speedlight was held by Kurt, who assisted on this shoot, and was set to 1/4 power (again – experience tells me that setting will probably work – and it did).

The final step is to make that an egg-yolk yellow gel instead of a blue-green gel – yellow accentuates the late day setting sun feeling that is synonymous with autumn. (I use Honl Photo gels).

Models in Oakville (Photo: Michael Willems)

And there we have the image. (In fact this is not quite the image – that one went to the client, and I do not like to publish images in this open forum before the customer has used them!). Also – note that these are shot a little wide since this is for a magazine front page, so there needs to be space for text.

Notes:

  • Umbrellas and softboxes outdoors will be blown away, so hold on tight.
  • If the models move, use AF-C/AI Servo focus mode.
  • With two models, be very aware of the danger of blinking – one of them will blink in very many images, so check, and take many images.

The setup was as follows:

Fun shoot.

(And perhaps also, a shoot that explains why photography costs money: A car full of equipment, props that get used just once, two sets of clothing, and five people taking several hours. All this costs money!)


Help – it’s night!

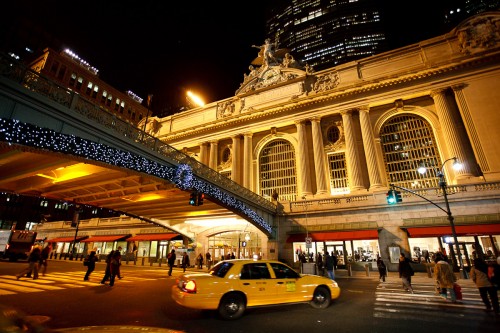
Grand Central, NY (Photo: Michael Willems)

It is night, as in this old shot of Grand Central Station. How do you deal with this?

Technique. A combination of techniques, actually. Use as many of these as you can:

  • Stabilize your camera. Use a tripod, or balance the camera securely on any surface (protecting it with a bean bag).
  • Use a wide lens. This makes it possible to shoot slower.
  • Use a stabilized lens.
  • Use exposure compensation (minus!), or spot meter off buildings, to avoid too-long shutter speeds.
  • Increase your ISO if you have to.
  • Sometimes I even slightly underexpose and then push the exposure later – better a little grain, if I must, than motion blur.
  • Take many shots – and just use the sharp ones!

As you see, there is no single answer. A combination of the above will work. Night is the best time for many shots – use it.

This shot is from the all-new “Travel Photography” course I just wrote for the School of Imaging, by the way. Completely rewritten and worth taking – if you are going to travel, you owe it to yourself!


Vegetation Tip

A quick tip, today:

Green vegetation is dark. About a stop darker, on average, than a grey card.

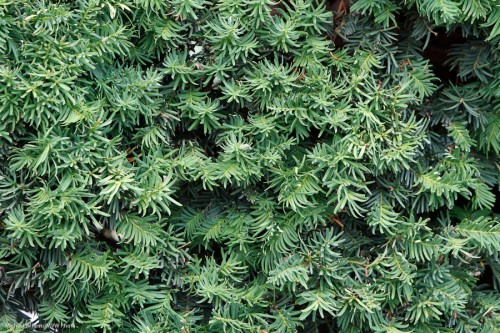
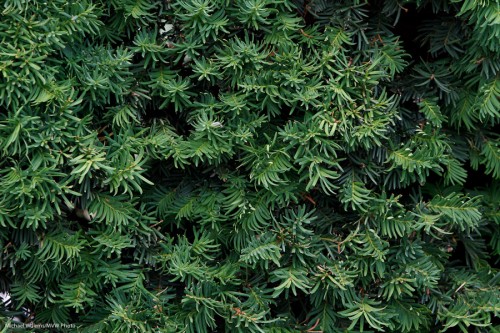
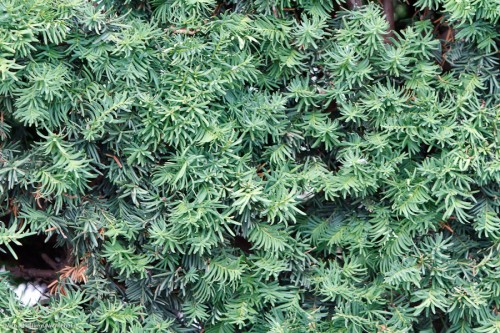
That means that when you shoot green plants (a hedge row, or the back yard,or the fall colours), the image is too bright. Too bright means “washed out”:

Not too bad.. but one stop darker – i.e. exposure compensation set to minus 1, or the light meter pointing at “-1” if you do it manually – gives you this:

Much better.

If you had adjusted the wrong way, i.e. to plus 1, you would have gotten this:

Of course this holds for average green plants – some are brighter, and if you mix sky into the mix your camera will give you different readings (you might try the spot meter).

At least you are warned now – plants will often look washed out unless you expose them right – and right often means down by a stop.


Points of view

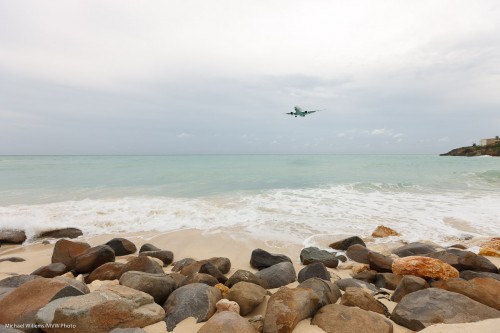
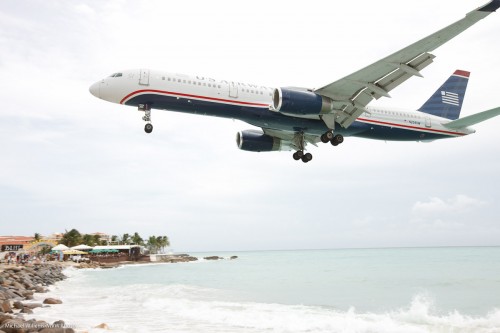
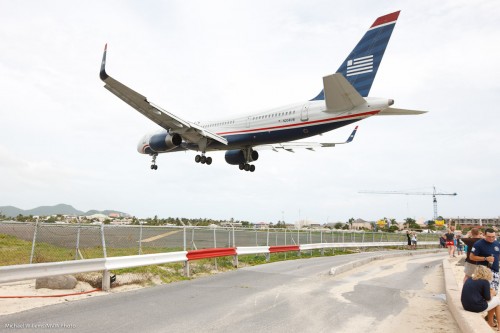
Just to show how much a few seconds and  shift in viewpoint can change your photo, look at these images:

Aircraft landing, Sint Maarten (Photo: Michael Willems)

Aircraft landing, Sint Maarten (Photo: Michael Willems)

Aircraft landing, Sint Maarten (Photo: Michael Willems)

Most people would assume that…

  • The larger the aircraft, the more impressive
  • The less perspective distortion, the better

I am not sure I agree with that.  The top picture is a favourite, even though the aircraft is tiny. And while aircraft spotter sites insist on “straight” images, I much prefer the drama a wide lens gives you (bottom images).

This is not to say that I am right. What I mean is: cameras, and lenses, are powerful creative tools, and you should think about how you use them; try to use them in different ways; be creative; experiment, and follow your intuition.