Effects

Lightroom 3 has cool develop effects built in. I hardly ever use them, because I generally like to think of photography as something that is mainly done in the camera. But I must say, sometimes it is fun to go wild.

Take the “aged photo” effect. Desaturated, basically. Which seems very appropriate for this picture, taken today in Oakville during a Henrys “Creative Urban Photography” outdoor workshop I taught:

A 1958 Dodge, shot in Oakville by Michael Willems

1958 Dodge, shot in Oakville

Or this wall texture:

Wall texture, shot in Oakville by Michael Willems

Wall texture, shot in Oakville

So I suppose my message is: don’t feel bad when you want to do some post-production.

Lightroom Tips

As a photographer you need Lightroom, or perhaps Aperture if you are so inclined.  And Lightroom 3.0 is out, leading me to give you a couple of quick tips.

  • In the develop module, ^C (control-C or on a Mac command-C) copies selected settings (you can indicate which ones) from a photo and then ^V pastes them to another photo. This is often the way I synchronise settings between a few photos. Quick and simple, and unlike some of the other settings, not confusing.
  • Always type “G” to go back to grid view, “E” to go back to loupe view; and type “D” to go back to the develop module. Using the mouse all the time for this takes too much time.
  • “L” dims, or turns off, the lights. (Keep pressing and it toggles).
  • “F” goes full and even fuller screen. (Keep pressing and it toggles).
  • “Z” toggles the zoom view (a useful shortcut to know).
  • Use “Solo mode” on the panels on the left and right (right-click to select this). That way you avoid everything opening at once.
  • The new develop presets are really good – try them!

Also, remember to set the metadata and develop presets. These are well hidden – I regularly take forever to find them. But while the User Interface here is infuriatingly confusing, you only have to learn it.

  • Create a metadata preset that you can then use when you like and even automatically apply when importing. Do this as follows: Library – Metadata – Edit Metadata Presets – (make your changes, e.g. enter copyright data) – Save current settings as new preset. Call it something like “Joe Metadata Standard”.
  • Create a develop preset that you can then use when you like and even automatically apply when importing: select a photo, go to the develop module, make any changes you need (eg set camera calibration to CAMERA Standard, not ADOBE Standard) – and then use menu functions DEVELOP – NEW PRESET. Call it something like “Joe Develop Standard”. You will now see your new preset in “User Presets” in the left panels. To make changes to your preset, right click on it here and “Update with current settings” after you make the changes to the image.

Learning this application is sooo worth it.

Can you use a Canon 7D at high ISO?

Yes you can. Especially when you use Lightroom 3 noise reduction.

I want to show you this picture again – a repeat, but now with full sized crops and re-edited with Lightroom 3’s magic noise cancellation.

Here is the cat, shot with my 7D and a 50mm lens set to f/2, at 3200 ISO. And.. pushed 1.67 stops.

Meaning I underexposed, and increased exposure on the computer. This results in the worst noise you will ever see, much worse than you will see when using the camera properly.

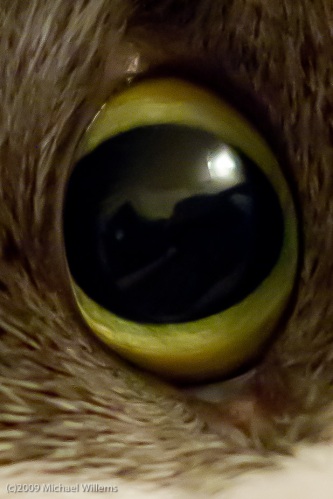
Here is a detail from it, in the original size crop with no noise cancellation. Click to see it at real size.

Cat's eye with noise, shot by Michael Willems at 3200 using a Canon 7D

Cat's eye with noise

Now we apply 90% noise reduction. Magic:

Cat's eye with noise reduction, shot by Michael Willems at 3200 using a Canon 7D

Cat's eye with noise reduction

The finished picture:

Cat with noise reduction, shot by Michael Willems at 3200 using a Canon 7D

Cat with noise reduction

So do not be afraid of high ISO when you need it. It’s fine. Relax.

1600 is the new 200

I am now using Lightroom 3, having upgraded from 2.6. Strongly recommended. Very strongly: worth every penny of the $99 upgrade fee.

If you do not yet know about Lightroom: you need it (or if you use a Mac, Aperture, the other option. For PC, Lightroom is the only option). The apps organize, keyword, rate and find your files, or rather allow you to do so; and they allow you to do 99% of the editing you’ll ever need, non-destructively and quickly. Much more quickly and conveniently than in Photoshop, which in spite of its name is aimed at illustrators.

Lighroom 3, which I will review in more depth soon, is superb. The major function is the noise reduction. 1600 ISO is the new 200. It is magic.

Look at this image of a student at the Henry’s imaging show recently (and I know you are reading this!). Shot at 1600 ISO with the Canon 1D Mark IV. Click on the image to see it larger:

An image shot with off-camera flash at 1600 ISO

An image shot at 1600 ISO

Superb quality!

But the original was more noisy, especially since I had to push it half a stop (yes, it was a dark room).

Here is a piece of that image. When you click it, you see it at its original size.

An image shot with off-camera flash at 1600 ISO, before Lightroom noise reduction

before noise reduction

Now look what happens when I apply some noise reduction:

An image shot with off-camera flash at 1600 ISO, after Lightroom noise reduction

After Lightroom noise reduction

And that is just after dragging the slider,. I could play with the parameters to make it even better.

Magic, pure magic. I shall be shooting tomorrow’s Bat Mitzvah party muchly at 1600 ISO, I imagine.

Exiftool, a great exif tool

A tip for y’all today. If you take digital pictures, get Exiftool.

Exiftool is a free utility by Phil Harvey that allows you to see (and even alter, but seeing is the main thing) the entire range of EXIF data embedded in your image.  Not just what your camera maker wants you to see – no: everything. Hundreds of fields, like the exact zoom setting of your lens. The focus spot you used. Much, much more.

ExifTool is a command line utility and it’s free, from here (link).

(Additional tip: open a command line (terminal) window, type “exiftool” and a space, then drag the image you want to know about  from your desktop into that command line window.  This avoids the need totype long complex filenames.)

That was quick

I am impressed. Remember I mentioned Inkpress and how well they reacted to the warped paper?

Well, less than two days later, a box with lots of new paper just arrived via FedEx. Now that’s service!

And I am back to printing. And I note the new boxes have cardboard under and on top of the paper, and the paper is entirely flat, so I should have no more issues. Well done, Inkpress!

Let's start printing.

Printing is more important than ever. We can now make great photos and print them professionally at home, impressing everyone. And we should! Printing is the way to really enjoy your photography.

But it is, or can seem like, a kind of black magic – an art almost as much as a science. Perhaps because of that, I was asked recently to talk about my print workflow. And since I just spent the entire last two days printing 13×19 prints, this seems a good time to start.

“Start” is the word: this will be several posts – not one.

And what I want to start with is the distinction of pigment inkjet printers (such as the Canon 9500) versus the more common dye inkjet prints (like the Canon 9000).

Dye printers:

  • Are common and affordable.
  • Can print to any paper.
  • Have ink that bonds with the paper.
  • Produce very bright colours.

Pigment printers:

  • Are more costly.
  • Can only use certain papers.
  • Deposit their ink on the paper instead of bonding with it.
  • Produce prints that dry a bit more quickly.
  • Most importantly, tend to produce prints that last. 200-300 years is common, while dye prints often last just 20-30 years.

I use a Pigment printer (the Canon 9500). This means I am restricted with regard to the paper I can use. I use Canon papers and other Hahnemülle papers (the ones that say “Pigment” on the box). These are not as bright as other papers (off-white), but for a good reason: they last and stay the same way. I would rather have a slightly yellowish paper that will be the same for centuries than a bright white print whose ink and paper will both fade in more decades.

This is not a law. Some dyes wortk very well and are long-lasting. So do your research. But you will find that today, pigment printers are a great option if you want prints that last, while dye printers offer affordable impressiveness for today.

I know – I am simplifying. So do your research and decide what to do. Google is your friend.

Service Done Right

Yesterday’s post was about Canon’s new CPS (Canon Professional Services) program that apparently decreases service level, introduces a lot of red tape, and at the same time changes the cost from $0 to $250. I may be mistaken, but I do not think so, and Canon has not replied to my email about this.

So let me also share an example of a company that does service right.

I have a pigment printer, not dye (namely the Canon 9500). That means I need to select paper carefully (not all papers can be used with a dye printer – in fact few can. Read the box to make sure). I use Canon papers made by Hahnemülle, and I use Inkpress Pro papers from www.inkpresspaper.com – in particular Inkpress Pro Silky, which I really like. My standard paper!

But the last two boxes I bought contained only warped paper. Obviously a storage problem with the retailer, or perhaps old paper. In any case, this ruined half my prints: they touch printer rollers and smudge ink all over.

I went to the web site at www.inkpresspaper.com and filled in a simple form. Minutes later, a VP from Inkpress emailed me this:

How many sheets was it? Please provide us with your address- we will send you a replacement asap.

Now that is service done right. Not only does it help me with my immediate issue (I only print large, and 13×19″ paper costs a few dollars!) but it ensures that I will remain a customer, and that I say nice things about Inkpress and their paper.

I cannot understand why every vendor does not understand this, but I do, and Inkpress does as well.

dpi/lpi versus pixels

I keep hearing people say “I want this picture at 300 dpi”, or “send it to me low quality at 72 lpi”.

When talking about a given image, that by itself is meaningless!

Let me see if I can explain. I will simplify and assume that dpi (dots per inch), ppi (pixels per inch) and lpi (lines per inch) are the same. They are not, not exactly; but assume for a moment that they are, since it makes no difference for this explanation.

Folks, the dpi (or lpi) setting makes no difference to the quality of an image. Not by itself. It is just an instruction to the printer.

It is the number of pixels that makes the difference. Not the number of pixels per inch, which is just an instruction to the print device.

Let me try to explain.

Let’s start with the image. You have taken a picture. It is a certain number of pixels in size. Say, 640 pixels wide, or 1,200, or 4,500. That is the resolution of the pixture. The more pixels, the higher the resolution. Very simple. So let’s say your camera is a 6 Megapixel camera – that means your image is 3000 pixels wide (3,000 wide x 2,000 high = 6,000,000 pixels, or 6 Megapixels).

When someone says “send your picture to me at 72 dpi” or “send it to me at 300 dpi” that means nothing by itself. Try it: export your photo from Photoshop as 72 dpi and then as 300 dpi and compare the two images. Identical number of kilobytes, and when viewed full size, identical detail.

DPI means “dots per inch”. So by saying “take this image and make it 300 dpi” that is just telling the printer “take this image and print it ten inches wide” (3000/300 = 10). Setting it to 72 dpi means “print it  42 inches wide” (3000/72 = 42). But it neither increases nor reduces the quality!

What people need to say if they are talking about image quality is:

  1. “Send it to me 10 inches wide at 72dpi”.
  2. Or “send it to me 10 inches wide at 300 dpi”.

Which just translates to:

  1. “Send it to me 10 x 72 pixels wide, i.e. I mean 720 pixels wide”
  2. or “”Send it to me 10 x 300 pixels wide, i.e. I mean 3,000 pixels wide”

So if you mean 720 pixels wide, or 3,000 pixels wide, why not just say that?

That is the essence. After all, it is easier to set one variable (pixels wide) than two (dpi and size); and pixels mean something real.

Unless we are printers, we are talking about it from this perspective, so we should use clear terms. Telling me “send it to me at 72 dpi” is only meaningful if you also add the inches. So be clear, and say “send it to me 3,000 pixels wide”.

Lightroom Tips

Two Lightroom performance tips for you today:

  • Optimize your library regularly. On a Mac, go to “Lightroom”, “Catalog Settings..”, and select “Relaunch and Optimize”.
  • Increase your Camera RAW Cache size to at least 10 GB (if your hard disk has that much size available). On a Mac, go to “Lightroom”, “Preferences”, and set Camera Cache size to 10 GB or more.

This will keep your Lightroom installation working more quickly.