Fong

When I shot the Tribe party recently, I was not the only photographer using a Gary Fong Lightsphere:

fong

In general, where there’s no obvious bounce surfaces, the Fong Lightsphere is what I will turn to. No panacea, but a good tool to have in your bag. The Lightsphere throws light in all directions, and there is a good chance that something will bounce back light.

And of course open your lens all the way f/1.4 is better than f/2.8 when the light is low. And 2.8 is better than 4. And 4 is better than 5.6… you get the picture.

That dreamy look

If you want portraits to have that dreamy look, use a lens with a wide aperture (a small F-number, like 2.8).

I took this picture yesterday, using a prime 35mm lens (the Canon 35mm f/1.4L) on a Canon 7D, at an aperture of f/2.5 and a shutter speed of 1/50th second.

That 35mm on a 1.6 crop factor camera is like 50mm on a traditional full frame camera. So it’s a “Nifty Fifty”.

A that focal length, I was able to go quite close to Mr Pumpkin without much distortion, as you can see.

IMG_2199

That gives you a very nice look. The close proximity combined with the f/2.5 aperture gives me nice soft bokeh (the creamy quality of the background blur). Even the back of the head is soft.

Beautiful: reason for a smile.

Off topic

After I said yesterday that Apple should write the Canon UI. I am not so sure, having just discovered there is no way to set MONDAY to be the start of the week in the iPhone’s calendar. I can never find anything in month view with Sunday starting the week. Yes, you can set “international” to UK, but that messes up everything else, like phone numbers. What were they thinking?

Hold it.

In the last couple of days I used two new strap systems while shooting events: the BlackRapid R-strap (which I’ll review later) and the new Ezee Strap, pictured here:

IMG_1722

That strap sits on your shoulders (the leather part on your back), and the movable hooks attach to the camera through rings. The camera thus sits symmetrically in front of you. To take a picture, you simply raise it and it comes up.

The first thing that I felt after putting on the strap and attaching the camera: : nothing.

Meaning – instead of the usual effort and discomfort of holding a heavy camera like my 1Ds MkIII, it is effortless. So that’s good. Easiest way I’ve held a camera. Also – the camera stays in place,. It neither swings right and left, nor forward much when you bend over. This is great!

There are a few minuses, of course. The rings are metallic and they do scratch the camera hooks a bit. That’s minor so I can live with it. The strap is, quite frankly, cheaply made. But it does the job. And because it has two hooks, it is saferthan some of the other alternatives.

Also, the camera hangs exactly where your belt buckle is. But.. it raises so easily and effortlessly (even for vertical shots) – that this, too, is worth it. And finally, this strap is costly – but again, it does the job, so compared to a bad back…

So while there are some drawbacks, none of those are showstoppers. I plan to use this Ezee Strap in some more upcoming shoots, and will give you more feedback after those. So far, it looks like it will stay in my bag as a permanent fixture, and one that makes a big difference in shoots where I carry multiple cameras.
Menu

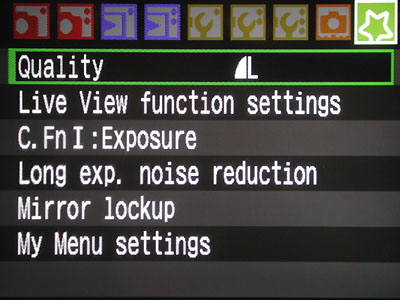
As a teacher of photography, I am struck time and time again by how difficult it is to explain camera menus to people. Canon is better than most, but all are difficult. All sorts of buttons, and different ones all the time:

mymenu

To experienced users and pros, these are simple. But to novice camera users, navigating through these menus is a real challenge. Do makers of cameras not do focus groups?

Evidently not. Just look at the “wake-up” button that you need to keep pressing every few seconds when setting anything on your DSLR. Again – obvious to us, but tough for novices. Nothing tells you this!

Did you know that on a 7D, you can get the camera to default to always going to your custom menu when you press the “menu” button? Look for it under “My Menu Settings”. The function has an unintuitive name, but it’s there…

I think we need Apple to design the next DSLR User Interface.

"What lens should I get?"

“What lens should I get?”

I hear that question a lot from students, and I am always delighted to help answer it.

Of course “help” is all I can do. And I will, over time, in this blog. I can explain the difference between:

  • Zoom and prime.
  • EF and EF-S (or non-DX and DX).
  • Wide and telephoto.
  • Normal and specialised, like Macro and Tilt-Shift.

And I can explain what to use them for (long for sports and safaris, short for environmental, parties, and photojournalism).

And with that knowledge, you can, for instance, buy the lenses I use – or at least understand why I bought them:

lenses

So this is a typical photojournalist collection, consisting of fast (f/2.8 or better) lenses:

  • Zooms: 24-70 2.8L, 70-200 2.8L and 16-35 2.8L
  • 100mm macro
  • Fast primes, 35 mm f/1.4L and 50mm f/1.4

But “fast” does not have to mean “expensive”. The first lens you should buy is the lens I shot my lenses with – the cheapest Canon lens (and Nikon has one too): the 50mm f/1.8. The “nifty fifty”. And while the lenses above range from $500 (50mm) to $1,000-$2,000 (all the rest), the 50mm f/1.8 is just over $100. And boy, is it fast and sharp. Zoom in to see!

And that nifty fifty on a crop camera turns into an 80mm portrait lens.

One thing to feel good about: when buying a lens, you are investing. Unlike a camera, which loses value as quickly as a PC, a lens keeps its value for many years.

3200 on a 7D

This is what the cat looks like, when shot using my 7D, hand-held using the 35mm f/1.4L lens in available Tungsten light, slightly cropped, at 3200 ISO:

IMG_2036

I am not going through the trouble of showing the full crop because I want to make a point. And that point is: we often over-analyse. As you see here, indoors, low light, 3200 ISO with a fast lens, and you get images that look great at 1200 pixels wide and in a moderate-sized print.

Yellow and blue

We have seasons in Ontario. Grey (now), then brown, then white, then grey, then brown, followed by green, and then grey again. White, unfortunately, with brown , is the longest.

IMG_2060

But in between, you get some nice pictures.

IMG_2070

I always look for contrast: brightness and colour. This was this morning, outside in a car park.

Taken with the 7D with the 35mm f/1.4L prime lens. My general walkabout lens.

Why fast lenses?

Beginners often ask me “why should I buy those lenses with the low F-numbers? Why not buy the standard lens with the 5.6 on the front? They say the lens with the 2.8 on the front is better but I see it takes the same pictures: it’s just more expensive, right?”

Not exactly. The low F-number means  the lens has a larger maximum aperture. This means two things: it lets in more light, meaning faster shutter speed; and the ability, should you choose this, to create blurrier backgrounds.

Here’s my hand at F/11. Recently in Scarborough, while the other instructor, Christine, was explaining the effects of the Aperture setting. My hand is as close as the lens will allow while still achieving focus. I am in Aperture mode (“Av”) and have set the camera to a setting of F/11:

f11

Now the same at f/5.6: a much blurrier background, see:

f56

And now, since I have an expensive lens, I can go even farther, to the extreme end of this lens, namely f/1.4. Meaning very wide open. Meaning very blurry background – and when you look carefully, even foreground:

f14

So that is why people buy these lenses with those low F-number – i.e. “fast”lenses. If you want to blur the background dramatically. Or if you want to have the resulting faster shutter speed (at the same ISO, f/1.4 gives a shutter speed four times faster than f/2.8, and 16 times faster than f/5.6).