What you do not light

Lighting is all about what you do not light.

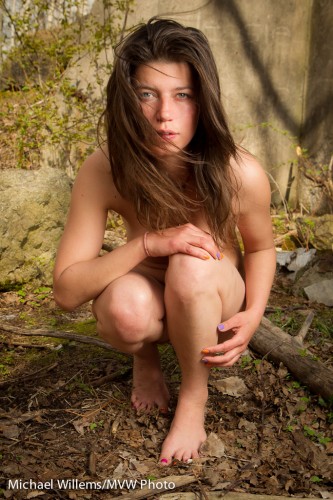
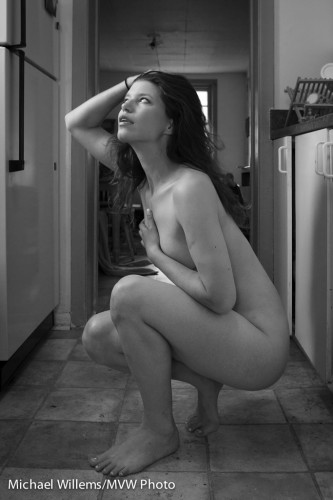
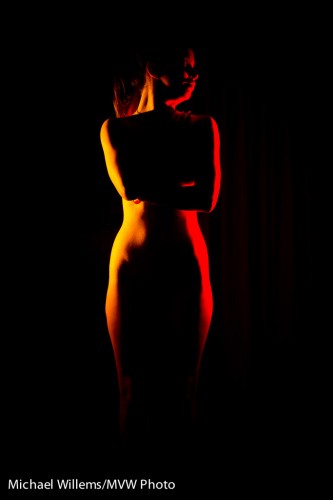
Like in this “implied nude” shot from the other day:

How did I light this?

  1. Camera on manual, with settings guaranteed to make the room look dark (it was not, but the camera makes it look like it was): something like 1/125th second, f/5,6, 200 ISO.
  2. One flash on the camera disabled, except for sending commands (“master”).
  3. One TTL “slave” flash on our left, slightly back aimed forward a little, with a grid to stop light spilling, and a yellow Honl Photo gel.
  4. One TTL “slave” flash on our right, slightly back aimed forward a little, with a grid to stop light spilling, and a red Honl Photo gel.

Easy technique, and a lot of fun. Try to not light everything all the time. A few flashes, grids, gels: all you need!

 

Light, camera, action

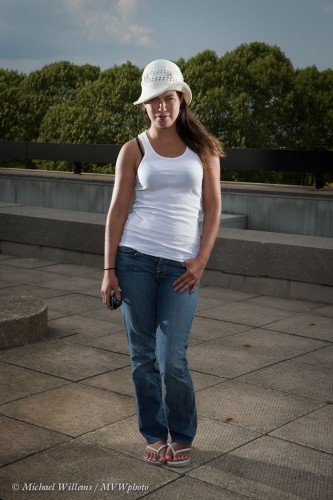
In an image like this, taken today, you need flash:

Why?

Because on a sunny day, the shadows will otherwise be harsh. And because the background needs to be darker, since that makes the colours saturated. And since, as you know, “bright pixels are sharp pixels.”. And since you want to direct light, rather than have the sun do it. And since the sun needs to be behind the subject, so there no squinting. And since flash give you crisp, great sharpness.

I used TTL flash for the shot, using one off-camera flash. The camera was on manual mode at 1/300th second, f/5.6, 100 ISO. A flash on the camera was off, but was driving the off-camera flash via light control, so direct path of light between the camera and the second flash is needed.

The colors here are great precisely because a flash was used. I do not like to shoot outdoors without a speedlight, and here you see why.

In bright sunlight, a single speedlight can do this, as long as your camera has a good flash sync speed (1/300th second on mine!) and as long as your flash is close enough to the subject to compare with the sun’s brightness. Else, use a studio strobe.

Outdoors light, or, Umbrella RIP

I shot some model shots outdoors today, in very difficult conditions. Outdoors in varying light: often, ouch, direct bright sunlight. And very windy – up to 95 km/h gusts – which means a light stand with an umbrella, which after all is like a sail, gets blown over constantly.

And outdoors on a bright day you need a flash, and preferably a modifier like an umbrella or a softbox.

That gets you well-lit shots without horrible shadows. Shots like this one of today of my model Kim (from my Tumblr site):

What is the challenge outside?

  • You want to expose the background right – you want to make it dark to bring out saturated colours and to make your subject the “bright pixels”.
  • That means low ISO, fast shutter, and high F-number.
  • But you cannot exceed a low speed like 1/200th of a second (your maximum “flash sync speed”)…
  • And low ISO and high F-number reduce the effective power of the flash…
  • …so for flash you would ideally like high ISO and low F-number, since your flash needs to be powerful to “compete with the sun”!

That is why you need a large flash, like a battery powered studio strobe. So using a speedlight can be a challenge.

And yet, I managed, as you see. Partly by holding the umbrella close to the model. And by tuning all the variables just right. The umbrella did die, RIP; but it was worth it for the shoot. Yes, you can do it with a simple off-camera TTL speedlight!


A good on-camera flash portrait in simple steps!

As said here before, this is not rocket science, really. Just technique. Let me illustrate with a portrait of a student in my class an hour or so ago:

CAMERA – Set your camera to MANUAL mode. Select, say, 1/125th second at f/5.6 and 400 ISO. This will make the ambient light disappear so the only light is your flash.

FLASH – Use an on-camera flash. Make sure this flash is in TTL mode. Since you are shooting against a white wall, turn flash exposure compensation (“FEC”)  to +1 stop.

AIM: Start by aiming the flash straight at your subject. Baaad:

(Just look at the shadows, the deer-in-the-headlight look, the skin, the shadows: Ouch!)

To improve this, now aim the flash behind you, upward at 45 degrees:

Much better. Especially for women.

But for even better results., often used for men, now turn the flash to your right, and still 45 degrees upward. Now you get Rembrandt lighting:

Simple, innit?

Go try this right now!


Lighting a garage shoot

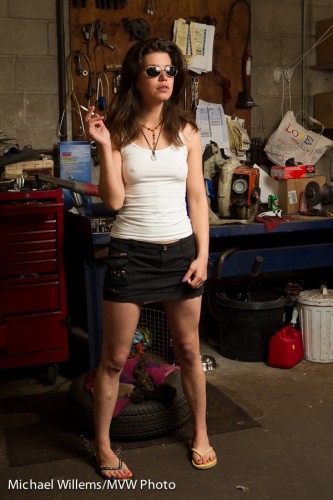
I did a garage shoot yesterday. Grimy garage with girl: a well known (and always good) theme.

But this depends on lighting it properly. And as usual for the Speedlighter, I did it simply:

  • One camera, set to manual
  • Aperture, exposure and ISO set to work well for a darker background: 400 ISO, 1/125th, f/5.6.
  • TTL off-camera flash.
  • One off-camera flash into an umbrella. The main flash is doing nothing.

This gives me shots like this:

Simple and effective!


Grids for chiaroscuro

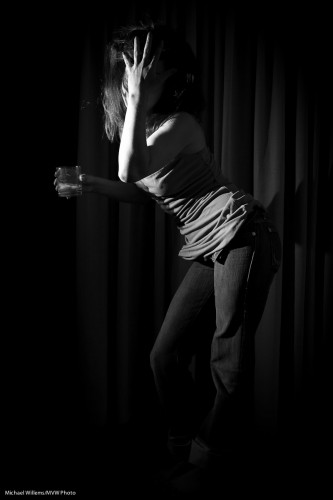
You use a grid on a flash (such as the Honlphoto 1/4″ grid I use) to restrict the light a flash throws. Like in this chiaroscuro picture with a flash on our left that I just took:

Without a flash, the curtain would have been brightly lit, destroying the image’s effect.


Available Light

I am The Speedlighter – but I also of course use available light sometimes. Like in this shot, from my Tumblr feed:

That is an available light shot that works because:

  • There is a window with reflected light – not direct sunlight. This means a north-facing window, for instance; or in this case, an east-facing window in the afternoon when the sun is in the west.
  • I have placed the model in the “cone of light” that descends from this window, so the light hits “the face first, then down from there”.
  • I have exposed well.
  • I have positioned the model to take advantage of that light in the way it lights up her face.
  • The background is fairly simple (I cropped very carefully while taking this picture).
  • The opposite side is light enough (sometimes you need a reflector to achieve this).

Shots like this can really work. And they are easy – all you need is a window as described; a suitable lens; and away you go. remember tho use a high enough ISO so your picture is not shaky.

Of course you can mimic this effect with flash – and I often do – but do try to also use available windo light sometimes!


Bouncing and long lenses

When shooting an event, you would usually use a somewhat wider lens (a 35mm, say, or a 24-70) and bounce the flash behind you, upward – you have read this here many times.

But when you take candid shots with a longer lens, behind you does not always work: to get the righ angle of attach of the light to your subject, you have to bounce forward. I have mentioned this here too, but let me illustrate with an example.

Straight on is not good: hard shadows and “deer in the headlight” eyes. Even when combined with lots of ambient light to minimize this effect, it’s still not great:

But sometimes, bouncing behind is just too far. When you are far away, 45 degrees up but forward is better – but the problem is that some of the light goes straight to the subject:

See the hard shadow under the chin, in the picture above? Especially if there is a wall behind the subject this will be unacceptable.

So then you block the direct path with a bit of a flag (your hand right in front, or a reflector with the black side used to eat up the forward light – so it sticks jus a little above the flash head. You now get this:

So.. when you take flash pictures, just as in yesterday’s lesson: remember where the light goes!


Portable Studio

Your on-camera flash is a portable light studio – provided you use it right. That means:

  1. Finding the right balance between that flash and ambient light. In many cases I want the ambient light to be the fill light, so I set it to -2 stops. My flash will be the key light.
  2. Bouncing the flash.
  3. While bouncing, aiming the flash to get the effect you need.

That third step is essential. To see why, look at the two examples below, of a kind volunteer in yesterday’s Sheridan College class.

Picture one – I am aiming the flash behind me. That’s just like having a large umbrella behind me: butterfly lighting:

And in picture two I swing my flash to the left, still behind me. Now that is like having an umbrella on my left, behind me. This results in broad lighting, which gives the face some modeling, some dimensions, some roundness: in other words it is now a three-dimensional face, not a flat face:

See what I mean? Beginners often fail to think about where they aim their flash, while this is one of the most important steps. Try!


Light direction

When you use a simple bounced flash, always ask this:

“Where should the light be coming from?”.

And then that is where you point your flash.

So if during a custom workshop at Seneca College I want to light up Seneca student and reader Danny Lee with lighting that compliments a man and provides some modeling, I want light from the side – so I aim my flash behind me to the right:

If, on the other hand, I wanted to light him evenly, which makes the face look flat and featureless (and women like featureless because “featureless” also means “wrinkle-less), I would aim the flash straight behind me:

So today’s lesson: always watch where your flash is aimed, and enusre that that is where you would like the light to be coming from.