Flash tip

When your flash is grossly overexposing your pictures…

  • The flash is not seated correctly, or the contacts are dirty
  • The flash is set to MAN (manual), instead of TTL
  • You are using + Flash Exposure Compensation (or on a Nikon, also Exposure Compensation).
  • You are simply too close.

Those are four obvious starting points.

Here is me, pictured by David Honl in Las Vegas the other evening. Using a Leica X1 with off camera flash equipped with CTO gel and Honl Photo Traveller 8 softbox.

Michael Willems, shot by photographer David Honl

Michael Willems, shot by David Honl using a Leica and flash

Today

…during the Netherlands-Uruguay game.

Netherlands-Uruguay happiness, 6 July 2010, photo Michael Willems

Netherlands-Uruguay happiness, 6 July 2010

Tech Note: In a bright room like that, straight flash (aimed forward) is an option, but as fill – meaning I expose just under for the ambient light and Flash Exposure Compensation is set to -2 stops.

Pic of the day

is one I just took on a training walk with a student, a pro photographer. I was showing flash effects:

Blue, Green, Yellow and Red, by Michael Willems

Blue, Green, Yellow and Red in Oakville

Underexposing the background gave me drama and saturated colours; flash gave me bright, poppy foreground. This picture is all about the colours.

Replacing the sun

The sun, most photographers would agree, is not the friendliest light. It is like a studio with one direct light:

  • Too contrasty for the camera’s dynamic range to handle dark to light;
  • It throws shadows;
  • It makes smooth surfaces (like, um, skin)  look wrinkly.

So you get this, of Joseph Marranca on Monday at the Mono, Ont venue of the advanced creative light workshops:

Back yard in sunshine, by Michael Willems

Back yard in sunshine

Nice, but it suffers from all the problems of direct sunlight.

When you would rather have this, two seconds later when the sun went behind a big sky-mounted softbox: a cloud.

Back yard in shaded light, by Michael Willems

Back yard in shaded light

Nice and soft. Saturated colours. Smooth.

Now the only problem is that if you want highlights, you don’t get them. Can’t we have both?

Yes. And that is where flash comes in.

In the portrait shot below of Oakville’s mayor, yesterday, I first took away the sun, using a diffuser. And then I added a flash. Off-camera , with a Honl grid and a Honl quarter CTO gel (with my white balance set to flash). Plus a bit of fill flash on the camera.

Oakville's mayor Rob Burton, photo by Michael Willems

Oakville's mayor Rob Burton, June 2010

I think that being in control is better than just relying on too-harsh direct light. Do you agree?

Effects

Lightroom 3 has cool develop effects built in. I hardly ever use them, because I generally like to think of photography as something that is mainly done in the camera. But I must say, sometimes it is fun to go wild.

Take the “aged photo” effect. Desaturated, basically. Which seems very appropriate for this picture, taken today in Oakville during a Henrys “Creative Urban Photography” outdoor workshop I taught:

A 1958 Dodge, shot in Oakville by Michael Willems

1958 Dodge, shot in Oakville

Or this wall texture:

Wall texture, shot in Oakville by Michael Willems

Wall texture, shot in Oakville

So I suppose my message is: don’t feel bad when you want to do some post-production.

Tara

Model Tara, that is, today, on a workshop in Mono:

Model Tara Elizabeth shot by Michael Willems

Model Tara Elizabeth

How did I get the background to look blue?

By using a gel. A Honl photo gold/silver reflector plus a half CTO gel, combined with my white balance set to tungsten. That makes her face neutral but the background blue.

And notice the hair light is purple? That’s to match the dress.

Here’s course participants having fun:

Model Tara Elizabeth in Mono, Ont

Model Tara Elizabeth in Mono, Ont

Piecing it together

Remember my recent post about how you need to tell a story with your pictures, but in a way that makes the viewer piece together that story?

One way to do that is by adding a second person in your portrait background, but having that second person blurred out. You sawa variant of this in the wedding cake picture, with dad in the background.

But this technique works especially well when there are two or more people, and especially when there is a relationship between these persons. Like in this nice wide-angle image of the bride and groom:

Groom with bride, by photographer Michael Willems

Groom with bride, by photographer Michael Willems

The centre of attention is the groom (unusually, because of course most of the rest of the wedding photos emphasize the bride, not the groom).  And then, a few milliseconds later, you clearly see the bride, and that she is smiling, and she is looking at her new husband.

More technical detail:

  • The wide angle makes the perspective show.
  • A good lens, which allows a wide aperture, and proximity to the subject, blurs the background.
  • Flash was bounced off the wall behind me, on my left (so the subject is hit with photons from the front).
  • The camera is in manual (“M”) mode; Exposure is set to light the room well.

Sometimes, not showing things that normally you would, also works. Look at the groom: we have no idea what he is thinking.
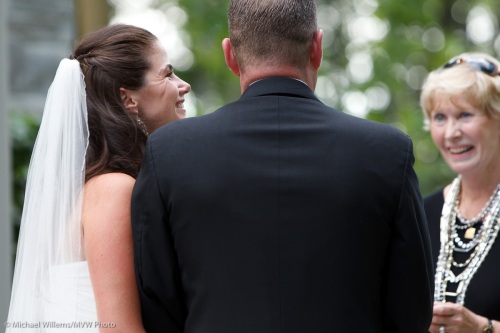
Knowing Looks, by Miochael Willems

Knowing Looks

Well, of course we do, we can guess – and that is what this is about.

Try it yourself now, this type of portrait! Aperture open all the way on a fast lens.