Why oh why?

Happy Canada Day!

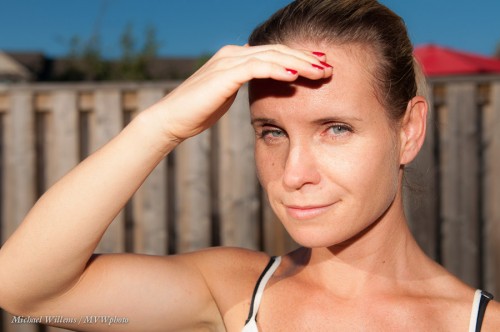
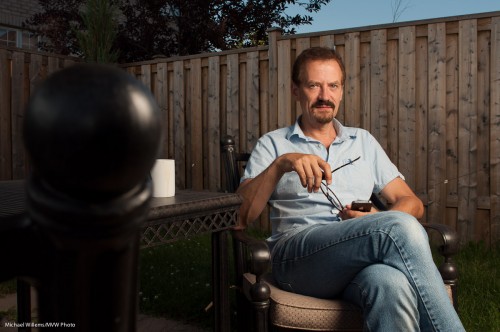
So why do I do this, people ask – this daily blog? Give away all my knowledge? Like how to take dramatic portraits like this (thanks, Mel) on a sunny day?

(Hint: 200 ISO/ 1/200th second, f/11, and a speedlight in an umbrella. See if you can work out why those particular settings? )

I do this teaching blog for a number of reasons.

First, because I am passionate about photography. We should all document our lives with artistic photos – the only time travel we ever get to do.

Second, because if I don’t, someone else will, and I’d rather you learned from me since I believe I know what I am talking about. I am a full-time photographer and photography coach and teacher, so I live and breathe this.

Third, because many of you come to me for private training sessions. A few two- or three-hour sessions and you will know so much more than before – all this theory here wil click into place and whatever aspect of photography you need help with, we can teach you quickly. From portfolio reviews ove rthe internet to live workshops here in Oakville, Ontario or actoiss the Toronto area and nerby, I’m your guy. You won’t believe the improvements to your photography!

Fourth, because some of you will come see me at venues such as my Vistek Mississauga seminars, and at the five-day August Niagara School workshop at Brock University (there’s still some space).

Fifth, because if you like my photos, you may engage me for your portraits, wedding, event, party, industrial, nudes, or whatever-else-you-want-documented-photography. I;m good, and while not the cheapest, I am sure you will be delighted with the iamges.

And finally – last but not least: becuase I love teaching. We are here only once and we may as well share.

Hope you enjoy. This blog is free and always will be. Updates are daily – with a few exceptions when I am travelling and so on.

And if you do feel like contributing: make a contribution at my site and I will send you a personal preview draft of my Photography Recipe e-Book (in convenient PDF format) as a sign of my gratitude!

 

What’s this Hi-Speed flash thing again?

A reminder for all you speedlighters.

Say you want a shot like this, taken a few days ago,with your Nikon D90 or whatever SLR you have equipped with an external flash (like an SB900):

Yes, direct on-camera flash, when used outside and hence mixed with available light, can give you this – not bad eh? And the picture isn’t bad either. 🙂

But look at the background. It is blurry.

That means a large aperture was used (f/5.0 in this case).

But that means the shutter speed must have been very fast – even at low ISO, you need a fast shutter on a sunny day if you want the aperture to be large. I used 1/2500th second.

But hang on. When using flash, you cannot exceed the flash sync speed! Which is 1/200th second on this camera.

So how did I do this? I enabled “fast flash”. (“Auto FP flash” is what Nikon calls it; Canon calls it “High Speed flash”). On a Nikon, go into the flash part of the pencil menu and find flash sync speed, and set to Auto FP. On a Canon flash, indicate the little “H with a lightning symbol”.

Now the flash, whenever you exceed the sync speed, pulses rapidly instead of firing all at once, meaning that you can shoot at fast shutter speeds, where the shutter never fully opens all at once.

The drawback is that most power is lost, so you need to be very close. Aim the flash forward and watch the indicated flash range: as soon as you exceed the sync speed, that range drops rapidly. Stay within that range and you get great outdoors flash pictures!

___

NOTE: Come join me for a five day workshop at August’s Niagara School of Imaging – it is filling up but there is still space. Act now and spend five days with me on all this stuff, and emerge a flash pro.


Prom Season

To help out a proud mom, I shot some images the other night of a young couple about to go to their high school prom. I thought I might share that process here.

The day was wet and dark – warm, but raining. And then it stopped raining – but it was still very dark, totally overcast, and remained that way.

Perfect. We want dark, so that:

  1. The sun will not cast harsh shadows;
  2. Our speedlights can overpower the ambient light, to make our subjects the “bright pixels”;
  3. We can render colours saturated (darker is more saturated).

So let’s start. First of all, of course I shoot manual. I set my camera to “sunny sixteen”, i.e. 200 ISO, 1/200th second, f/16. Then I go to f/5.6 to match the light (look it up: Sunny Sixteen, and totally overcast, no visible shadows). Then I go back to f/11 to make everything two stops darker. Then I go to 1/300th and f/9.0 – that is the same exposure but f/9 makes my flash more powerful than it would be at f/11, while the shutter speed makes no difference – provided I stay at or below my sync speed (on the 1D4 this is 1/300th).

Then I added flash – off-camera flash firing into an umbrella. My on-camera 600EX was disabled except for commands; the 430EX in the umbrella did all the work. So all I carried was a camera, two flashes, and a light stand with umbrella, with bracket to mount on pof those flashes. Light and easy.

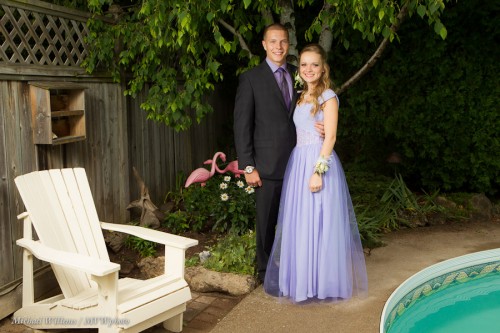
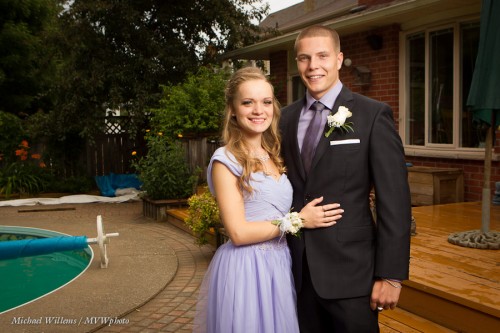
Then, the setting. As the Speedlighter, I opted for outside, of course. A great back yard with a pool gives us this shot:

Note the Rule of Thirds, and note that I wanted a “home backyard prom” look, not a studio look, so while I photoshopped (Lightroomed, actually) away some items I did not want, I did want the chair, the pool, the lovely pink flamingoes, and the other items that show where we are.

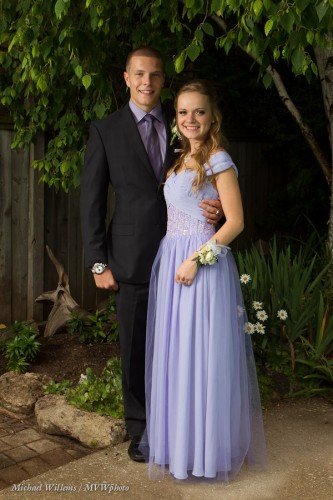
Still, I did also take one more traditional vertical shot without all those trimmings:

The important thing is to have models look toward the umbrella: always watch where the light is.

I used TTL flash for this, so needed to occasionally change Flash Exposure Compensation (FEC).  Note: In my courses I teach you all this stuff. I do private coaching – and stand by also for my seminars at Vistek in Mississauga, starting 21 July – dates here soon.

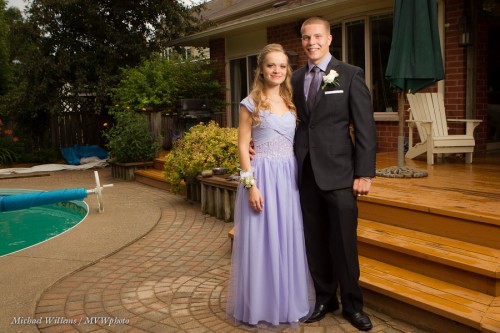
Finally, I made some that make the scene even more of a home scene. In the following shot I electronically removed a container of chemicals, a barbecue gas tank, and a decorative frog:

…but I also made sure to zoom in and do a close-up:

In the above shots I had the umbrella on my right so that Vanessa was looking into the light – flattering for women – while her date James gets Rembrandt Lighting – flattering for men.

Postscript: when I say “looking toward” – I should be clearer, I mean “their faces turned toward”. Photographer’s jargon!

Do you see how this all works? Fun, isn’t it?

___

If you are in the Toronto area or elsewhere where I find myself and want lovely family portraits or “senior shots”, please contact me – you owe your family some great heirlooms…!


Prints… or not.

Prints… good and bad, are on my mind today.

Good, because prints are the way to share photos. A beautiful print, professionally printed and framed, is a work of art to last.  Frame your pictures – they will look so beautiful. Choose art paper and permament ink and the quality will astonish you – once you work out the paper types, print flow, drivers, settings, and so on. I print straight from Adobe Lightroom – and it rocks.

Alas, I am having to replace my printer. The Canon 9500 Pixma Pro is a great pro printer but the print head appears to be busted, Canon thinks – which means $300+ plus labour plus tax, and a wait of several weeks while I cannot print.

Since I cannot possibly wait that long, and in any case do not want to pay that much for a repair, I just had to shell out for an all-new Pixma Pro 9500 Mark II. We shall see if this arrives soon – until then, no prints. Alas.


EV

You will have perhaps noticed that in the EXIF Wizard post the other day, theere was a value called “EV”, or exposure value. That is the absolute “exposure value” that corresponds to a certain “light value”. The exposure value is basically a camera setting for exposure, where:

(N = aperture number, t= exposure time).

0EV corresponds to “1 second at f/1.0”. A typical exposure value for a full daylight scene at mid-day in full sunlight at 100 ISO is 15.

And this is useful, why?

First, because it allows you to realize that there is such a thing as absolute exposure values. Second, more practically, because using this, if you use a tool like Exif Wizard, you can see what the light value was when you took a certain picture.  And that is always useful for a photographer. And third, because light is predictable (the sun is always equally bright, for instance – rememer the “Sunny Sixteen Rule”?), so you can use the theory behind this to calculate camera settings.

This article on Wikipedia is good reading, if you feel like a little light academic liftwork.


Hands-On with the Canon EX600-RT flash.

So, in the past weeks I have:

  • Lost a 580EX II flash
  • Broken my car windshield (gravel truck, pebble…)
  • Broken my second 580EX II flash.

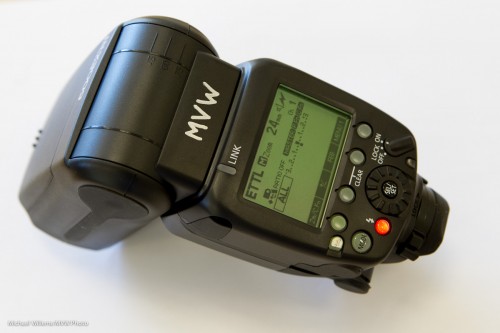
I have therefore had to go out and buy a 600 EX-RT. A not actually more powerful flash (600 refers to the highest guide number, but Canon has just upgraded the Guide Number table to include higher zoom settings – the actual head is the same power as the 580’s, it just has a 200mm zoom setting – and more zoom means more concentrated power forward), but one that has been significantly upgraded.

Here it is:

First – very first – impressions:

  1. It’s just like a Nikon SB900!
  2. But it now adds radio control (2.4 GHz, like WiFi) as a built-in option for controlling remote flashes. A Pocketwizard Flex killer? I never tried out the TTL Pocketwizards (the company was rather slow and difficult in getting test models to me, so I use the “dumb” industry-standard Pocketwizard II Plus, of which I have six), but if I were Pocketwizard I would probably be worried. Radio is evidently superior to light, especially outdoors.
  3. The radio control is, however, useless until you have other Canon radio-operated wireless devices, and there are few so far. I.e. until a new 430 replacement comes out, buy even more 600EX flashes. And with six existing 430s I am not about to start using radio to obsolete all those – you  cannot mix radio-control and light-control: it is one or the other.
  4. My 1D Mk IV controls the 600EX-RT – but not all of it. The custom menus are only partly controllable with my 7D and 1D Mark IV cameras. (Upgrade, Canon?)
  5. Still no optical slave? This function (which Nikon calls “SU-4 mode”), would be very welcome.  If it exists I have not yet found it.
  6. The new Custom Functions Menu is fairly intuitive. As is operation in minutes. Which is a nice change. But still, I can poke holes in the User Interface in minutes, and, not being a committee of older gentlemen ruled by consensus, I could improve it in minutes…
  7. Wireless flash has its own button now.
  8. But it takes a week, well, something like ten seconds, of holding down the C.Fn button to get to the Custom Functions.
  9. A possible warning sign for me: there’s a temperature overload feature and warning. I do hope this does not mean this flash has turned into a Nikon overheating flash: one outstanding feature of the Canon flashes has been that you can fire them at whatever power you need all night – and as an event and creative shooter, I very often do.
  10. The new optional “beep” seems erratic. It is meant to sound when the flash is charged, but it often does not do this – eg when it has fired at low power. At best, the feature is very poorly documented.
  11. Communication between the 600EX and my 1D Mk4 is erratic when I attempt to change FEC (flash compensation) on the flash as well as on the camera (which is bad practice but easily done).
  12. I like the new “light distribution” feature (alas, in a custom menu, whereas Nikon has a switch) that enables you to spread the light a little closer, or to concentrate the beam a little more for vignetting and more effective power).
  13. Compatibility with older cameras is doubtful. Canon says you lose synch speed unless you use a 5D MK3/1Dx camera, but it appears all is well on my cameras so far. Mmm.

I think a software upgrade would solve some of the issues; but they can generally be worked around.

This updated flash is an investment in the future that also works for today, but that may (willy-nilly or voluntarily) speed up our move towards that future.

Stay tuned for more impressions, and some images, soon.


Handy tool

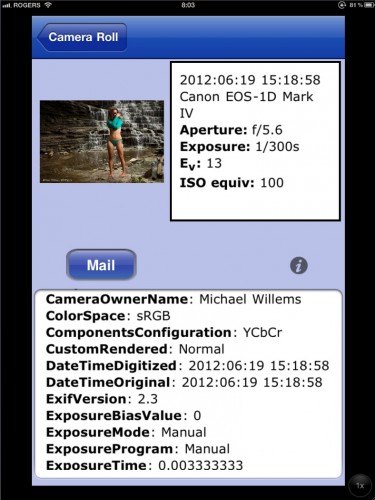
Recommended: Exif Wizard, an iPad app that tells you the EXIF data in the images on your ipad.

Like this:

..and there’s a whole lot more info. As long as you have not stripped out the EXIF data while saving (Lightroom, etc, offer this possibility), you will be able to go back to your saved images and answer the question “what settings, equipment, etc was I using for this?”. Which for pros as well as beginners is an important question.


Printer woes

My Canon Pixma 9500Pro printer is suddenly printing too dark at the top. Fortunately, I have made all my exhibit prints, so I’ll look at it after the exhibit’s first weekend. First a thorough cleaning then we’ll see from there.

One intriguing issue I had to solve, though, is this, and I thought I would share it. When using Canon art papers, Canon insists on a 3.5cm margin around all edges. Fine, I know that and I have set up my Lightroom printer parameters accordingly.

Suddenly, though, the settings no longer worked, and every print failed with a warning to use a driver with a 3.5 cm margin. I tried everything I could, but it kept saying that – and the margin setting in the Lightroom setups had not changed since – forever.

Guess what? It took a bit of doing but I solved. that one. The margin used to be set as 1.38inches in Lightroom. But either the Mac OS, or the printer driver, or Lightroom 4, now translates 1.38 in as just below 3.5cm! Once I changed the margins to 1.39in, it all worked.

The moral of this story: don’t give up, try all sorts of things when you are having an issue. Be creative and eventually you will hit on the one that gives results. I mean.. who would have thought that a rounding difference would cause issues?

Direct flash?

Can you ever use a flash aimed directly at the subject? I mean.. the victim?

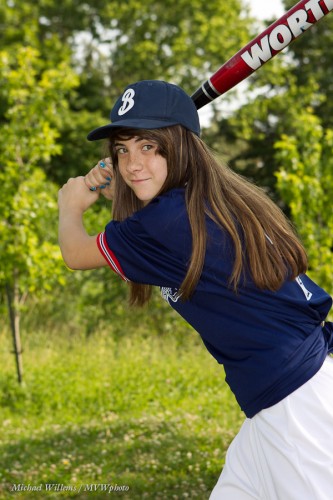
Yes. Outdoors, you can do this. Look at this shot from a recent softball shot:

To do an outdoors shot like this on a summer day (it is the first day of summer on the northern hemisphere, after all):

  1. Ensure the subject is not in direct light – sun behind them if possible.
  2. Go to the maximum shutter speed when using flash (1/250th sec on most cameras). If the light is fairly constant, I am assuming you are using manual mode, as a pro or someone who wants to shoot like the pros.
  3. Find a nice background.
  4. Now set the aperture for the correct background (around -1 stop on the meter perhaps). This was around f/5.6 at 100 ISO in the shot above.
  5. Then turn on the flash and shoot – with the flash aimed directly at the subject of you cannot bounce.
  6. Use flash compensation if you need (if the subject is too bright or too dark).

The awful “direct flash” effects are minimised by the available ambient light filling in the shadows: your flash is now the “key light” and the ambient light is the “fill light”, which fills in the shadows left by your flash.

Result: an OK picture even though you are not using modifiers like umbrellas. Yes, these would be even better but you can’t always use them.