Don’t Fear High ISO’s

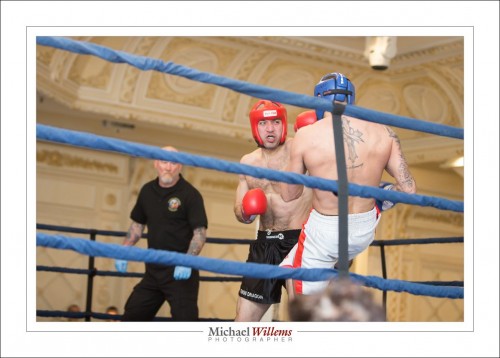
Last night I shot a kickboxing tournament in Vaughan, Ontario. So the food was all Italian, and I must say, rather good. As was the wine. I used a flash of course; bounced behind me, as usual. A few samples:

20160408-1DX_7469-1024

20160408-1DX_7510-1024

20160408-1DX_7507-1024

But I chose to set my camera to 3200 ISO. For three reasons:

  1. The first thought when doing flash is about the non-flash, ambient part of your photo. That means 1/250 sec, 3200 ISO, f/2.8 on a 70-200mm lens.
  2. The flash was bouncing against a very high ballroom ceiling. That works fine but needs a high ISO.
  3. I needed a fairly fast shutter speed to freeze motion a little.

That’s why. You see the logic? And as you look at those shots, I hope you realize that high ISOs are nothing to be afraid of.

A well exposed photo at high ISO is always better than an underexposed shot at low ISO, remember that! 

POSTSCRIPT: I shot these from my seat at the dinner table. Not wanting to get in the way of the hired pros. And wanting to enjoy my dinner.

Tip: I am available for private training, as most of you know, whether local or worldwide using Google Hangouts. And if you want to start by doing it yourself, get my e-books from http://learning.photography.


Crisp!

If you like crisp, sharp, punchy photos, you may want to do a few things…

16000739203_fbb406ebd8_o

  1. Use a flash.
  2. Use a prime lens.
  3. Use a tripod; or hold your camera formly.
  4. Use a fast shutter speed.
  5. Expose to the right: i.e. expose brightly, just shy of overexposing.
  6. Use a high contrast scene, like the one above.
  7. make sure your subject is the bright pixels.

If you do the above, you’ll see much sharper images than you are used to.


That Creative Dip

We all hit it every now and then, if we are engaged in some creative endeavour: the dip. The block. The point when we think “I am bored with this, I have done it all. I cannot come up with anything new, creative or fun. I’m done, and moving on”.

tumblr_nvlnmgEcfp1qfts2ko1_1280

Blocked? No you’re not! You are just bored. And delayed. Temporarily. Your muse will return.

So how do you deal with this in the interim?

By making it new. Get inspired! Do things like:

  • Have a good night’s sleep. Or two. Start there!
  • Realize you are not alone. Entire web sites are dedicated to Creative Block.
  • Google photographs of the type you like. Read some of the back stories.
  • Read some photography magazines.
  • Learn something new. A new type of photography; a new technique.
  • Read photo books.
  • Carry a notepad and immediately write down what inspires you.
  • Get my books from Amazon or from http://learning.photography.
  • Set yourself challenges. Like “shoot only B&W for a week”, or “Focus manually for a week”, or “take only wide angle pictures for a week”.
  • Join a meetup group, like Brantford Photography School.
  • Contact your friends who like photography, and go for a walk around town, do some street photography.
  • Do macro photography indoors. Do whatever photography you have not done.
  • Binge Watch Netflix for an entire weekend—then get on with it.

There are many ways you can re-kindle your enthusiasm. Look for the ones that resonate for you, and, as said: get on with it. There’s lots to do.

There’s been 12 billion years before you when you were not here, and before our universe collapses or freezes, there’ll be another 12 billion years—you and I are just here for a few decades. Enjoy them.


And Now For Some Free Efex.

News for Lightroom and Photoshop users. The Nik Collection of photo editing tools, including Viveza, Silver Efex Pro, and so on, is now available for free. It used to cost $500. I suppose this means it is end-of-life, but you may want to add these tools for occasional use.

www.google.com/nikcollection/

Top right, select “download now”. Then install.

Note that this is not actually a plugin. It is simply an external app called from within Lightroom by right-clicking and selecting “Edit in…”, and then selecting the effect you like.

If you have sensibly selected “Store Presets with Catalog” in Lightroom, the presents do not appear and you have to add them yourself, like this: support.google.com/nikcollection/answer/3002259?hl=en

The drawbacks:

  1. You now lose both time and disk space, because when you edit, a new file (usually, a large .TIFF) is created.
  2. You are breaking the “fully reversible edits” paradigm in Lightroom!
  3. You have to learn new software.

In fact, frankly, after a fairly brief inspection I do not yet see a lot that Lightroom cannot do all by itself. No doubt there’s some, but not an awful lot—not that I would use regularly anyway.

But I do like the film types included in SilverFX Pro, for instance, and may just occasionally use these. The fact that this is not an actual plugin is a great thing: if I do not use these apps, they in no way degrade or affect Lightroom. So, I have installed them. You may want to as well, as long as you use them judiciously. Have fun!


Adobe Bug Redux

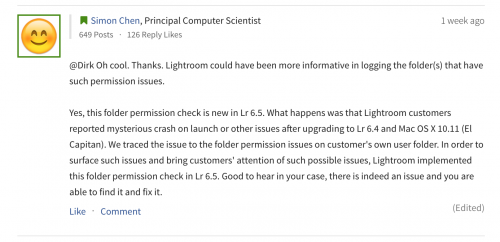
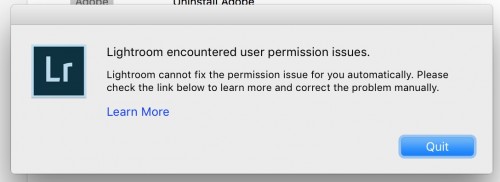
It’s even worse than I thought. It appears that Adobe deliberately caused the “Lightroom [etc] will not start” issue!

This apparently from Adobe:

Screen Shot 2016-03-24 at 14.45.50

So Adobe installer screws up the folder owner/rights; then Adobe causes their apps to refuse to start when it detects the issue. And they give no information: the fix (below) is out there, but you have to Google to find it.

Absurd that Adobe can do this: stop people’s business cold, deliberately. A bug is inevitable and forgivable, but a deliberate decision to not allow the app to start when they detect it, is unforgivable.

Almost enough to give mega-corporations a bad name.

Oh wait.


Huge Adobe Bug

And this is why I hate “permissions”, “Creative cloud”, and so on: corporations deciding what *I* do.

After the update of Adobe Lightroom 6.4 to 6.5, it will not start:

Screen Shot 2016-03-23 at 12.48.18

Huge, huge bug! Adobe.. this is mission critical!

The solution:

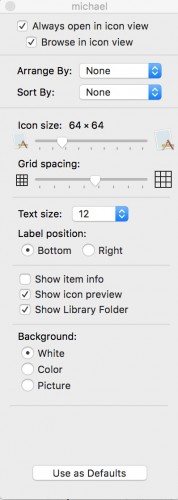
First, go to your home folder in finder, and in “VIEW OPTIONS”, enable “Show Library Folder”:

Screen Shot 2016-03-23 at 12.57.18

Now go to all three of these folders:

  • [home]/Library/Application support/Adobe
  • [home]/Library/Caches/Adobe/
  • /Library/Application support/Adobe

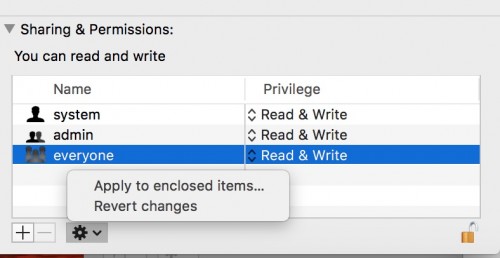
And for both those folders, right-click on the folder and  INFO.

Then, change the access rights so that EVERYONE has READ/WRITE, not just READ.

But also, click on the lock to open it and then click on the gear to apply to enclosed items:

Screen Shot 2016-03-23 at 13.01.38

And now it will start.

But security… all rights to everyone? Doesn’t look secure to me! So beware before you upgrade.


Back up—intelligently

An advanced computing tip today on Speedlighter. This is an extended version of a previous post.

Have a Mac or UNIX-like computer? Then you can use a simple little command to synchronise disks. Let me explain.

I have two hard disks next to the Mac. Two 6TB disks (I recently upgraded them).  I work on one: all my images and Lightroom files and office admin files live there. Then I have the other as a backup disk.

Whenever I work, as soon as I am done on one and am sure it’s all good, I run the following command on my mac:

I.e. the following is the actual commands; the lines above preceded by # are just comments.

rsync -a –verbose –progress –stats –delete /Volumes/MVW-3TB-1/Lightroom/ /Volumes/MVW-3TB-2/Lightroom/

rsync -a –verbose –progress –stats –delete /Volumes/MVW-3TB-1/MVW-Docs/ /Volumes/MVW-3TB-2/MVW-Docs/

rsync -a –verbose –progress –stats –delete /Volumes/MVW-3TB-1/Photos/ /Volumes/MVW-3TB-2/Photos/

So if your disks are called “Photodisk1” and “Photodisk2”, for example, and your folders are called “Photos” and “Lightroom”,  then you would make it:

rsync -a –verbose –progress –stats –delete /Volumes/Photodisk1/Photos/ /Volumes/Photodisk2/Photos/

rsync -a –verbose –progress –stats –delete /Volumes/Photodisk1/Lightroom/ /Volumes/Photodisk2/Lightroom/

(Each command is all on one lline; i.e. your file has two lines of text)

The rsync command intelligently compares the two disks and adds anything to disk 2 that was added to, or changed on, disk 1, while deleting anything from disk 2 that was deleted on disk 1. A perfect and simple backup in seconds (the first time can take a day of course, depending on how full your first disk is).

Using the nano text editor, I put these commands in a little text file called “syncdisks”

nano syncdisks

…and after I save that file, I make it executable using the chmod command:

chmod 755 ./syncdisks

I then call that file by typing

.syncdisks

(with the period) every time I want to run it.

I could automate further (drag it to the desktop so you can simply click on it) but as it is this is good for me – and it shows the power of the command line, doesn’t it?

(If this was all a bit techie for you, ignore this post and move on. You can always call me to come and so it all for you. A few hours on location consulting and you have everything organized, installed, and working perfectly)

RAW has space. Lightroom has attitude.

…and together, those two mean you need to do something sometimes.

Here’s a studio shot from just now:
20160316-1DX_7009-1024

That’s fine. But it appears in Lightroom like this:

Screen Shot 2016-03-16 at 13.23.52

…it only begins to look overexposed when I move “Highlights” to +30! While on the back of the camera it looks much more overexposed.

In fact, I have to push “Highlights” to +80 (almost all the way to the right) in order to see what I am seeing on the back of the camera:

Screen Shot 2016-03-16 at 13.23.18

Why is this? Because of two phenomena that combine, in a sort of perfect storm:

  • A RAW image has a lot more space than a JPG. And what you see on the back of the camera is the built-in JPG preview that every RAW file contains.
  • In addition to this, Lightroom “protects” us. If you blow out a background, for example, Lightroom pulls back the brightness to make that background NOT overexposed, as long is there is any room at all in the RAW file.
  • So combining these: unless you make it really extreme, when you see blinking on your camera, you will get an image without overexposure on your computer. If you are “overexposing” by a stop on the camera, you will not even notice that on the computer.

That is all very well, unless you want to overexpose. Like in the case of a background that you want to have pure white. Lightroom thinks it knows bette rthan you do, and that, in my opinion, is not a good thing.

Fortunately you can fix it by the method I describe above, or by using the earlier 2010 Camera Calibration process (bottom right panel in the DEVELOP module). Just so you know.


This is one of the things we will talk about at my Lightroom/Computer seminar this Saturday.  There is still space: Sign up soon if you are interested: space is strictly limited.

Saturday, 2pm… Lightroom/Computers

If you are interested in getting the most out of Adobe Lightroom, and you live in the GTA, then consider coming to my Lightroom workshop on Saturday. File organization, presets, best practices, and storage and backup strategies will all be shown, and I will help you do your own personal setup. I’ll also show you how to get there, if you are doing it differently today.

http://www.meetup.com/Brantford-Photography-School-Meetupome-join/events/228874541/


Judgement day.

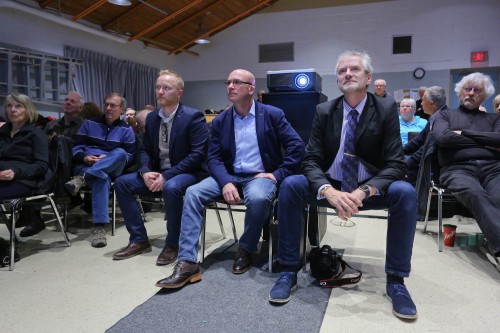
it was judgment day today. But fortunately a benign one. The Latow photography guild in Burlington held a photo contest with a South African photo club. 60 photos, 30 from each club, were to be judged. I was one of the three judges, and had a great time tonight. I saw excellent, excellent work.
IMG_0074

(Photo: Paul Sparrow/Latow)

And I observed a few interesting things.

First, that the status of work was incredibly high. Some beautiful, beautiful work. Mostly technically perfect.

Second, that the standard of Photoshop/Lightroom work in Burlington was very high. Higher than that in South Africa.

Third, that my judgment and that of the two other judges, highly experienced professionals, wee very very similar. Our grades were usually identical as far as I could see.

And fourth, and most interesting, was that whenever the picture was not perfect and could have been taken to the next level, it was usually a case of the photographer letting himself or herself off easily.  We all have a tendency to do this. The “yes but” phenomenon. Yes, but there wasn’t enough light. Yes, but I didn’t have enough time. Yes, but there were no clouds. Yes, but that car was in the background.

You must not do that. No one is  interested in the excuses. The only thing that matters is the end result. The photo. Nothing else matters. If there are no clouds in the sky, come back on a day when they are there. If there is not that of light, come back when the light is better!

This was your conscience speaking. Now, a beer and bed.