Marking images in Lightroom

In Lightroom, there are many way to mark images. These include:

  • Rating (1-5 stars)
  • Keywording
  • Colour labels
  • Picking

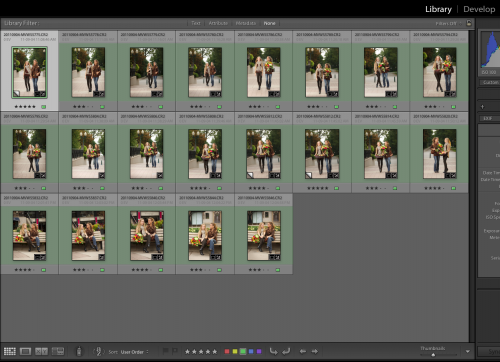
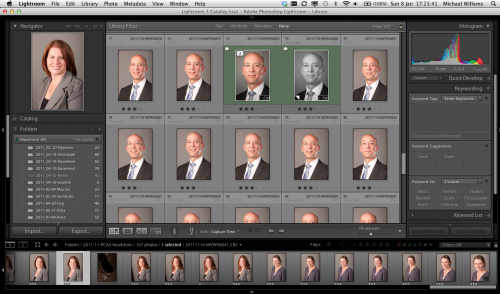
You see some of these in use here:

These give you a great ability to use images the way it suits you.

I use start to rate the pics –  this is independent of use. One start is technically unusable; two starts is technically just about OK but not good – a snapshot; three stars is usable and can be shown to client; four stars is great in this shoot; five stars is portfolio shot. Stars are carried across collections too, since they are a property of the pic, not of its use.

The same is true of keywords, which I assign upon, or just after, import.

On the other hand, I use colour labels to indicate something temporary – like “use this for the article”.

I use pick to indicate a very temporary pick – as in “these are the ones I am going to print now”.

This way I can work with all my images in a multi-dimensional way. Lightroom really really rocks!



Printing more prints

Adobe Lightroom offers great print functions. One of them is the ability to print multiple images on one sheet.

You can print the same image multiple times (a “Picture Package”), or many different pictures on a page (a “Custom Package”).

The latter is easy:

  1. To keep it easy, in the PRINT module, select a “normal” print size that you have previously defined (eg a 13×19 page, or an 8×10 page).
  2. Now go to “Layout Style” on the right, and select “Custom Package”.
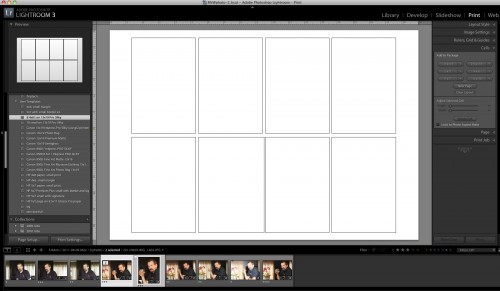
  3. Go to “Cells”, and add cells of the right size( eg 4×6, 5×7, etc). These will show up as empty blanks.
  4. You can rotate and reposition each cell after you add it. You can also create multi-page layouts.

You see this:

Once you are happy, save the layout by using the PRINT – New Template function from the top menu.

Now you can make your actual print. To do this, drag the images you want into the layout from the negative bar at the bottom. Then print, and you are done!

My printer did overtime today printing a recent shoot – I find that a large page with small images is good for two purposes:

  • For me – It allows me to see an overview conveniently – a “contact sheet”, if you like.
  • For the client – I get many prints done at once. (Note that if this is for printing and cutting, I also enable “Cut Guides” in the Page section!)

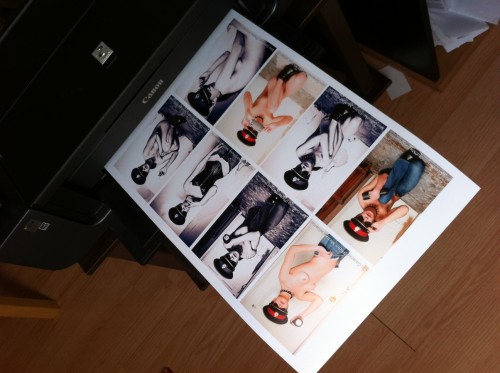
Here’s my Canon Pro 9500 printer producing a selection from a recent shoot:

Model shoot overview (Photo: Michael Willems)

Saves me a trip to the print shop, and the print is under my control – and one page is easier than 8 small pages. Once again Lightroom delivers the convenience that really makes it work well for photographers, by making life easy and saving time.

Personal note: today I honour the memory of my father, GTC “Eddy” Willems, who died of a stroke in 2002 at age 72. Today would have been his birthday.


Lightroom Tip: Perspective

When you aim your camera up, you get converging verticals – like this:

You can use an expensive tilt-shift lens to fix that.

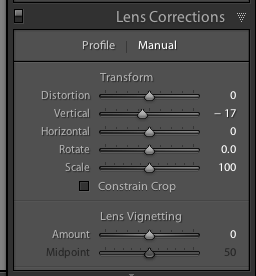
But there is an easier way: in the Lightroom “Develop” module, find “Lens Corrections”, go to the “Manual” tab, and you see this:

Pull “Vertical” to the left a little (as I did above), and you get this:

The verticals have been disciplined!

All you now need to do is crop off the edges (see bottom left).

Simple – takes only a second. Lightroom rocks!


Another student question

Shannon asks:

I really enjoy reading your blog, and I have a question/possible blog topic… I’m wondering how to deal with all the large raw files that I am uploading into lightroom. The other day, I had an alert come up that said that I had no more room on my computer for the files.. lol. So, I purchased a fairly large external hard drive, and thought I would move a bunch of the pictures onto it so that I would have more room. But I found it difficult to figure out how to move all the files out of lightroom and onto the external hard drive, and Im also not sure how I could access them in lightroom again unless I re-import them… do you have any ideas as to how to deal with this/managing all the files? I’d rather not delete the files if possible.

Great question.

And good news. Lightroom makes it easy. You can have your files live anywhere you like, anywhere at all – and you can move the files. Anywhere, any times.

Now for moving files.

  • When you move files using Lightroom, that is the end of the job. Lightroom knows where they now live since it moved them.
  • When you move files outside Lightroom, using your PC or Mac, then you are not moving anything “out of Lightroom”. You are just moving them, and now need to tell Lightroom where they now live. Lightroom will now show them with a question mark. Meaning, it does not know where they are. Simply right-click and “find missing files”.

As for where files live: I recommend files on an external drive; and the catalog file on that drive als (and everything backed up!). You may find this a useful post also in that regard.

Does that help? If not, a short coaching session will help sort it all out. Stick with Lightroom, sort it out – it is worth it!


Lightroom 3.6 is out

…and I think that if you are a Lightroom user, you should upgrade now. New cameras supported and a number of bugs fixed – Adobe has details on this blog.

If you are not a Lightroom user, I hope you are at least an Aperture user.

And if you are neither, then you probably should be. Lightroom has saved me up to 80% of my previous post-production time. ‘Nuff said.


Does Lightroom overwrite files?

A word about how Lightroom uses files.

Lightroom is a “database of changes”. It never touches your original file (whatever format it is). We call that “non-destructive editing”.

Here’s how it works:

  1. You have your original file. Lightroom simply knows where it is (that is basically all that “importing into Lightroom” means!).
  2. Every time you make a “change” (like cropping, adjusting exposure, etc), Lightroom stores that instruction n its database (which it calls its “catalog”).
  3. What you see on your screen is that original file plus “what it would look like with that change”. But no new file is actually generated (except perhaps a little internal preview)!

It is only when you use a file that the changes are applied to make a new export file (or a printout, a web site, etc). This export file is made suitable to its particular purpose, and it is temporary: you create your export file, then use it, and then delete it.

Advantages:

  • You always keep your original file intact.
  • You do not fill up your disk with additional files.
  • You can always review and redo any setting (including all the “RAW-settings”.

These are great benefits over the old ways of editing images, and they are why Lightroom and Aperture, which basically does the same, have taken over photographers’ workflow so quickly.


Lightroom Top Tips #213

Another Lightroom tip.

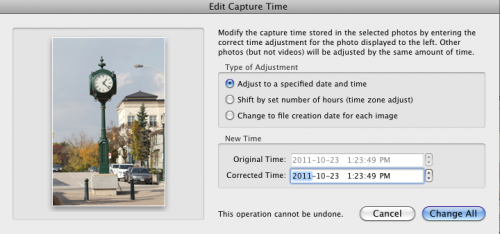
Imagine you have done a shoot with two cameras, but one was set to the wrong time – you forgot to set it to the right seasonal time, perhaps?

Easily solved.

  1. Go to the LIBRARY module. Select the folder or collection that contains the event you are talking about.
  2. Show the filter bar (press “\”) and using METADATA, select only those photos taken with that incorrectly set camera. In my example below, that was the Canon 7D.
  3. Select all of these (Apple-A or Control-A).
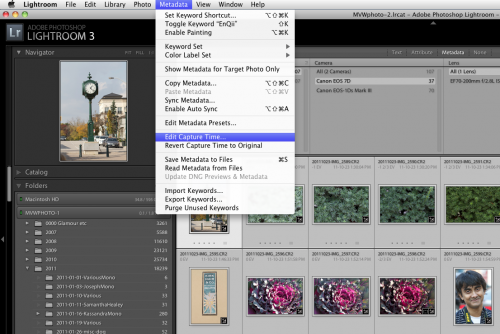
  4. Now go to METADATA in the menu, and within that select EDIT CAPTURE TIME:

Now you see the options:

Select SHIFT BY SET NUMBER OF HOURS, select the number of hours, and hey presto, all your images are set to the right time.

Is that cool, or what? Lightroom’s strengths majorly include the organizing features you may not have found yet, like this one. Have fun!


Lightroom Shortcuts

Abobe Lightroom is about productivity. The faster you can work, the more time you have for shooting, not editing.

My main three Lightroom shortcuts are very simple:

G – takes you to the “Grid” view in the Library module:

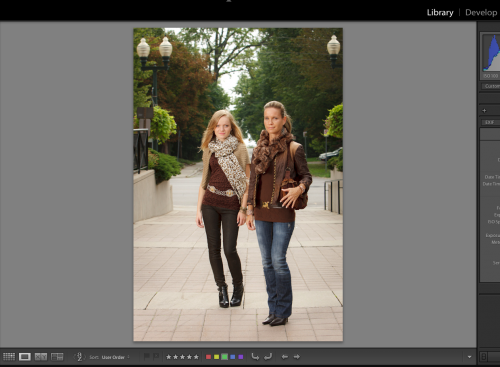
E – takes you to the “Loupe” view in the Library module:

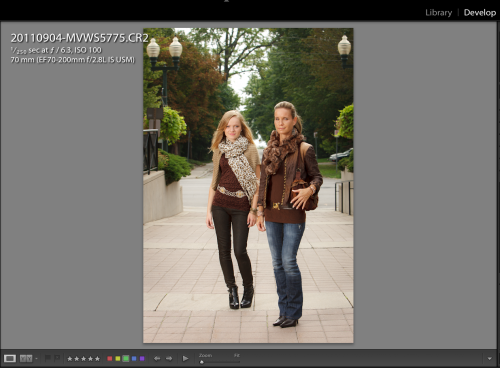
D – takes you to the Develop view in the Develop module:

I switch between these views many times a day – it is amazing how a few simple shortcuts like this can make your life more productive.

Also try F (full screen toggle: tap it three times to cycle through the options) and L (Lights out – ditto).


There are of course many more shortcuts and nice-to-knows: Michael does photographer coaching, both remotely and in person on location: contact me if you are interested.

Lightroom tip – today only

I see that today, Adobe is offering their Lightroom 3 software at 50% OFF.  (Today only – that is October 11th – until 11:59pm).

That’s $149.50 (US) – half the usual $299 price.

… and yes, this offer is valid in Canada.

Check out www.adobe.com for details. Right now. Lightroom rocks, I run my entire workflow on it – and it is available for Mac or PC.


Lightroom Tip: Go Solo

In Adobe Lightroom, the organizing/editing app of choice for most pros, you can use (and hence, see) a lot of panes full of functions to the left or to the right of the image or images you are looking at. In Develop module, these panes include Basic, Tone Curve, HSL, Detail, and so on; each pane with its own set of functions.

All those panes can result in a long list of functions: one that can be impossible to get a quick overview of.

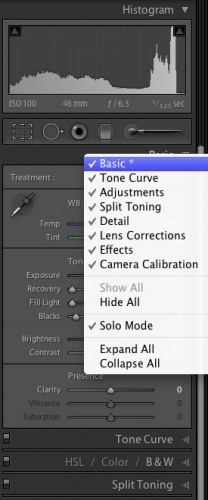
And that is why we have “Solo” mode. Right click on any pane’s name, as for instance I am doing here on the “BASIC” pane in the DEVELOP module:

And as you see, there is an option called “Solo Mode”. Turn that on, and from now on only one pane opens at a time in that module.

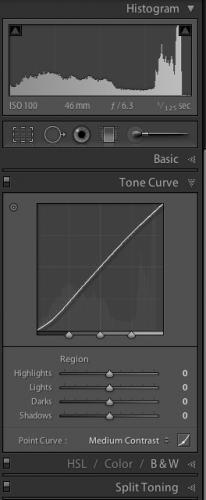
So if for instance I click on the “Tone Curve” pane, the Basic pane and any other panes that are open, instantly close.

This makes Lightroom much easier to use.

Note, you only need to turn this on once, but you need to to it on each side (left and right) in each module (Library, Develop, Print, etc).


There are of course many more shortcuts and nice-to-knows: Michael does photographer coaching, both remotely and in person on location: contact me if you are interested.