Real Life shooting

Today, a few more words about the “real life” Karate Championship shooting I did on Friday and Saturday.

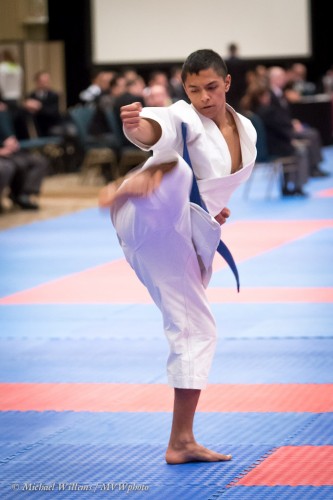
As you read yesterday, the light was low, meaning I had to shoot at 10,000 ISO (yes, ten thousand) at f/2.8 to get to a mere 1/160th second, which is kind of the minimum I would like. Even at that speed, motion blurs:

But what were the other challenges, other than the fast lenses and high ISO needed? I ask because while I have pointed out many times that photography is basically simple, it is in meeting the limits, overcoming the problems, that you get to be really good.

One: the dim light also makes focusing unreliable. Even on my 1Dx, I got a lot of incorrectly focused shots. Remedy: shoot more; focus as accurately as you can using cross-point sensors (the centre one, on most cameras, is always cross-point), and focus on cpntrasty areas (the collar, for instance).

Two: the very red nature of the light – about 2,500K in this ballroom, redder than a normal incandescent lightbulb – is not good even when you set the camera to “Tungsten” white balance. So you need to correct it afterward – meaning RAW is best.

Three: RAW is slower, so you lose some shots due to the camera catching up with writing to the memory cards.

Four: the salmon and blue floor mat mean that in every picture, the bottom of the white suits looks either salmon or blue, which makes it look like the white balance is off. It’s not – it’s just the tungsten light reflecting off the floor.

Five: the competitors move unpredictably, so you need to:

  1. Shoot wide to ensure you do not cut them out of the frame.
  2. Use continuous focus (AI Servo/AF-C).
  3. Shoot sequences of shots.
  4. Use not one focus spot, but several (9 or more), to give the camera a chance to track the subject.

Six: in Karate, the subject turns away from you much of the time. The judges are on the other side, so lots pf shots of the subjects’ back. Just be ready to shoot in the few seconds you have, when the subject is looking your way.

Seven: the background is not of your choosing. Do the best you can, and throw it out of focus as much as you are able.

As you see here, there’s quite a lot of real life “working with limitations” going on in a real shoot – not just the basic thinking of “ISO+Aperture+Shutter = Exposure”.

___

NOTE! Want to learn how to use off-camera flash using “Master-Slave”/”Commander-Remote” TTL flash control for your Nikon or Canon system?  Do not miss my evening course in Hamilton on Friday: http://cameratraining.ca/Flash-TTL.html. This and other upcoming workshops on http://cameratraining.ca/Schedule.html. Book now to guarantee your place.


Another reader question

A few days ago, reader David asked me this:

Just wanted to get your input on a upcoming event I will be shooting on Friday night. The events will be group shots (family and player) at a high school basketball game for their ‘Senior Night’. Since it will be in the gym with very high ceiling, bouncing off the ceiling does not seem to be a viable option. I was thinking about bouncing using a gobo card. Since the room will be filled with lovely (not) florescent light and wonderful (not x 2) swamp lights overhead, I could bounce the flash as a fill light to help get rid of the awesome green tones. The second option is to use an off camera 580EXII with a Honl Traveler 8 softbox (close to camera center maybe). The third option (since I believe in the power of 3) would be to use my Fong Reporter Whaletale with and on-camera flash. I am interested in “what would Michael do?” (As a a side note: I typically use a gray card to get a good white balance. I shoot everything in RAW, so flexibility in post-prod adjustment is not an issue.)

Good question, David.

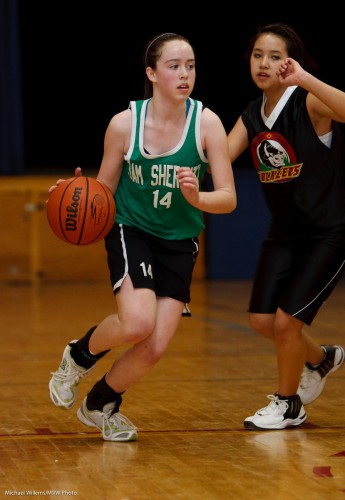
For basketball I would say the following. First, here’s an example of a basketball pic I shot.

That was 1600 ISO, f/2.8, and 1/300th second.

And… oddly for the Speedlighter, I used flash, straight-on. As you correctly surmise, ceiling bounce or wall bounce can be difficult.

So this is one case where, if it is allowed (Ask the coaches! In high school basketball it will often be allowed) you can use straight-on flash to fill in the light. Of course this means recharge time between shots,  but if allowed, you may want to do it. Also watch out, you could get red-eye – easy correction of course, but still, you have to do it.

Alternately, you can bounce of a larger bounce card. That will mean less power and more recharge time, but it can be viable.

Of course you can also choose to live with the light that is available.

You other options are good to try, too. Off-camera is not likely to be much help though since at the distance you are shooting at, it’s close to the camera even if held a few feet away. The softbox, ditto, and you lose light.

Also, the long lens is great but do not forget the wide lens for close shots. And:

  • If you can, bring two cameras
  • Ask the coaches if you can use flash
  • Get close ups
  • Shoot under the rim, but be careful behind it – balls will hit!
  • Shoot vertical shots
  • Get the back of shirts to get the numbers
  • Shoot emotion: happy, sad, angry
  • Shoot action: close up
  • Shoot static for each player too

I hope that helps… and yes, I did answer this reader before that Friday!

Summer sports

So on warm sunny days, when you shoot summer outdoor sports…. hey wait. It is -23.5 C outside, here in Mono, Ontario.

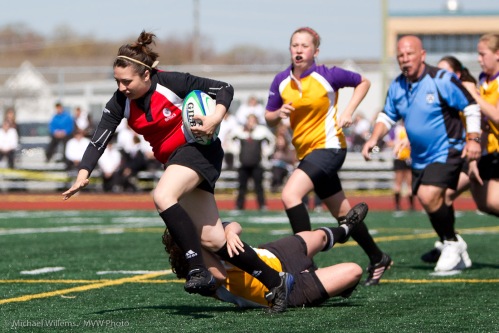
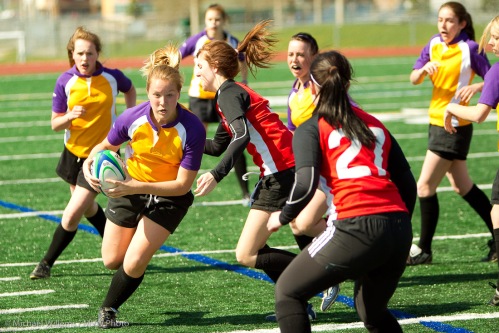
But yes, I thought this would be a nice time to give you a walk-through of an outside summer sports picture, like this Rugby shot from July 4, 2010:

Rugby game

So how do you shoot outdoors sports?

  • Perhaps S/Tv mode with a fast shutter speed, or A/Av mode with a wide open aperture. I prefer Av mode, wide open, so that I can be sure that the fastest possible speed will be selected. Manual is also possible of course. In the shot above, I used Aperture mode at f/3.2.
  • I used an ISO setting of 200 – just a little faster than 100.
  • This gave me a shutter speed of 1/3200 second.
  • The lens was a 200mm lens – namely the 70-200 f/2.8 at 200mm on the 1D, meaning 260 effective mm.
  • Use AI Focus/AF-C focusing mode!
  • And use one focus point.
  • Look closely at the background: looks like turbulent air is making the background look, well, a little turbulent. This is normal on artificial turf, and this will limit what you can do in terms of distance.
  • As a wide aperture I try to shoot groups of people in the same plane of focus, as in this image – either that or single players.
  • Obviously you will be using continuous shutter: click click click click click.
  • To enable this, use a fast memory card.
  • Position yourself so that you catch players with the sun coming into their faces – not on the back of their heads!
  • Try to catch expression/emotion if you can. Quite a lot of that in there I think.
  • Sports like Rugby are also colorful – all good.
  • I shoot RAW, but sports is the one occasion when sometimes I shoot JPG – smaller files and faster clicks.

I thought a quick outdoor sports picture would be nice for today’s belated post – I remember sweating on that day.

A distant memory now that it is -23.5 C! Almost time to drive to Scarborough to teach “Travel Photography” at 1pm (there’s space!).

And another few sports tips

Since I just got back from shooting a junior Lacrosse game, here’s another few quick tips.

And they do not apply just to Lacrosse!

  • As said yesterday: look for action and emotion.
  • If you are shooting through Plexiglas, shoot straight through it and get close to it. You may need to bend down to minimize reflections from behind you.
  • Bring a soft cloth to clean that Plexiglas.
  • Avoid shooting from the penalty box in pro games of hockey and lacrosse. In junior games you may be able to get away with it without getting hit by projectiles. Safety first, though…
  • Bring bottled water and a snack.
  • Indoors, shoot manual. Tonight I shot at 1600 ISO, f/2.8, 1/320th second. Pretty typical values for an arena.
  • And as also said yesterday: shoot a lot. It took me 400+ shots to get enough good ones: I aim to submit 6-10 images.

Here’s one I like:

Quick sports checklist

Inspired by yesterday’s Rugby game and tomorrow’s Lacrosse game, both of which I shot/will shoot for newspapers, here’s a little checklist for the 1D Mark IV and similar cameras for sports like this:

What to bring:

  • Camera
  • Backup camera
  • Spare batteries
  • Spare memory cards
  • Rain protection
  • Pens, notepad/paper
  • Business cards
  • Assignment sheet (so you can prove you are official)
  • Mobile phone

Camera setup:

  • Continuous drive shutter
  • AI Servo/AF-C mode
  • One focus spot
  • For these sports, custom function III-4 set to “1”, AF Tracking priority (so that a player who comes in front does not quickly cause focus to shift)
  • On my 70-200 2.8L IS lens, IS on, but set to position 2 (that means, suitable for panning). If your IS/VR lens has only “on” and “off”, select “off”.
  • Record all images to both cards (the “1”-series cameras have this option for extra safety)
  • Size you want

As for exposure, the need is for fast shutter speeds. 1/320th or faster.

While there are several ways to achieve that, I do it as follows:

  • Outdoors, I use aperture mode wide open (f/2.8) and ISO as needed, say 200 ISO, to get super fast shutter speeds. Outdoors I can often get settings like 200 ISO, 1/4000, f2.8; or 200 ISO, 1/2000, f4.
  • Indoors I generally use manual mode after metering and checking histograms. I am not afraid to go to 1600 ISO to get to fast-enough shutter speeds. Inside I can often use settings like 1600 ISO, 1/400, f2.8.
  • I could also use manual and enable auto-ISO, but I have not used auto ISO in an important assignment. I like to set my own.

Positions are sports-specific: more later. But a golden rule: follow the ball; follow the action; follow emotion. In that order!

One more tip: shoot the jersey numbers and the roster, so you can write the right cutlines. I was not happy that rugby players do not have the numbers on the front of their Jerseys.

And one last tip: shoot a lot. A “keeper ratio” of one in 10 to one in 30 is not unusual in sports. And with digital, it’s free.

I hope that helps all you budding sports photographers.

Shooting Rugby

I have never shot Rugby before, so I thought I would enjoy this morning’s newspaper shoot, a high school rugby game. And I did.

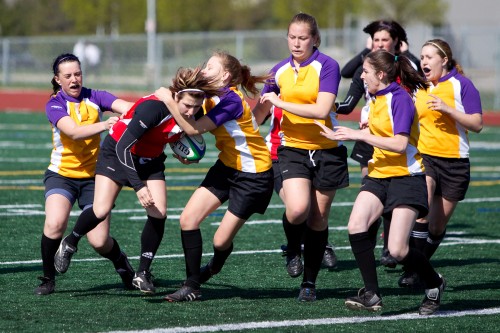
Here’s a shot. Of course it is one that I did not send to the newspaper, since I only just shot this and the paper is not out yet, and it is bad practice to trump your own customers. Click for larger:

For Rugby I used the 70-200 2.8IS L lens on the Canon 1D Mark IV.

I set the camera to continuous focus (“AI Servo”) and used a custom setting to give preference to tracking, not to refocusing on objects that appear in between. I used one focus point, with expansion to surrounding point.

The camera produced many sharp shots – most of them by far, so I was more than impressed with this first sports shoot with the Mark IV.

But my main learning was about the sport itself. Here’s what I learned:

  1. The sidelines are a great place to be.
  2. The sun needs to be behind the photographer on a bright day – and pay attention to where it falls onto the subjects (face is better than back of head!)
  3. 70-200 is a great lens for this sport
  4. Get action shots. There’s not much action in a school game – in that sense it is like football or cricket: periods of boredom with the odd burst of action.
  5. Get emotion.
  6. Get colours.
  7. Use fast shutter speeds (I used 200 ISO with the camera in aperture mode and set to f/2.8 mostly – leading to 1/3000th second shutter speeds).
  8. Get the action while you can – 15 minutes times two with only occasional action is no guarantee of a shot/

Oh, and the team in the red jerseys won by a 10-0 margin, so you can see why the others were very determined to stop that ball.

Lights… camera… action!

A quick reminder for those of you who shoot action shots: shots where the subject is moving.

For anything where the subject is moving, you may want to:

  1. Use Tv/S or manual mode (or Av/A mode with a large aperture) to set the exposure time to 1/200th sec or faster – the faster, the better, typically..
  2. Use a high ISO (in hockey arenas and wedding dance halls, you may well need 1600 ISO).
  3. Use the center focus point
  4. Set the focus mode (the “how does the camera focus) to “Continuous” (AF-C/AI Servo).
  5. Set the drive mode to continuous.
  6. If you are moving with the subject,  turn off your lens’s stabiliser, unless you have a “mode 2” for panning.
  7. You may want to try JPG shots for these.

And finally, do think about how you want to show or freeze motion. It is not a given that all motion must be frozen. A hint of motion blur can show the viewer that something was actually happening, and that they are not staring at a statue.