ISO to the rescue

A beginners tip, today. About ISO.

All being engineers, you all know that ISO stands for the International Standards Organisation, of course. And you all know that the engineers in Japan chose this term to indicate the camera’s sensitivity setting. You can set the sensitivity of your camera, where more sensitivity means you can take pictures in the dark.

It also means faster shutter speeds. Try this: have someone wave at you indoors and, with your camera set to 100 ISO and with its flash turned off, take a picture. You will see this:

Now set the camera to 1600 ISO.

That means 16 times higher sensitivity (four stops) – which means 16 times shorter shutter speed, as the camera does not need as long to gather the same amount of light; hence 16 times less time for motion blur.

So now you get this:

The price? Noise. More noise, just as when you turn up the radio when you are hearing  a weak signal. The volume will  increase, but so will the noise. In photos, we used to call this “grain”, after the larger silver crystal grains that captured the light on negatives.

But usually, that is a small price to pay if you want to avoid blurry hands.

Best setting for… stadiums

Reader Ray asks about shooting in a stadium. In this case, he will be shooting Monster Jam at the Air Canada Centre.

Whether you are shooting monster trucks or skaters like the young lady below (who is not exactly in a stadium but is in similar light), this kind of shoot is interesting.

Here are some pointers and questions:

  • Are you even allowed in with a long lens? Many venues restrict this.
  • It may seem like there’s lots of light, but if you are shooting action (things move!) you need fast shutter speeds, so your light may still be insufficient. Look through the camera: do you see a shutter speed twice the lens length or more (if 200mm, you want 1/4ooth sec or faster)? Depending on the action you may need much more.
  • So to get this, turn up your ISO as needed. 1600 ISO is not uncommon, although in bright stadiums you may not need to go this high.
  • Use the fastest lens you can get (lowest “F-number”). This is important!
  • Pan with the action (follow the action). When panning, turn your IS/VR off, or to “mode 2” or “Active” if your lens has that.
  • Shoot RAW.
  • White Balance is unimportant when shooting RAW. Still, you may want to set it (e.g. to “Fluorescent”).
  • Use manual exposure mode (“M”) and check the histogram to set it. The light will not vary so you should use manual to ensure that your exposures are consistent. Use evaluative metering. You can start at, say, 1/250th sec at 1600 ISO at f/5.6 and vary from there (you’ll probably need to open up more or, alas, slow down the shutter, if you are using a kit lens).
  • Set your camera to continuous shutter release
  • You may want to use “AI Servo” / “AF-C” continuous focusing if the subjects move to ward you or away from you.
  • And finally: shoot a lot. A lot! You will get some good shots. The better your lens, the more you will get, but even with a less bright lens, you will get some winners if you shoot a lot!
  • Shoot when the subject is “standing still”, e.g. when the truck is at the top of an arc as it jumps.

Using all those guidelines should help!

Also – check out my book, which will be coming out soon, for many such “Quick Recipes”.

Michael

One more "Studio" post

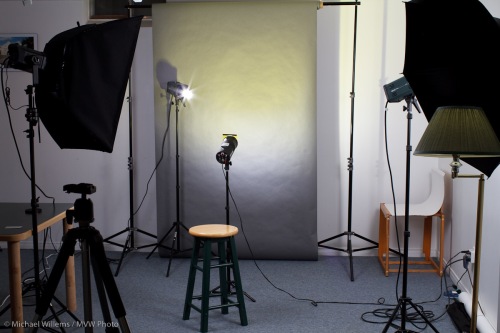
I thought I would add one more picture of the small studio, and how it works.

This consists of:

  • A grey background
  • A main (“key”) light: a Bowens 400 Ws monolight, fired into a Bowens 60×80 softbox.
  • This light is activated through a PocketWizard; all other lights have a photocell that follows this light.
  • A fill light, 250 Ws fired into an umbrella
  • A 100 Ws background light with a yellow gel
  • A 250 Ws hair light with a snoot
  • A stool for the victim to sit on

The camera is set to manual exposure and has a Pocketwizard on it which drives the flashes. Don’t forget to set your camera to manual low ISO, and to check that your exposure time is under the synch speed (e.g. 1/125th second). Then meter for the right light (meter key and fill lights individually).

And this very vanilla setup leads to:

Photographers will know: the biggest challenge is to focus on yourself. That is why we are always hassling people to model for us.

Opus Non Magnum

A word about that Opus studio flash that you saw in that previous picture the other day, at the top:

I have owned nine Opus lights, and seven of them have failed. They are sometimes dead in the box (the nine above do not include the one that was dead when I opened the box). If they do work, they die, or they malfunction later. Seven out of nine – I have never seen worse.

The importer, after I wrote a few times, told me:

It sounds like the equipment you’re using has been discontinued by Opus.
These unit were designed for the “Home User” looking to experiment with strobe lighting with out paying the premium for professional lights.

Meaning what, that failing is OK for home users?

He adds that the lights have a two-year warranty. But having seen so many of these Opus lights die, and having heard many photographers describe Opus catching fire, I cannot recommend them in any way.

For affordable monolights that also offer quality, I can recommend the Bowens lights.

Pro camera for sale – SOLD

As said, I am selling my backup camera: a  Canon 1D MkIII, new model (Serial number 565… – it’s not an “old, revised, blue dot modified” one).

This is THE Photojournalist’s camera: best I have owned. 10 fps, built like a tank.  And it’s like new. Perfect working order, no damage, has not been dropped, mistreated, or anything; no oil, no dust; low shutter actuations (around 15,000) – this was my backup camera (the 1Ds MkIII being the main one).

I am selling because I also bought a 7D and I don’t need a third backup.

This camera has the latest firmware and has been inspected by Canon CPS. It comes in the original Box with warranty doc. It has over 15 months left of the Henry’s extended warranty – fully transferable! – and it comes with original:

  • Battery
  • Battery charger
  • Video cable
  • Computer cable
  • Manuals
  • Software
  • Strap

I’ll take cash, and of course you can come inspect and play with the camera here in my Oakville studio/classroom. Even take a studio portrait while you’re here 🙂

Here is the camera as shot with my Canon 7D just now, using the Bowens lights with softbox, fired with PocketWizards:

What's this?

For new SLR users: What is this little wheel next to the viewfinder (the wheel with the +/1 symbols in this image)?

It is the diopter adjustment.

This personal setting adjusts the eyepiece to your eye, just like a pair of glasses.

  1. Look through the viewfinder
  2. Now look at the focus points or the green LED information (“wake up” your camera repeatedly if necessary).
  3. Turn the diopter all the way up, then all the way down; then find the position where it is sharp – and leave it there.

If you wear glasses, you may be able to set the diopter so you can use the camera without them.

If two people use your camera, you will have to keep adjusting this setting, unless you have the same eyes exactly.

Snap

Me, snapped by a student last night:

The Nikon D80 camera is on manual. That means aperture and shutter speed are set manually, but it does not mean that the flash is manual!

The flash is still fully automatic – the camera fires a preflash, measures light return, and sets flash power for the actual flash accordingly. We call that TTL (iTTL, part of CLS, for Nikon; E-TTL II for Canon). The flash was turned back toward the ceiling behind the photographer:never fire straight into your victim’s face if the flash is the main light source.

Simple setup for budding pros.

You saw my picture the other day. That was shot quickly, and I’ll explain how.

Here’s a very simple studio (or portable studio) setup for such quick portraits:

  • Two lights aimed either at a white wall behind you or into (or through) umbrellas. Both of these 45 degrees above, on either side. (45 degree high and 45 degrees left or right).
  • The main light (which is usually two stops above the other, fill, light) preferably through an umbrella; the fill light can reflect off an umbrella.
  • One light behind the subject aimed at the wall behind him or her, perhaps through a grid.
  • Optionally a hair light, perhaps using a snoot.
  • As a starting point, set your camera to manual mode, 1/125th second, f/5.6, at 100 ISO.
  • No flash on the camera, of course.
  • Check the histogram. Adjust aperture or light power accordingly.

For the shot here, we aimed both lights at the wall/ceiling: quicker than an umbrella and since here we did not need accurate pointing and shaping, it did fine.

When the histogram looks good, finally remember to get your subject to smile, as my colleague photographer Dani Valiquette did today, when I asked her to take a portrait for me. I don;t smile, except she made me.

And hey presto, one minute later you have a simple portrait.

You need to click and then view at original size to see exactly how sharp this is. Bright flashed pixes are sharp pixels.

Personally, I prefer the serious one, but I am told by many that I look less handsome when grumpy. Surely not?

This will be a common occurrence for you as a photographer: you like one shot, and the subject likes another – often the one you think is the inferior one. Get used to it and shoot both. Without giving up your artistic integrity, you can give the customer what they want.

We're gonna need a bigger drive

Actually, you need two (one to store your images, and one as a backup). And perhaps a third for off-site storage.

And here’s why. We are seeing four trends in photography, all increasing at the same time.

  • Pictures get bigger (more megapixels).
  • You’ll take more of them.
  • You’ll re-use them more, so will want fast access.
  • You’ll store them all in the same place.

As “digital” took over my life, the number of pictures in the last five years in my Lightroom catalog increased as follows:

  • 2004 :    1,080
  • 2005 :    2,999
  • 2006 :    5,052
  • 2007 :    5,617
  • 2008 :  13,599
  • 2009 :  26,785

I stored more in Lightroom, I took more pictures, I kept more, and they also became bigger, so 2009 is disproportionally larger than previous years.

Can you see that my images appear to be increasing at more than Moore’s law rate?

Of course I expect them to top off this year – they may already have maximized – as I do more training, and more quality shooting rather than volume shooting – but who knows. Even then, larger files will make tyour storage top out. So get ready for more storage, and be agrressive.

How aggressive? The images above filla a 1TB drive (and two backup 1TB drives).

Fortunately, storage is also becoming cheaper, and by 2011 we will have 1 TB SD cards.