The importance of being saturated

…as in colour. Today:

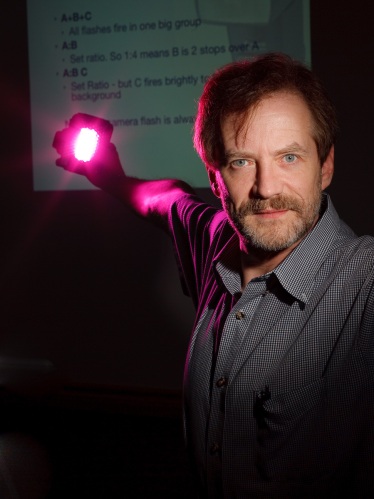
I took this picture yesterday and it shows a few things:

  • Lower the background’s brightness = increase its saturation
  • To add excitement, add a splash of colour!
  • In particular, add red to the green and blue you find in nature
  • Dramatic lighting = contrasty lighting

Five speedlites were used in the production of this picture. Four on the sides and one behind me. they were fired via pocketwizards.

In any shoot, the worst thing a photographer can encounter is bright light.

Why?

Here’s why. Think along.

  • The available (ambient) light will be fill light.
  • That, and the fact we want these saturated colours, means it will have to be darker (say, two stops darker) than the main, flash light.
  • That means the flash light has to overpower it (by, say, two stops).
  • That means the flash has to be two stops brighter than the sun.

That’s why we call this “nuking the sun”.

For which we needed five flashes, four on the sides and one behind the camera. Firing at full power, mostly.

(That much because ambient is controlled by ISO, aperture, and shutter speed. Shutter speed cannot go beyond 1/200th second (or whatever your synch speed is).  ISO is low already. So aperture is the only way to affect the background.  But Aperture also affects flash exposure so for each stop you close the aperture you need to double flash power.)

Grids and why you might like them.

Grids,  like the Honl grid attached to my flash here, are very important modifiers. A grid ensures that the light from a flash does not go “everywhere”. Instead, it goes to one cone of light, that drops off softly at the edges. This was taken by a student a few hours ago:

Oddly, that cone is a bit softer than the straight flash.

TIP: Use a gel if you want to see where a light is going, That way you can identify easily which light is shining where:

And have fun.

Improvise

Sometimes you need to improvise. Scrap that. You always need to improvise.

For a model or portrait shoot I would like at least several lights.

Recently, on a shoot I had only one available flash, a 430EX speedlite in an umbrella on a stand. So I used the 580EX on my camera to fire that 430EX flash through the umbrella on the camera left side:

I did that as follows:

  • 1D Mark IV with 580EX on the camera as “director” (master) only, otherwise disabled
  • 430EX in slave mode firing through a useless Opus umbrella (useless because it broke and kept coming apart) on a stand
  • Flash compensation of +2 stops – this is what I needed because of the white wall. I set the Flash Compensation so that the histogram went exactly to the right edge.
  • I moved the umbrella as close to the moel as possible. This makes the light softer. Farther away makes it harder.

I would have liked the umbrella on the right, since that is where she is looking – but during a model session you cannot keep moving the umbrella.

And it worked, didn’t it?

Phoenix a couple of weeks ago:

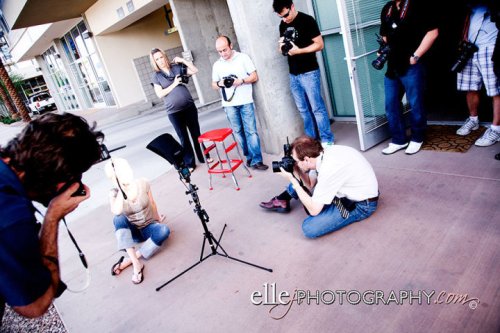
The bicycle team! Myself, David Honl’s assistant Korry, David Honl, and Jasen and Christy of Studio Moirae.

And myself taking a picture of Christy, surrounded by students. Dave Honl on the left.

Thanks to Elisha for the great pictures. Including one that makes me look handsome – um, I mean, one that shows my true handsomeness:

It’s amazing what a modifier or two (or just one!) and some knowledge of flash can do.

Studio Settings

A few words to get you started on studio portrait setups.

When you are shooting in a “studio” (i.e. controlled) setting, your camera settings might be, as I recently pointed:

  • Camera on Manual
  • 100 ISO
  • Auto ISO disabled
  • 1/125th sec
  • f/8
  • “Flash” white balance

Why as small as f/8?

Because lower aperture numbers than 5.6 can give you too selective a depth of field; and with most lenses, higher numbers than f/8 create diffraction, meaning slight blurriness. If you like sharp, stick to f/8 or perhaps f/5.6.

You also use f/8 or similar because studio lights are powerful. (Someone the other day searched for “how to shoot wide open with studio light” – often, the lights are so bright even on their lowest settings that the only way to do that  is to use a neutral density filter on your lens).

And lenses?

For portraits, I use 50-200mm. Smaller focal length (like 50-70 on a full frame camera) makes a woman’s body smaller (if I shoot at head height). Larger makes the nose smaller, but can make the body slightly bigger. I.e. larger gives you no distortion, but sometimes ever-so-slight distortion is exactly what you want. My favourites are:

  • 24-70 2.8L
  • 70-200 2.8L IS
  • 50mm f/1.4 (for use on the 7D, or for body shots on the 1D Mark IV or 1Ds Mark III)
  • 35mm f/1.4 (for environmental portraits)
  • 100 mm f/2.8 macro (yes, a macro lens is a great portrait lens)

But you can keep it simple! A Canon Digital Rebel or Nikon D90 with a 50mm f/1.8 lens, for instance, will allow you to take great razor-sharp studio portraits. It’s all about the light!

Last chance

There’s still some space left on the weekend workshop Joseph Marranca and I are arranging this weekend in beautiful Mono, Ontario, an hour north of Toronto: but you need to be quick.

Two days of intense learning about lighting: we will teach you studio lights as well as small flashes; one as well as many; traditional portrait lighting as well as edgy lighting like this:

If interested, go here right now and sign up online while you can. You’ll go home with some portfolio pictures.

And for the rest of you, I shall post some pictures after the weeknd.

Photojournalism is dangerous

Especially so in Iraq, as PDN points out in this article, about the 2007 killing by a US helicopter crew of a Reuters journalist and his companions – 12-15 people died. The salient point is that they died because the soldiers mistook cameras and lenses for rifles and RPG launchers.

The army, of course, is in a difficult situation in Iraq. It concluded that “the soldiers had acted according to the rules of military engagement”. WikiLeaks disagrees: watch the entire video on http://www.collateralmurder.com/

And a note to Dave Honl: if you’re a journalist working in Iraq, be careful.

Reader question

Reader Ray asks:

I know you have many cameras: as a pro you need them, I understand that. But why do you have, or what’s the reason behind your thoughts for having, a crop camera when I am sure you have many full frame cameras.  I would like to hear your the take on this, I know why I have a crop camera…lol

A-ha. A good question. Indeed, why do I ever shoot with a Canon 7D (1.6 crop factor, i.e. the sensor is 1.6 smaller than a 35mm negative), and a Canon 1D Mark IV (crop factor 1.3), rather than just using my top-of-the-range full-frame 1Ds Mark 3?

Well, there are several reasons.:

  1. Crop factor cameras make lenses appear longer. So a 200mm lens appears like a 320mm lens on the Canon 7D (200 x 1.6 = 320).
  2. I like lighter cameras… the 7D weighs half what the 1D weighs, and sometimes that is important. It is also smaller, which makes some types of photography, like street photography, easier.
  3. The 1D Mark IV is more modern. Sometimes you take the more modern camera because you need its functions.
  4. Sometimes you take a camera with fewer pixels like the 1D Mark IV, because it means smaller files.
  5. The 1D Mark IV is faster (10 frames per second, as opposed to 5 on the 1Ds and 8 on the 7D).
  6. Quite often, good enough is good enough.

I hope that explains that as with so many things in life, nothing is simple. Sensor size is not everything, just like pixels aren’t everything!