Backups

As you make more and more photos, backups become more and more important. And of course you make them. Diligently.

Right?

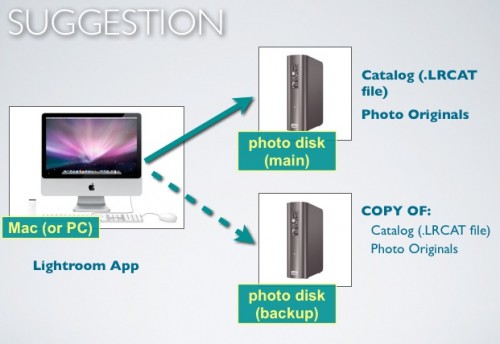
This is what I do:

Details:

  1. My photos live on a 5 TB external drive. When I add photos from a camera, they go there immediately, not to my Mac. Straight onto the external drive.
  2. My Lightroom catalog also lives on that external drive – that way, I can take that drive to anyone with Lightroom installed and I have all my work right there.
  3. I have set Lightroom’s “Keep presets with Catalog” option ON.
  4. When I am happy that the pictures and catalog are good, and ONLY then, I “intelligently” copy the new stuff to a second 3TB drive. I do that only once I am convinced it is good – no sense copying bad data. The script for that intelligent copy is here (link). Intelligent means the script checks all files on both disks, and copies over the differences (anything new gets added to the backup disk; anything deleted gets deleted from the backup disk also).
  5. I do not reformat the memory card until after this is done and verified.
  6. I also back up my regular Mac, using standard backup software – but since I keep little data on that Mac, it’s not critical.

OK, so I am pretty well backed  up.

Except I am not. All my data lives on the two drives attached to my iMac. That is very dangerous – many things can go wrong. Things like:

  • Lightning
  • Flooding
  • Fires
  • Burglary (you think the burglar would take only external disk 1 and leave the backup drive behind?)
  • …and more, too much to imagine.

To solve this, there’s a few things not to do:

  • I could back up to DVD drives, but that is very expensive, very slow, and very unreliable. Ditto for CDs.
  • Cloud backup – too early to be practical (making a full backup at today’s Internet network speeds would take months – literally).
  • Keep memory cards – way too expensive.
  • Drobo – this is a possibility (RADI drive), but the Drobo uses its own proprietary encryption.

So here’s the solution:

  1. Instead of more local backup, I use a third 3TB drive, and once a week everything gets copied to that third drive (again, using an “intelligent” script).
  2. And the key: this third drive lives off-site, not at my home studio. So come earthquakes, lightning, or floods, I’m OK.
  3. Finally, I have one more set of off-site drives, per year, which I make a full copy to at the end of each year.

A lot of work. But worth it, because I can sleep. Are your memories (or your business) worth less? I didn’t think so – so come up with an off-site storage strategy today. Every hard disk fails. Not “if”, but “when”.

 

Experiment with aspect ratios

Your camera produces an image in the aspect ratio 3:2 (or 4:3, if you use a four-thirds camera). But why not let go of that, and use your own ratios?

Like square.

Or like wide.

Or odd-shaped.

I am a firm believer in “make the picture whatever shape you think fits the picture best”. Not “whatever the frame-makers in China or the paper-makers in Switzerland have decided for you”. Make the picture the way you like, and then cut white edges off paper, and have custom frames made.

On that note: no, you cannot print a 4:3, say, on 3:2 paper without either cropping the picture or cutting off white edges. It’s the reality of life.

I have found that often, people do not understand this: “yes but I want my 4:3 picture to fit on this 8:10 paper and no, I won;t accept cropping or white edges”. Well, here’s news: you have to. To understand why, imagine you have a square picture. Try fitting that on an 8×10 piece of paper, and now you will see why it cannot be done. So you either crop to the paper aspect ratio prior to printing (Lightroom is very good at that), or you print with white edges, which you then cut off. It’s one of those “it is what it is” things.


Tip: Stitch.

When you travel, so some panorama shots.

You can do them in your iPhone or similar. But you can also do them—and probably at higher quality—with your DSLR. Like this:

  1. Camera on tripod. Manual mode. On a day with consistent light.
  2. Take a photo on the left of your scene.
  3. Rotate the camera around its axis (hence the tripod, too). Overlap 20-30% with previous shot. Click.
  4. Repeat step 3 until you reach the right.
  5. Take all these shots an put them together in Canon Photostitch, or Photoshop, or whatever other software you have (you can download lots of apps).

Now you get this: click the image repeatedly to see it at  full size:

That’s the Las Vegas strip. In all its glory.


When.

In a forum I visit, a photographer just asked:

Hey friends! I’ve got an external hard drive which is giving me some problems and I can’t seem to pull files from it. My computer recognizes it, but doesn’t let me access the files. There are about 200 that i don’t have backed up elsewhere and I would love to figure out how to get them. Does anyone know any file recovery service which may help?

I am so sorry for her, but on the other hand I wonder why there are still people without backups. EVERY hard drive will fail. It’s not IF—it’s WHEN.

A student in my new Sheridan College course, which started tonight, a student told me she had previously lost two years of her young son’s life in pictures. We have all had this thing happen: please, please learn from these experiences of others, and

  1. Go get a new backup drive or two. Now.
  2. Make backups, perhaps using simple scripts like the one I have described here.
  3. Keep one backup off-site.
  4. Print as many photos as you can.

Then you can sleep, as well as enjoy your photos!


Lightroom: Upgrade to 5?

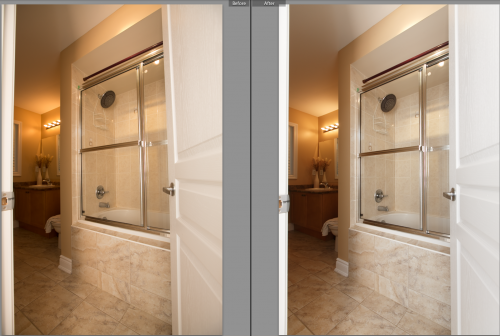
Yes. Yes you should upgrade to LR5, and I mean now. For the vignette tool, but also for the healing tool, and especially for the lens correction tool. Corrections are “one click” now: both lens as well as architecture correction. Look: original on the left; corrected with simple click on the right

My 16mm lens is perfect, except of course it does introduce a little barrel/pincushion distortion: barrel on the left. One click and it’s gone. Those clicks are here:

“Enable profile corrections” checks if it knows your camera/lens combo, and corrects for vignetting and distortion. “Auto” corrects for the perspective distortion that exists when you aim the camera slightly up or down. Two clicks and perfect: that alone is worth Lightroom. That way I get verticals that are vertical, im images like this:

Any idea how much time that saves me? 100 times the 2 minutes (if I am very quick) that it would otherwise take me in Photoshop, os that is three hours saved on just this one aspect of my photos. Lightroom 5 is the way to go.


Cloudy

As you all know, Apple Aperture is end-of-life. And with that, end-of-competition: Lightroom is the only game in town.

And with that, Adobe is flexing its muscle; it is trying to get everyone to use their “Cloud” subscription model. That way, they get a fee (like $9.99) every month, instead of one payment of $150 for Lightroom forever. Clearly, they are interested in this.

Clearly, I am not interested.

  • First, I would pay much more (In five years I’d pay $600, as opposed to $150 for the app, and even with upgrades perhaps double that over that period).
  • Second, I want nothing with auto upgrades. This is mission critical. I am still using CS3 (very occasionally). If it ain’t broke…
  • The price is $9.99 per product per month, I think. But that is today’s price… subject to change.
  • Third, I want nothing to do with a product that has to go online occasionally to check if I am allowed to use it. No way. What if I lose my password? What if their authentication system fails? What if my Internet connectivity fails, e.g. because I am travelling? No, that just will not do. This is company critical: I need an app that is mine to run without authentication, permission, whatever.

Adobe is making it almost impossible to buy Lightroom today. But the key is “almost”. After a long while online with support, I was today given the “BUY AS A PRODUCT” links:

Normal Users: https://www.adobe.com/products/catalog/software._sl_id-contentfilter_sl_catalog_sl_software_sl_mostpopular.html?promoid=KLXMI

Educational Users: https://store1.adobe.com/cfusion/store/html/index.cfm?store=OLS-EDU&event=displayProduct&categoryPath=/Applications/PhotoshopLightroomSTE

For as long as possible, I shall go on using Lightroom as  a normal license rather than a monthly subscription, and you all may want to do the same.


About EXIF data

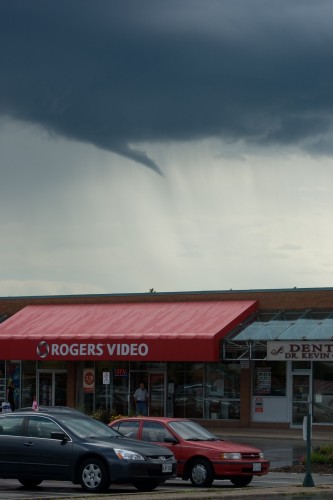
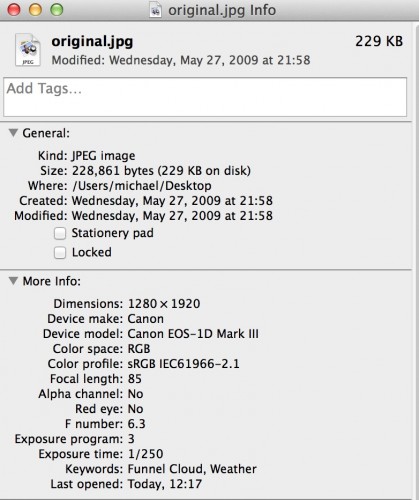
You have read before that I use a utility called EXIFTOOL to read EXIF data embedded in files. And there is much more embedded than you think. One important piece of data: file creation date. Take this, of a funnel cloud over Oakville  few years ago:

Apple INFO thinks;

2009, cool.

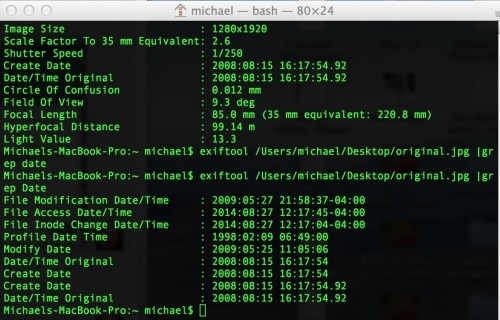
But EXIFTOOL gives me the real creation date:

Now in this case, Lightroom would have also given me the right date. But there are many more pieces of information in the EXIF data than Lightroom tells you. Go install EXIFTOOL (search for it) and have fun seeing what hidden gems of information your pictures contain.


Simple is good

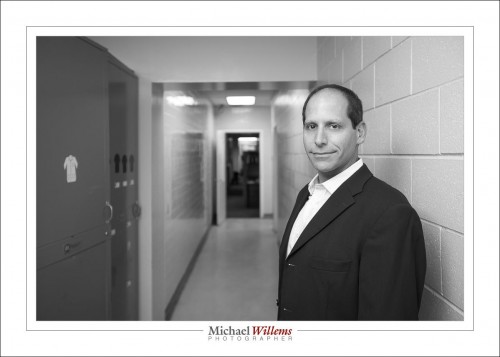
And that can also apply to black and white photos. These recent business photos prove the point, it seems to me:

Both work very well in B/W:

  • The colour is not distracting (a yellow hallway. a green kitchemn)
  • I can make skin lighter or darker by dragging “Orange” in the B/W slider (HSL section) up or down.
  • I cam make other items lighter and darker too, this separating subject from b/g.

That is why I always send b/w versions of my photos to clients. Properly finished B/W versions, that is.


Size matters.

This time, I mean size of files. A student just wrote to ask:


“I have taken photos for some friends and used Lightroom for editing and exporting.  I did not shoot in RAW- still learning.  My SOOC images are substantially larger than my exported JPEG files.  For instance, one file is 6.72 MB but comes out 800KB once run through Lightroom.  I am exporting at a quality of 80, length and width of 4×6 and resolution of 300ppi.  My friend has asked me for larger files.  I am under the impression that larger files don’t necessarily mean better images, but perhaps I am wrong? Is this downsizing normal? I have never had any issues with print quality as long as I size in a 4×6 inch ratio and set 300ppi as my resolution.  Am I doing something wrong in exporting that is causing such a dramatic drop in file size?”


This is perfectly normal. A 7MB JPG (or a 14 MB RAW) will indeed be about 800 kB at those settings. Yes, your new JPG is smaller:

  • 300 ppi x 6″ = 1800 pixels wide, which is about one quarter of the actual size of the file.
  • 80% is going to result in a much smaller size than 100%: compression is the entire point of JPG files.

So if the original file is 6MB, then a quarter of that is 1.5MB, and with extra compression, 800 kB seems a perfectly normal file size: as expected.

Indeed, a larger file means better image quality. This is always the case; whether it is noticeably better is another question, of course.

I tend to think in pixels, Saying “1200 pixels long” is easier than saying “4 inches at 300 ppi”, and it means the same. You can specify either way, but I always prefer the simplest.

Finally: you tell me you are shooting a wedding soon. You should be shooting RAW. What is there to learn? Just select RAW as the filetype instead of JPG. Done. If you use Lightroom to finish your pictures, it will know the RAW format your camera produces: done. Simple.

And yes, sometimes things that appear simple are simple.


Outside

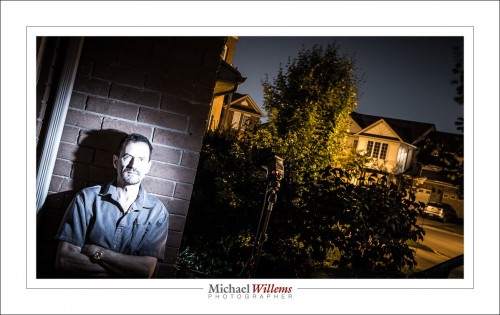
Outside the box, that is: Do not be afraid to think a little outside the box sometimes. Like here, me last night:

20s at f/7.1, ISO800. 50mm on Canon 1Dx.

The flash has a grid, leading to a circle of light, a spotlight effect. I am blown out by the flash, for an extra intense, eerie effect. The sky and houses have light due to a 20 second exposure. Post production made the saturation lower (“desat” effect). The “Dutch Angle” tilt gives it interest also.  And although the flash would take 10 seconds to remove in Lightroom using the healing tool, I prefer to leave it in for extra mystery effect. 50mm lens gives this a realistic, undistorted look.

Key in this photo? Balancing ambient (start with it!) and flash (add it afterward).

Now, off to a CEO shoot, which although it will presumably look very different will use the very same principles. Photography is an amazing tool.