Backups revisited

Another quick note about backups, today.

I have talked about them before, in posts including these two, which you may want to (re-) read:

Why bring all that up again?

Because hardware dies, and I hear too many disaster stories every week. Hardware dies. All hardware dies. Let me repeat: eventually, all hardware dies. We just don’t know when.

Examples, all of the last few weeks:

  • My Macbook’s hard drive died in the middle of Santa shooting over Christmas. Yes, I had backups.
  • Also, I just now deleted my new laptop’s Lightroom catalog. And again, yes, I had backups (I use Apple’s Time Machine as one of my additional backup mechanisms).
  • A client called me last week: her husband’s backup drived had died, and the original (photo and Lightroom) files – his life’s work! – were also lost. Fortunately, we had set up a backup scheme using two external disks, as in my first post above; so I was able to help restore the files – his work is safe.

So please – please – spend time today to make backups and to set a backup schedule that includes:

  1. Regular backups
  2. Off-site backups (what if you get burgled: you think they’ll leave your backup disk for you?)
  3. Non-proprietary backup methods (disk arrays that use proprietary encryption are, I think, a bad idea).
  4. In-app settings (like the setting in Lightroom that creates XML files: that should be a standard setting!)


If you do all that, your work will be reasonably safe. Also, you will sleep at night. And I will not get disaster calls.

We keep all our work in one place nowadays, so we are more vulnerable than ever to loss of… well, everything. Be safe out there!

 

New Macbook…

My MacBook Pro died yesterday, in the middle of a shoot. So this morning I quickly bought a new MacBook Pro (Retina screen, 15″) and then proceeded to the Santa shoot; installed Lightroom; and the shoot continued.

Great stuff, but a new MacBook shows me some Apple problems. The MBAs are taking over, so Apple is doomed, unless Mr Ives fixes things. Like:

  • I cannot set the screens to not mirror from the top bar anymore.
  • iTunes is a terrible kludge: just a vessel for sales and advertising that needs a degree to sort out.
  • iCloud ditto… like my dead laptop: how do I “de-authorize” it? You can de-authorize a working computer, but a dead one? No idea how!
  • iWeb, the world’s only proper GUI web app, is no longer downloadable – it’s been killed. All my web sites are made with it. There’s no other app I know of that is as easy.

That’s just for a start: there’s much more. Apple makes great hardware, but many apps are iffy, and the good (not for dummy) apps are killed. Wow. Apple is becoming IBM.

Regular teaching posts will continue after the end of tomorrow’s Santa shoot!


Tethering your camera

As I have mentioned before, tethering your camera to the computer is a very simple solution. You get the pictures onto the computer immediately for review and post-production.

It is especially simple in Adobe Lightroom:

It does, however, have some watch-its.

For one, it is not always stable. Even with the latest version of Lightroom, that fixes bugs that “only happen to Canon cameras tethered to a Mac” (yeah – only the most popular combination!), there’s still plenty to worry about. Disconnect the camera momentarily and things grind to a halt. Change the memory card: ditto. In real-life use like the Santa shoot, several times a day I have to reset camera, restart tethering; even restart Lightroom or worse, reboot the Mac.

Also, you can be lulled into a false sense of security.  The pics are on the computer now, so all i swell, right? Yes, but backups… what if your computer fails?

So my tips for real life tethering:

  • Find a long USB cable
  • Secure it well
  • Use large memory cards
  • Do not delete them – keep them until your computer is backed up
  • Take your time, allow for restarts
  • Update Lightroom to the very latest version
  • Avoid doing anything else with the camera while shooting tethered.
  • Unselect “Auto Advance Selection” if you are working while shooting.
  • Apply your favourite develop settings as at of the tethered setup.

Do all that and you can have a good workflow!

Back to Santa shooting.


Rough to finished

“What finishing work do you do, Michael?”, I am often asked.

I try to keep it simple, as simple as I can. That way, there’s little work, and I feel like I am a photographer, not a Photoshop/Lightroom artist.

But I often use techniques like:

  • Adjust white balance if needed.
  • Adjust exposure a little if needed.
  • Adjust “blacks” and “whites” as well as “highlights” if I have to, e.g. when the shot’s background should be dark but is not quite dark enough.
  • Add brightness where I need it, if I need it.

Those are the “fixing mistakes” adjustments, and I keep them to an absolute minimum. In studio shots these should be zero.

Then there are the creative adjustments, and those I feel better about if I have to make them. I keep them to a minimum, but I will do them if needed.

  • Crop – to whatever aspect ratio I like (unless I know I am making a print, in which case I crop to that print’s aspect ratio).
  • Vignette a little – but keep it minor.
  • Adjust “Clarity” down a little if humans are involved (a minimum – perhaps -10 to -20).
  • Adjust sharpening.
  • Reduce noise if needed, e.g. in shots over 1600 ISO.
  • Add film grain if I feel like a film-type look.

I often shoot a little wide so I can crop to taste afterward.

Here’s a rough shot, as taken by me a couple of hours ago:

And here, adjusted and cropped:

In this example, I added a little more vignetting than I usually would, for clarity.

So my advice: keep “fixing” adjustments to a minimum by shooting properly, and keep creative adjustments to a minimum if like me you want to be a photographer rather than a photoshopper. Oh – and do it in Adobe Lightroom.


Lightroom 4.3 is out

Lightroom users (and why aren’t you all?): Lightroom has just been updated.

Currently, on my Santa shoot job, I am shooting “tethered” – meaning my camera is connected to Lightroom, which shows the client what I am shooting as I am shooting it.

Problem is, it would hang up several times a day, causing long delays.

Now, in the new update, Adobe says the follwoing is fixed:

Tethered capture fails when turning camera off and back on. This also can occur if the camera goes to sleep and then wakes. This occurs only with Canon cameras and on Mac only.

Since I am using a Mac and a Canon camera, that makes sense. Let’s hope it is indeed fixed. Many more Santa pictures to come… 12-5 today and tomorrow at Hopedale mall in Oakville.


Grain

Not the kind you eat.. the kind you look at. Grain. Or noise, as it is called in digital pictures. Bad! Grain must be avoided at all cost!

Perhaps not.

  • First: there is a difference between the look of electronic “noise”, which results from the use of small sensors, high ISO values, or great exposure pushing in post-production, and film-type grain. This electronic kind of noise is ugly.
  • Second: while electronic noise is ugly and must be avoided, not so for film grain; not necessarily. Film grain can be very attractive, as in 1960s photos shot on Kodak Tri-X film.

Which is why you can now add film grain in many apps. Like in Lightroom.

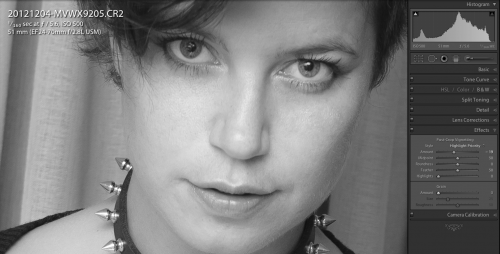
Here’s a detail of a picture. You need to click to see it at original size. This screen print shows the EFFECTS pane in the DEVELOP module:

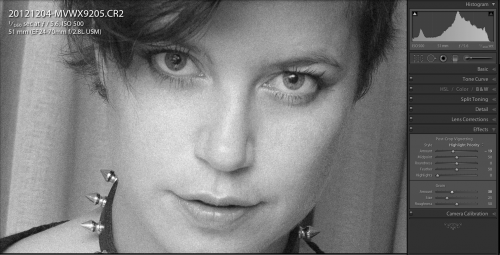
Now the same, with some grain added (look at the slider on the bottom right):

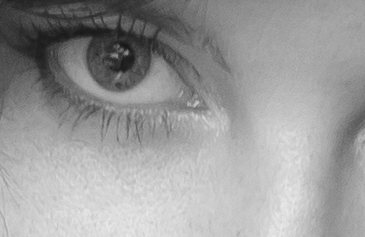
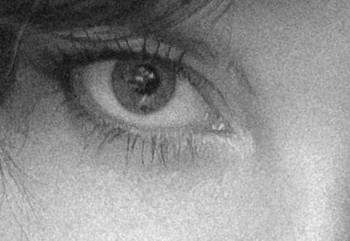
Again, click all the way through to the “Full Size” link. You will see a difference somewhat like this:

I often add some grain to my black and white images, to give it that authentic film look. As an added bonus, this treatment also hides imperfections that can result from sharpening.

Don’t go crazy and add 100% grain to all your pictures – but used judiciously, this is a great addition to your arsenal of tools (if I can be forgiven for mixing metaphors).


Vivid.. I like vivid.

A common question:

“Why don’t my images look as vivid once they are in Lightroom as they do on the camera or in other software?”.

Good question. We have all seen this: you shoot RAW. It looks great on back of camera, great when first in Lightroom, but after a few seconds, dull. Why?

What you see on the camera, and in Lightroom, and in iPhoto, and so on, is an interpretation of a RAW image. A translation of the actually captured bits, if you will.

What you see on the back of the camera is a built-in JPG; an already-interpreted image. Interpreted according to your camera’s menu settings. Settings like colour space, white balance, contrast, saturation, sharpness, and especially the “autocorrect” settings. So you are not seeing the captured data; you are seeing an interpretation; often a “fixed” one (those in camera “auto fixes” need to be turned off, as I have explained here several times before).

Same in Lightroom. Initially you see the built-in JPG, but after a few seconds Lightroom switches to its own interpretation of the RAW image.

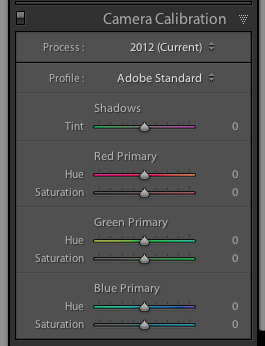
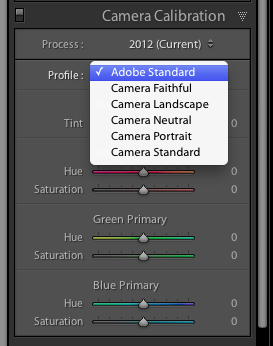
In the DEVELOP module, on the right at the bottom, you can choose the way the image is interpreted. Lightroom defaults to “Adobe Standard”. Try the others to see how your image changes.

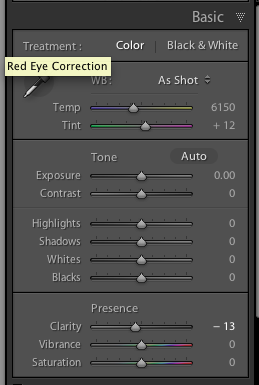
Next, to get the image you want, go to the BASIC pane in the develop module, and set this according to your needs.

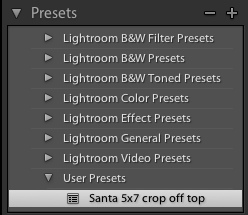
Then, still in the DEVELOP module, save all your settings as a “User Preset”. Press “+” and save the settings, naming it to something meaningful, as I named mine in the example here:

Then upon importing, apply this setting automatically. And now your Lightroom photos look just like the images you see on the LCD, or in other apps.

Oh, and when you export, choose sRGB as your colour space, unless specifically told otherwise.


Tether!

I am shooting Santa pictures today:

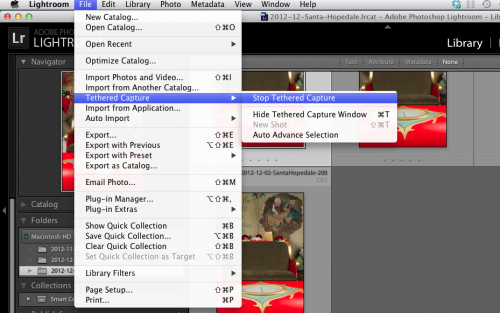
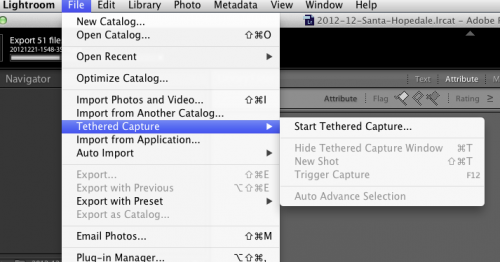
The way I do this is by “tethering” (connecting) the camera to the laptop via a USB cable. Then in Lightroom I go to the FILE menu and within that, select TETHERED CAPTURE. Then I select START TETHERED CAPTURE.

Also, unselect the AUTO ADVANCE SELECTION option if you do not want to be interrupted while working when a new shot is taken.

It’s REALLY simple in Lightroom. No extra software is needed, no Canon/Sony/Nikon/etc software.

You can even release and set the camera from within Lightroom:

If you have never tethered a camera, try!


Techniques When It’s Tough, Continued

Tough shoots, when nothing works for you? “Gibt’s Nicht Gibt’s Nicht“, as a German acquaintance used to say.  you can always do it.

Here’s yet another way. Shoot without flash if you must, in a hurry, even with the wrong settings and fix later.

This image, from last Saturday’s Bat Mitzvah party, was taken at 1600 ISO but the flash was not ready. Nevertheless I wanted the moment and could not wait, so I took the image:

Now since I shoot RAW ( a must!), I can then pop up the exposure by, wait for it… 2.8 stops. Almost three stops and yet a very usable picture results:

Now do not get me wrong, I am not advocating making bad pictures and then trying to fix them in post. What I am saying is that you have a large number of techniques at your disposal, and sometimes even this one comes in very handy. A safety net, if you will.

___

A good photographer has all these at his or her command – that’s why you hire a pro for shoots. And those of you who want to learn these techniques: I am available for training, one or one or groups.