Nifty Fifty

One lens that should be in everyone’s kit bag, however cheap your camera or however little you want to spend on equipment, is the 50mm lens. A lens they used to call the “nifty fifty”. I have mentioned this lens before.

Many manufacturers have a cheap 50mm lens – Canon and Nikon both have a 50mm f/1.8 version that costs less than $200. This Canon one costs only about $130:

50mm

So it can’t be any good, then?

Wrong. It is very good. On film cameras this used to be called a “standard lens”. Now, on crop factor cameras,  this lens has come into a new life as a portrait lens – on a Canon Rebel, for instance, with a 1.6 crop factor, this is like an 80mm lens. Great for “headshots” portraits.

And the nifty fifty is a fast lens – “fast” being somewhat of a misnomer that just means “has a low f/number”, so it allows lot of light in, and allows for selective depth of field (only part of your picture is sharp).

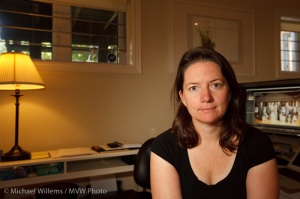
Which in turn allows you to take pictures like this, using only available window light:

Ivka, 50mm, f/2.0, 200 ISO

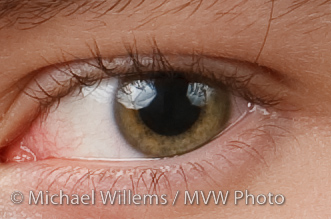
Notice that at f/2.0 you get very selective focus. This is not bad – it can be used for effect.

Make sure, however, that if you do this you focus carefully, using one focus point, on the closest eye. Looking at the picture above in detail:

Eyes

If you like that look, and have a window, go get yourself a 50mm lens today.

Crop factors explained

Cameras used to have a negative-sized negative (duh). That is what we call “standard size”. (It is 24×36 mm, if you are interested).

But many digital cameras, especially cheaper models, have a slightly smaller sensor than that. We call this a “crop factor” sensor. These can be 1.5 times smaller than a negative (some Nikon models), or 1.6 times smaller (some Canon models), and so on.

So let’s work though this to see how it works.

First, using, say, a 24 mm wide angle lens, take a photo on a “full frame camera” (a film camera, or an expensive DSLR like a Canon 5D) and you get picture 1:

MVWS7676

Now put the very same lens on “crop factor camera” and take the very same picture from the very same vantage point. Same lens. Smaller sensor. So because of this smaller sensor, only the central part of the lens is actually used, and you now get picture two:

MVWS7676-2

The lens is the same, but the sensor is smaller, so a smaller part of the lens is actually used.

Finally, if I now print or display that “crop” picture at the same size as picture one (after all, it probably has the same number of pixels), I get picture three:

MVWS7676-2

And that looks just like a picture I would take with a 36 mm lens on a full-frame camera! See how the objects are larger?

That is why we say that a crop camera “appears to make your lenses longer”. So a 50mm lens on a full-frame camera, when used on a Canon Digital Rebel (crop factor 1.6) works like an 80mm lens on a full-frame camera. It has, as we say, “an effective length of 50×1.6 = 80mm”. There are other subtleties, but basically, that’s all.

This is excellent news if you like long lenses (your 200mm lens is now, free of charge, a 300mm lens). It is perhaps not quite such great news if you like very wide angle lenses: your 35mm lens works more like a 50mm lens (35mm x 1.6) would work on a full-frame camera. So to get what we used to get on a 16mm lens, you would need a 10mm lens.

Must have…

Once in a while, a product comes along that you just must have – no discussion needed.One such product is the Hoodman Hoodloupe.

Yes, the Hoodman brand is a bit corny, but the hoodloupe is a lifesaver.

H-LPP30

What does this device do?

Simply, it allows you to properly see your LCD display when you are using your camera outside. And once you see that, you will realise what a godsend this is. Suddenly you can actually see not just whether you got the shot, but more importanty, exactly how good it is. The colours, sharpness, and so on. No longer do you have to wait until you are inside to find out how your shots worked out. I have mine on me all the time now, and my outside shoots are notably better.

This device has proper optics built in -including a diopter, so you can adjust it to your eyes – and is very sturdy. That is why it is worth every penny – around 10,000 pennies. That’s $100 for you there without the calculator.

More details here:

http://www.hoodmanusa.com/products.asp?dept=1017

Henry’s stock them, so go get yours today. My personal recommendation!

Don't do as I do… please!

That is, if you want to keep your back intact so that after retirement you can still sit and watch the geraniums grow. I fear that I shall be lying in an orthopaedic bed of some sort.

This will be mainly due to my wanting to be ready for everything. Which I do – I insist that my customers should never hear me say “I did not bring X, Y or Z”.

And that means I need to bring everything. I mean everything:

gear

So what do I pile into my SUV (yes, I need one)? Brace yourself.

  • Camera
  • Camera bag with lenses and speedlites and small accessories – my main, small, Domke bag.
  • Camera bag with second camera (long lens) and more lenses, speedlites, etc.
  • Laptop and laptop accessories bag.
  • Bag with light accessories, pocketwizards, light meter, flash cables, etc.
  • Bag with four light stands and umbrellas.
  • Bag with backdrop (two stands, three-segment crossbar).
  • Strobes (four monolights) and power cables.
  • Overnight bag, just in case.
  • Tripod and monopod.
  • Paper rolls (grey and white) for the backdrop
  • Muslin for the backdrop, for those “Sears portraits”.
  • Reflectors.

The last four items aren’t even showing in the picture!

The main camera bag is the Domke described earlier, and the spare camera bag is this heavy-but-excellent Tamrac:

MVWS0227

So why am I pointing all this out to you? For a few reasons.

  1. So that you know what a full kit consists of. That way if you really want “everything”, you now know what that means and you can start collecting (and saving). Go for it.
  2. To show that equipment does make a difference. People who say it doesn’t are part right, but in large part mistaken. Hence “go for it” – the more of this you have, the better for your creative opportunities.
  3. To show that you can pack an entire studio in a small SUV. It may be painful, but it can be done.
  4. So you can avoid hurting your back by choosing wisely. Clearly I do not need all this for every shoot. I recommend that you make a selection of stuff, a sort of checklist, for each occasion. Do this in advance. I have such checklists: for most common situations I know what to bring without having to dig through everything and re-inventing the wheel each time.

And yes, for some shoots, those where I am not sure what to expect, I do bring it all.

Now you know one more reason why you pay a professional photographer more than you would pay Uncle Harry or Uncle Fred. It’s all to fund his or her future orthopaedic bed.

Newton's Fourth Law. And his fifth.

MVW_9805

One of Newton’s lesser known laws of motion is his fourth: weight doubles hourly if carried on a shoulder.
And then there is is fifth, the law of increasing weight with age.
You can see where I am headed with this. When you are traveling with a camera, you need as little weight as you can carry: any excess will seem to weigh tons by the evening.
So when I am shooting things like Stockholm’s Gamla Stan (below, in April 2006), I tend to not pack too much into my bag.

Gamla Stan Street, April 2006

Gamla Stan Street, April 2006

My current favourite bag, by the way, is my Domke waxed water-resistant journalist bag (above). Soft, molds to my body, and repels water; and a nice in-between journo’s size. And the beaten-up look is not only cool: it no doubt also slightly discourages theft. Not cheap, but the best bag I have owned.
So what’s in that bag?
Not a camera. That hangs over my other shoulder.
Instead, at a minimum, my bag contains camera stuff:

  • A flash (a 580EX II, or a 430EX II if I want to save even more weight: every gram counts).
  • A 16-35mm lens or a 24-70 lens (one on the camera, one in the bag); with lens hoods.
  • A spare camera battery.
  • A spare set of flash batteries.
  • Spare memory cards.
  • a 35mm f/1.4 or 50mm 1f/1.4 lens.

And the essential gizmos:

  • Honl flash modifiers: grid, snoot and gels.
  • A small, foldable Lumiquest softbox.
  • A Hoodman “Hood Loupe”.
  • Filters for rain etc, and perhaps a polarizer.
  • Plastic bags and lint-free cloths.
  • Business cards and model releases.
  • Tylenol, ear plugs, perhaps a pocket knife.

You see how most of the latter items are small, or very light, or both? That way I maximize utility: I have what I need, without going overboard and being victimised by the laws of the universe.
Carry whatever you think you may need if it is light; but hesitate twice if it is heavier than a few grams.

Keep it Simple, Student

The other day, when teaching a class on studio lighting, I decided I may as well be the model. So here it is: my portrait, shot by a student. Sharper than any I have ever had.

Michael Willems - August 2009

Michael Willems - August 2009

Students were shooting with a classical setup. Classic does not have to be expensive. This is all we used:

  • A paper backdrop behind me.
  • Three affordable studio strobes (Key, fill, and hair light)
  • Three light stands
  • Two umbrellas on main and fill light
  • A snoot on the hair light
  • To set it off, two pocketwizards
  • A light meter to measure.

But at last they were using 1Ds Mark 3 cameras (or their Nikon equivalent) and “L” lenses, yes? Right?

No. While there was a wide range of equipment, the picture here wsa taken with a Canon Digital Rebel XS (the cheapest Canon DSLR) and a 50mm f/1.8 prime lens – the cheapest Canon lens. If you could see the picture full size as I am seeing it, you would be amazed (and perhaps a little depressed at the million pores we all have).

That 50mm lens (available for Canon, Nikon and several other brands) is one of the sharpest, and a great lens for these portraits. It used to be a “standard lens” but it is now, with crop factor cameras, a great portrait lens (50mm is now equivalent, on those cameras, to 75-80mm). And very affordable – well under $200.

It is really all you need for this type of professional studio portrait.

Note the way I am leaning forward. That makes a portrait more dynamic. And note the catch lights in my eyes – those are necessary in a portrait.

If you want to learn this type of photography, take a course. Worth doing and worth spending a few dollars on – especially since one thing you may do not need to do is to spend lots and lots of money on expensive equipment.

The Honl Flash Modifier System

More and more, I leave my studio lights at home – strobes are a hassle to carry – and I shoot with speedlights modified with the Honl Photo flash modifier system:

MVWS6659
This system, which consists of the Honl speedstrap, grid, gels and snoot, makes small speedlights practical for studio-like shooting without the hassle. As a photojournalist and on-location general shooter, I use it all the time.

The shots below, taken in a few minutes of my friend Storey the other day, illustrate some of the effects.

My camera, a Canon 1Ds MkIII, had a 580EXII flash on it to drive the second (key) flash; the key flash was a 430EX, handheld. The 580EX did no work other than drive the key light; all the work was done by the key light, i.e. the 430EX, combined with ambient light. To achieve this, the camera was fired in manual mode at 400 ISO and the speedlights were using E-TTL.

Picture 1 : straight flash aimed at the subject.

StraightFlash

Picture 2: using the grid. More focused light on the subject. The kind of “Euro” effect I used to achieve in Photoshop. Now I do it in camera – leading to efficiency gains. Don’t you love this kind of “light falloff outside the subject” effect?

HonlGrid

Picture 3: now using the snoot (and -1 stop FEC). Now we are really lighting just the subject. Drama, baby! (Of course normally I use the snoot not for this but to add hair light).

HonlSnoot

And finally just for fun, picture 4: grid combined with a red effect gel. And setting the white balance right now means the background turns green even without a green flash or green ambient light. Magic!

HonlGel

This is all very easy. Honl is now available at Henry’s. If you come on one of my courses I would be delighted to show you these products – they are entirely solid. Get yourself some speedstraps and snoots, grids and gels (both correcting and effect), and do pro work with a few speedlights and preserve your back.

Nuking the sun

Daniel Alamo

My trip to Texas brought it home again – or it would have, if it weren’t already firmly home. Flash, especially in bright weather, is essential.
I thought it might be good to illustrate this once more by way of example, using some of last week’s Texas pictures.
When, then, do you need flash? Leaving aside the obvious “when it is dark”, I will concentrate on three more interesting cases, both to do with mixing light.
Case 1: to light backlit subjects. Look at Jason in Little Rock, Ark (on our way home). In image one, he is backlit, so while the background is exposed properly, he is too dark. Short of putting him into the sun, there is no way of escaping this problem other than by metering off him or using “+” exposure compensation (which would make the background way too bright), or by using what we call “fill flash”.

No Flash
You can even use your popup flash for this: it gets you from image one to image two, where Jason is lit properly:

Flash

Look how much better that looks. And note that in this case, where the flash is adding to existing light it is OK to aim straight at the subject.

Case 2: to darken the background; in particular, the sky. It comes as an epiphany to most photographers when they realise that you can make a blue sky anything from deep brooding dark blue to milky white, just by adjusting the exposure. Turning the sjy dark by overpowering (or “nuking”) the sun is a very powerful creative technique.
The picture of Daniel above, at The Alamo, illustrates this. I metered using the fully automatic evaluative (Nikon would call this “3D Matrix”) metering, and I used an exposure compensation setting of minus 1 stop. That darkened the sky. Then I used my 580EX MkII flash to add light to Daniel’s face, which would otherwise be way too dark. The shutter speed was 1/250th second (the 1Ds’s maximum sync speed) at f/14 at 100 ISO.
Case 3: to add colour. The BBQ picture below shows how this is done. Available light alone would not have made the meat (and Texas is all about meat) look at bright, vibrant, and if you are a carnivore, inviting. Adding flash (and in this case, bouncing it off the wall to avoid shadows) adds vibrancy to the colour that you would otherwise miss dearly.

BBQ

So turn on your flash and have fun!

Know your A:B C

MVW_9056-1200If you use Canon’s excellent multi-flash E-TTL II, you can get great results with simple speedlites like the 430EX.

But you have to know how the system works. There are a few gotchas – like the sensitivity of the E-TTL system to highlights: one reflecting item in your shot and the entire picture is underexposed. except that reflective item.

One other thing to know is the way you set ratios. This is under-explained in the existing literature, and yet, is very simple once you know it.

You can divide your remote flashes into “groups” A, B, and C. The options for setting up these groups are are A+B+C, A:B, and A:B C.

A+B+C simply means “fire all as one big group”.

A:B means “I have set one or more of my flashes (including the one on the camera, if that is enabled to flash) as group “A”, and one or more flashes as group “B”. I want to fire so that the ratio between group A and B is as set; e.g. if I set 4:1, then the “A” flashes fire four times more brightly than the “B” flashes”. So unlike the Nikon CLS system, which sets “stops with respect to neutral exposure”, the Canon system sets “ratios with respect to each other”. Not difficult: just another way of looking at it.

The one mode that gets most people is A:B C. (Note, just a space between the B and the C). This option simply means “A and B are as before, but any flashes in group “C” will fire at high power and this group will not be taken into account when calculating overall picture exposure”. This means you use group “C” to light up a white background.
Like in the pictures here of my son Jason, which I took in five minutes this morning before work. Including setting it all up. Pictures like this one:

MVW_9055-1200

This picture was shot as follows: on our left, the “A” flash firing through an umbrella. On our right, the “B” flash also firing into an umbrella (you can see that in the reflections in his eye – you do always focus on the eyes, right?). And behind Jason firing at the white wall behind him, the “C” flash, aimed at the wall. All three of these are 430EX speedlites. On the camera, a 580EX II speedlite. This on-camera flash is disabled; it simply drives the three 430s. The system is set to A:B C, with an A:B ratio of 4:1 (the camera left side of the face is four times, i.e. two stops, brighter than the camera right side).

MVW_9055

Simple, really.

If you want to learn more about this subject, Michael teaches Flash at Henry’s School of Imaging, or for more in-depth or customised training, privately, to a wide range of clients.

A softbox to the rescue

LumiQuest_Softbox3

I have been playing with my new flash tools. I shoot things with three Canon 430EX Speedlites, driven by a 580EX speedlite on the camera. I use Honl Photo speedstraps, grids, snoots, and gels, and a Lumiquest softbox of the type pictured above.

But sometimes it is easier. The portrait on the right was of my friend and colleague Peter West an hour ago, on the Lakeshore Road in Oakville.

MVWS6680

I shot Peter with the 1Ds MkIII with 50mm f/1.4 lens, set to “P” mode for a change.

On the camera, the 580EX flash that was not actually contributing light (master flash disabled). In my left hand, fired by the 580 EX’s infrared remote control, a 430EX flash fitted with a Honl speedstrap, a Honl 1/4 CTO gel to warm the light, and the Lumiquest softbox (available from Henry’s; description here).

I used two stops negative exposure compensation (-2 stops). That makes the background sky nice and blue and it makes the unlit face of Peter’s face two stops darker than the lit part. That’s what you want.

It is easy and it is effective. By using these simple techniques, even your snapshots can be well-lit and dramatic.